Building a deck is a fantastic way to extend your living space outdoors, creating a perfect area for relaxation, dining, and entertaining. With the right planning, tools, and a bit of elbow grease, constructing your own deck is a rewarding DIY project. This guide will walk you through the process of building a simple yet sturdy deck, ensuring it meets local building codes and your personal style.
Planning Your Deck Project
Careful planning is crucial for a successful deck build. Consider these key factors before you even pick up a tool:
- Budget: Establish a realistic budget for materials, tools (if you need to purchase any), and potential unexpected costs.
- Project Complexity: Assess your DIY skills and choose a deck design that matches your capabilities. Start with a simple rectangular deck if you’re a beginner.
- Size and Location: Determine the ideal size and location for your deck based on your yard space, intended use, and sunlight exposure. Consider proximity to your house and any views you want to maximize.
- Local Building Codes and Permits: Research local building codes and permit requirements before you start. This is essential for ensuring your deck is safe and legal. Regulations can vary by location and may dictate size, height, railing requirements, and footing depth.
- Material Selection: Choosing the right decking material impacts both the look and longevity of your deck.
Choosing the Best Decking Materials
The material you choose for your deck will significantly affect its appearance, maintenance needs, and lifespan. Here are popular decking material options to consider:
- Pressure-Treated Lumber: This is often the most economical choice and is treated to resist rot, decay, and insect infestation. Pressure-treated lumber requires regular maintenance, including cleaning, staining, and sealing, to prevent weathering and cracking.
- Cedar or Redwood: These naturally beautiful woods are more expensive but offer natural resistance to pests and rot. They require less maintenance than pressure-treated lumber but will still benefit from regular sealing to preserve their color and prevent weathering.
- Composite Decking: Made from recycled plastic and wood fibers, composite decking is a low-maintenance, durable, and eco-friendly option. It resists fading, staining, scratching, and insect damage. While more expensive upfront, it can save time and money on maintenance in the long run.
- PVC Decking: PVC decking is completely plastic, offering the ultimate low-maintenance and moisture-resistant option. It’s highly durable, resists mold and mildew, and comes in various colors and textures. PVC decking is typically the most expensive decking material.
Essential Tools and Materials for Building Your Deck
Before starting construction, gather all the necessary tools and materials to ensure a smooth and efficient building process.
- Carpenter’s Square: For ensuring accurate right angles.
- Circular Saw: For cutting lumber to size.
- Concrete Mix: For pouring footings.
- Decking Boards: Your chosen decking material.
- Drill: For drilling pilot holes and driving screws.
- Hammer: For driving nails.
- Joist Hangers and Hardware: For secure framing connections.
- Level: For ensuring水平 surfaces and plumb posts.
- Pressure-Treated Lumber: For the deck frame, including beams, joists, and posts.
- Post-Hole Digger or Auger: For digging footing holes.
- Safety Gear: Gloves, safety glasses, ear protection.
- Screws and Nails: Deck screws and galvanized nails for secure fastening.
- Tape Measure: For accurate measurements.
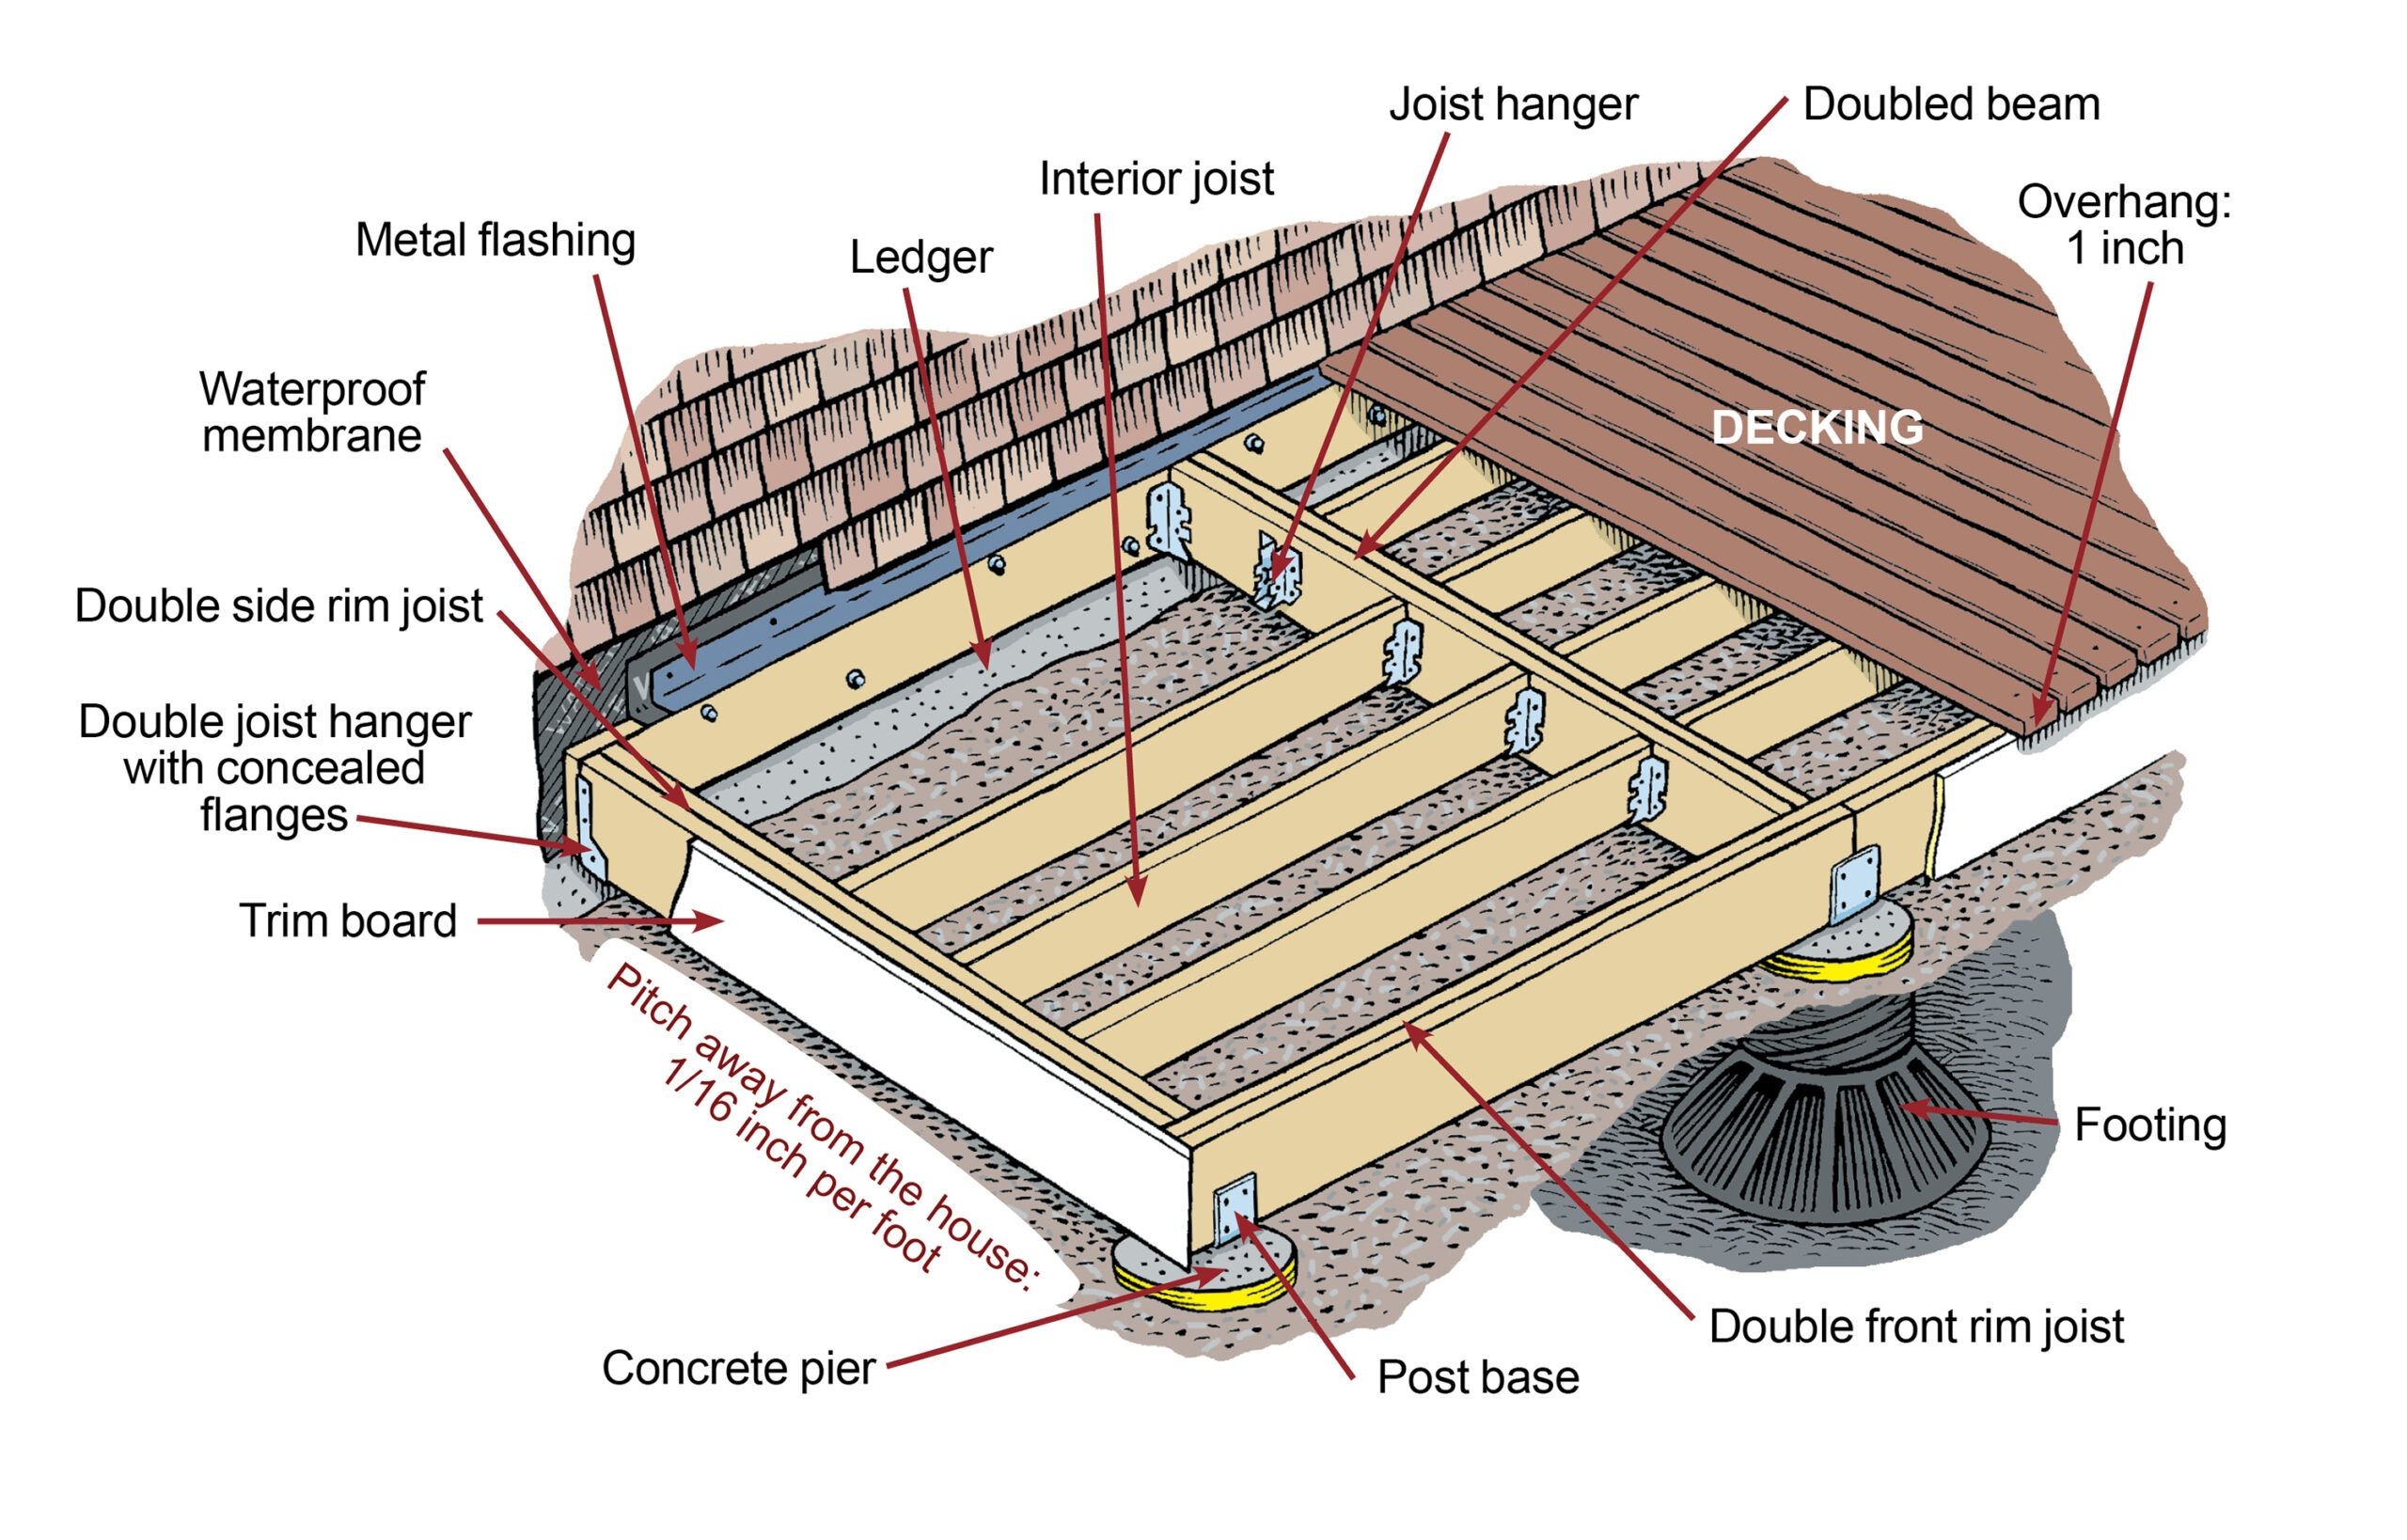
Understanding Deck Anatomy
The illustration above breaks down the key components of a typical deck. For this guide, we’re focusing on a simple deck attached to a house, using a ledger board for connection and concrete piers for support. Understanding these parts is crucial for following the building steps accurately. The frame, comprised of the ledger board, footings, piers, beams, and joists, provides the structural foundation for the decking boards.
Step-by-Step Guide to Building Your Deck
Follow these detailed steps to construct your deck, ensuring safety and structural integrity throughout the process.
Step 1: Attaching the Ledger Board
- Prepare the Wall: Begin by removing any siding or trim from your house wall where the ledger board will be attached. Expose the sheathing at least one foot above the intended top edge of the ledger board. Apply a self-adhering waterproof membrane to the exposed sheathing to protect against moisture intrusion.
- Mark Ledger Position: Determine the precise location for the top of your ledger board. Building codes typically require a step-down from the interior floor to the deck surface, usually between 4 and 7 3/4 inches below the door sill. Mark a level chalk line to indicate the top of the ledger board.
- Install Spacers: Cut pressure-treated wood spacers, approximately 2 inches wide and 1 1/2 inches thick, for every 2 feet of ledger board length. Align the top of each spacer with your chalk line and temporarily fasten them to the wall with 6d nails. These spacers create crucial ventilation and prevent moisture buildup behind the ledger board.
- Attach Ledger Board: Position the ledger board on top of the spacers, aligning its top edge with the chalk line. Nail the ledger board to the wall studs through the spacers using 16d nails at each spacer location. Ensure that any joints between ledger board sections fall directly over a spacer for added support.
- Secure with Lag Screws: Drill 3/8-inch pilot holes through the ledger board and into the house’s rim joist at each spacer location, following a staggered or zigzag pattern for maximum strength. Insert 1/2-inch lag screws into each pilot hole, adding a washer before tightening them firmly with an impact wrench or socket wrench. These lag screws provide the primary, robust connection to the house.
Step 2: Protecting the Ledger Board from Moisture
- Apply Waterproof Membrane: Cut a strip of self-adhering waterproof membrane that is 6 inches wide and matches the length of your ledger board.
- Fold and Apply Membrane: Fold the membrane lengthwise down the center to create a 90-degree angle. Apply this folded membrane over the joint where the ledger board meets the house wall. One leg of the membrane should cover the top of the spacers and ledger board, while the other leg extends upwards onto the house wall sheathing. This creates a waterproof barrier at this vulnerable junction.
- Install Metal Flashing: Cut a strip of metal flashing, at least 6 inches wide and as long as the ledger board. If multiple flashing strips are needed, overlap them by at least 3 inches, bedding the overlapping seams in siliconized acrylic caulk to ensure a watertight seal.
- Fold and Secure Flashing: Fold the metal flashing lengthwise to form a 90-degree angle, similar to the waterproof membrane. Position it over the waterproof membrane, covering the same area.
- Fasten Flashing: Secure the top edge of the flashing to the house wall by driving roofing nails every 8 inches. Ensure you nail above the horizontal leg of the flashing to avoid puncturing the waterproof barrier where water could penetrate.
- Install Joist Hangers: Attach concealed-flange double joist hangers to both ends of the ledger board and flush with its bottom edge. Use joist hanger nails to securely fasten them. These hangers will support the deck joists and connect them to the ledger board.
Step 3: Setting Footings and Concrete Piers
- Layout Footing Locations: Use batter boards and mason’s strings to establish the precise layout for your deck footings. Determine footing locations at all outside corners of the deck and at intervals of no more than 8 feet along the front rim joist. Mark each footing location clearly, then temporarily remove the mason’s strings to allow for digging.
- Dig Footing Holes: At each marked location, dig holes that are wide enough to accommodate your footing forms and deep enough to extend below the frost line for your region. Frost lines vary geographically, so consult local building codes to determine the required depth to prevent frost heave from damaging your deck.
- Assemble Pier Forms: Assemble your footing and pier forms according to the manufacturer’s instructions. These forms typically consist of cardboard tubes or plastic molds that create the concrete piers. Position one form in each dug hole. Gently backfill around the forms with soil to hold them upright and in place.
- Determine Pier Height: To establish the correct height for each pier, run a level line from the top of the ledger board out to each pier form. From this level line, measure down to determine the cut-off point for each pier form. The measurement should account for a slight slope away from the house (typically 1/8 inch per foot for drainage), plus the height of the rim joist and the post base that will sit on top of the pier. Mark the forms at this calculated height. Repeat this process for every pier location.
- Trim Pier Forms: Carefully trim the pier forms at the marked height using a utility knife or saw. Ensure the cuts are level and consistent to create a uniform deck height.
- Pour Concrete: Double-check the positioning and level of all pier forms. Once satisfied, fill each form with concrete mix. As you pour, use a shovel or stick to consolidate the concrete and eliminate any air pockets, which can weaken the piers. Ensure the top surface of the concrete is level and smooth.
- Cure Concrete: Allow the concrete to cure completely for at least one week before proceeding with further construction. Keep the concrete moist during the curing process by covering it with plastic sheeting, especially in hot or dry weather, to prevent cracking and ensure maximum strength.
Step 4: Installing Post Bases and Side Rim Joists
- Position Post Bases: Place a post base on top of each cured concrete pier. Orient the post base so that it won’t interfere with the placement of joist hangers later on. Mark the locations of the anchor bolt holes on the concrete pier through the post base.
- Drill Anchor Holes: Remove the post base and use a hammer drill equipped with a masonry drill bit to bore holes into the concrete pier at the marked locations. The hole depth and diameter should match the specifications of your anchor bolts.
- Secure Post Bases: Reposition the post base over the drilled holes. Insert anchor bolts into the holes and through the post base. Tighten the anchor bolts firmly using an impact wrench to securely fasten the post base to the concrete pier. Repeat this process for each pier and post base.
- Prepare Side Rim Joists: Cut pressure-treated 2x lumber for the doubled side rim joists and beams according to your deck plan. Doubling the rim joists and beams adds strength and stability to the deck frame.
- Assemble Doubled Rim Joists: Apply construction adhesive between the two layers of each side rim joist. Nail the layers together from both sides using 12d nails spaced approximately 16 inches apart in a staggered or zigzag pattern. The adhesive and staggered nails create a strong, unified beam.
- Attach Side Rim Joists: Fit one side rim joist into the joist hanger at one end of the ledger board. Ensure the corner is square using your carpenter’s square. Toenail through the joist hanger into the ledger board with 16d nails to temporarily secure it. Rest the opposite end of this side rim joist on a corner post base. Repeat this process for the other side rim joist on the opposite side of the ledger board. Remove any mason’s strings that are now obstructing your work.
Step 5: Installing Front Rim Joist, Beams, and Interior Joists
- Prepare Front Rim Joist: Cut pressure-treated 2x lumber for the front rim joist. If your front rim joist requires multiple pieces, stagger the butt joints to enhance strength and visual appeal. Ensure that any joints will fall in the middle of a post anchor for solid support.
- Attach Front Joist Hangers: Fasten concealed-flange double joist hangers to the ends of the inner 2x pieces that make up your doubled front rim joist.
- Install Inner Front Rim Joist: Fit the inner 2x pieces of the front rim joist into the post bases, aligning the joist hangers with the side rim joists.
- Secure Front Rim to Sides: Fit a side rim joist into a front joist hanger, ensuring the corner is square. Secure the front rim joist 2x to the post bases by driving hanger nails through the joist hangers. Then, further strengthen the corner connection by driving six 16d nails through the face of the front rim joist into the end of the side rim joist. Repeat this step for the other side rim joist to fully connect the front rim joist.
- Install Beam Hangers: Fasten face-mounted double joist hangers for the deck beams along the front rim joist and the ledger board. Space these hangers every 8 feet on center, ensuring they are flush with the bottom edges of the rim joists and ledger board.
- Install Beams: Fit and nail each doubled beam into the joist hangers as described in Step 4 for assembling doubled rim joists (adhesive and staggered nails). The beams run perpendicular to the rim joists and ledger board, providing intermediate support for the joists.
- Complete Front Rim Joist: Finish assembling the doubled front rim joist by applying construction adhesive and nailing the outer 2x pieces to the inner 2x pieces, mirroring the process for the side rim joists.
- Install Joist Hangers for Interior Joists: Install 2x joist hangers along the beams and the ledger board to support the interior joists. Space these hangers 16 inches on center. The joists should be level and flush with the top edge of the ledger board, rim joists, and beams, creating a level framing surface for the decking.
Step 6: Installing Interior Joists
- Install Interior Joists: Cut pressure-treated 2x lumber for the interior joists to the required length. Fit each joist into its corresponding joist hangers, ensuring it rests securely in both the ledger board hanger and the beam hanger.
- Secure Joists: Toenail the joists through the joist hangers using joist hanger nails. Toenailing involves driving nails at an angle through the side of the joist and into the hanger for a strong connection.
- Crown Up: When installing joists, check for a crown – a slight upward curve along the edge of the lumber. If a crown is present, position the joist with the crown side up. This helps to ensure a flatter deck surface over time as the lumber dries and settles.
Step 7: Attaching Trim and Decking Boards
- Install Trim Boards: Attach paint-grade trim boards to the outside faces of the rim joists. The trim boards should be as wide as the rim joists to create a flush appearance. Use two 8d hot-dipped galvanized or stainless steel finish nails spaced every 12 to 16 inches to fasten the trim. For long runs of trim, scarf joints (angled overlapping joints) to create seamless transitions. Miter joints (angled cuts that meet at a corner) at the corners for a professional finish.
- Measure and Cut Decking: Measure the distance from the house wall to the outside edge of the trim board. Add 1 inch to this measurement to account for overhang. Cut your decking boards to this length.
- Apply Adhesive to Rim Joist: Apply a bead of polyurethane marine sealant along the top edge of a side rim joist. This adhesive helps to secure the decking boards and reduces squeaking.
- Install First Deck Board: Lay a straight deck board in the adhesive, ensuring its long edge overhangs the trim board by 1 inch. Secure each end of the deck board to the joists below with 8d finish nails.
- Maintain Spacing: Tack 8d finish nails into the joists alongside the first board to act as spacers, ensuring consistent gaps between decking boards for drainage and expansion. The desired gap width depends on the decking material; consult manufacturer recommendations.
- Continue Decking Installation: Apply dabs of adhesive to the top edge of each joist for the remaining decking boards. Lay and nail the next deck board, using the spacer nails to maintain consistent spacing. Continue this process of gluing and nailing until the entire deck surface is covered. Add extra nails only if a board is warped or doesn’t lie flat against the joists.
- Replace Siding: Once the decking is complete, replace the house siding, ensuring it comes down to within 1/2 to 1 inch above the deck surface. This gap prevents moisture from being trapped and causing rot. Remember that laying decking boards perpendicular to the house (running away from the house) provides a stronger and more stable front edge for the deck.
Adding Stairs and Railings for Safety
If your deck surface is more than 30 inches above the ground, building codes typically require stairs and railings for safety and accessibility.
Building Deck Stairs
- Calculate Rise and Run: Accurately calculate the total rise (vertical distance from ground to deck surface) and desired run (horizontal depth) of your stairs. Divide the total rise by a comfortable riser height (around 7 inches) to determine the number of steps. Ensure all risers are consistent to avoid tripping hazards.
- Cut Stringers: Cut stair stringers from pressure-treated lumber to support the treads and risers. Stringers are angled supports that run along the sides of the stairs. Use a stair gauge and circular saw to notch out the stringers according to your rise and run calculations.
- Attach Stringers: Securely attach the stair stringers to the deck frame, ensuring they are properly supported and evenly spaced. Use metal stair stringer hangers and appropriate fasteners.
- Install Treads and Risers: Install the stair treads (horizontal steps) and risers (vertical boards between treads) onto the stringers. Use deck screws to securely fasten the treads and risers, starting from the bottom step and working your way up. Ensure the stairs are firmly connected to both the deck and a stable landing pad at ground level.
Installing Deck Railings
- Install Posts: Install railing posts at the corners of the deck and at regular intervals (typically every 6-8 feet) along the deck’s perimeter. Ensure the posts are plumb and securely attached to the deck frame using post mounting hardware and bolts.
- Attach Rails: Install the top and bottom rails between the posts. The top rail provides a handhold, and the bottom rail adds stability and visual definition. Secure the rails to the posts using screws or bolts.
- Install Balusters: Install balusters (vertical infill between rails) between the top and bottom rails. Baluster spacing is usually regulated by local building codes, typically requiring a gap of less than 4 inches to prevent children from slipping through. Secure balusters using screws or nails, ensuring they are evenly spaced and plumb.
Finishing Touches to Enhance Your Deck
Adding finishing touches elevates the look and functionality of your new deck:
- Deck Lighting: Install deck lighting to enhance safety and ambiance for evening use. Options include post cap lights, railing lights, and recessed deck lights.
- Post Caps: Add decorative post caps to protect the tops of the posts from water damage and give a polished, finished look.
- Water-Resistant Finish: Apply a high-quality water-resistant sealant or stain to wood decking to protect it from moisture, UV damage, and weathering, extending its lifespan and preserving its appearance.
- Built-in Seating and Planters: Incorporate built-in seating or planter boxes into your deck design for added comfort and visual appeal.
- Fascia Boards: Install fascia boards to cover the exposed ends of joists and beams, creating a clean, finished edge around the perimeter of the deck.
Tools for This Deck Building Project:
- Carpenter’s square
- Circular saw
- Concrete for footings
- Decking boards
- Drill
- Hammer
- Joist hangers
- Level
- Pressure-treated lumber
- Post-hole digger
- Safety gear
- Screws and nails
- Tape measure
By following these steps and carefully planning your project, you can confidently build a beautiful and functional deck that will enhance your outdoor living space for years to come. Remember to always prioritize safety, consult local building codes, and enjoy the process of creating your own backyard oasis!