Changing your Apple Watch band is a simple way to personalize your device and adapt it to different occasions. At HOW.EDU.VN, we provide expert guidance to help you seamlessly swap bands and ensure a perfect fit. Whether you’re switching from a sporty band to a sophisticated one or simply replacing a worn-out strap, understanding the process and compatibility is key. Discover the various band types and get step-by-step instructions for a hassle-free experience. If you require more personalized assistance or have specific concerns about your Apple Watch, our team of experienced experts is available at HOW.EDU.VN to provide tailored advice and support, ensuring you get the most out of your wearable technology.
1. Understanding Apple Watch Band Compatibility
Before diving into the process, understanding the compatibility of Apple Watch bands is crucial. Apple Watch bands are designed to be interchangeable across different series, but it’s essential to know which sizes work with your specific model.
- Question: How do I ensure my new Apple Watch band fits correctly?
Answer: Ensuring your new Apple Watch band fits correctly involves understanding the size compatibility between different Apple Watch models. Bands designed for 38mm, 40mm, and 41mm cases are compatible, while those for 42mm, 44mm, 45mm, and 49mm cases are also cross-compatible. The key is to match the millimeter size of your watch case with the appropriate band size.
Expanding on Apple Watch Band Compatibility:
Apple has maintained a degree of backward compatibility with its watch bands, which simplifies the process of finding replacements or new styles. However, there are nuances to be aware of:
- Case Size Matters: The primary consideration is the case size of your Apple Watch. Apple Watch models come in various sizes (e.g., 38mm, 40mm, 41mm, 42mm, 44mm, 45mm, and 49mm). Bands are designed to fit specific case sizes, and while some sizes are interchangeable, others are not.
- Series Compatibility: Generally, bands designed for older Apple Watch models (Series 1, 2, and 3) are compatible with newer models (Series 4 and later) as long as the case sizes match. For instance, a 38mm band from an older series will fit a 40mm or 41mm Apple Watch, and a 42mm band will fit a 44mm, 45mm, or 49mm model.
- Apple Watch Ultra: The Apple Watch Ultra, with its larger 49mm case, is compatible with 44mm, 45mm, and 49mm bands. However, using smaller bands (44mm or 45mm) on the Ultra is generally recommended for casual wear only, as they may not be as secure during rigorous activities.
- Band Types: Different band types may have specific compatibility considerations. For example, the Ocean Band, Alpine Loop, and Trail Loop are designed specifically for the Apple Watch Ultra and are optimized for rugged activities.
- Third-Party Bands: Many third-party manufacturers offer Apple Watch bands, and their compatibility may vary. Always check the product description to ensure the band is compatible with your specific Apple Watch model.
- Trying Before Buying: Whenever possible, try on the band with your Apple Watch before purchasing, especially if you are unsure about the fit. This is particularly important for bands like the Solo Loop or Braided Solo Loop, where precise sizing is crucial for comfort and security.
2. Preparing to Change Your Apple Watch Band
Before you start, it’s essential to prepare your workspace and tools to ensure a smooth and safe band replacement process.
- Question: What precautions should I take before changing my Apple Watch band?
Answer: Before changing your Apple Watch band, protect your device by placing it face down on a soft, lint-free surface to prevent scratches. If you have a Link Bracelet, separate it into two pieces using the quick release button.
Expanding on Preparing to Change Your Apple Watch Band:
Proper preparation is crucial for preventing damage to your Apple Watch and ensuring a smooth band replacement process. Here’s a more detailed look at the steps you should take:
- Choose a Clean, Soft Surface:
- Select a clean, flat surface to work on. This will help prevent dust and debris from getting into the band connectors.
- Cover the surface with a lint-free, microfiber cloth or a soft, padded mat. This will protect the Apple Watch screen from scratches and other potential damage.
- Prepare Your Tools:
- If you have a Link Bracelet, locate the quick release button on the inside of the bracelet. This button is used to separate the band into two pieces, making it easier to remove from the watch.
- Keep a small, soft cloth nearby to wipe away any fingerprints or smudges that may appear on the watch case or band.
- Understand Your Band Type:
- Familiarize yourself with the type of band you are removing and the mechanism for releasing it. Different bands have different attachment methods, and understanding this will help you avoid using excessive force.
- If you are unsure about the removal process for a particular band type, consult the Apple Watch user manual or search for specific instructions online.
- Ensure Adequate Lighting:
- Work in a well-lit area to ensure you can clearly see the band release buttons and connectors. Good lighting will help you avoid mistakes and prevent accidental damage.
- Take Your Time:
- Avoid rushing the process. Changing your Apple Watch band should be done carefully and deliberately to prevent damage to the watch or band.
- If you encounter any resistance or difficulty, stop and re-evaluate your approach. Forcing the band can lead to damage.
3. Step-by-Step Guide to Removing Your Apple Watch Band
The process of removing your Apple Watch band is generally the same for most band types, but here’s a detailed guide to ensure you do it correctly.
- Question: How do I safely remove my Apple Watch band without damaging the watch?
Answer: To safely remove your Apple Watch band, hold down the band release button on the watch. While holding it down, gently slide the band horizontally until it detaches. If the band doesn’t slide out easily, ensure you’re still pressing the release button firmly.
Expanding on Removing Your Apple Watch Band:
Removing your Apple Watch band correctly is crucial to avoid damage. Here’s a more detailed breakdown:
- Locate the Band Release Buttons:
- Turn your Apple Watch over so that the back is facing up. You will see two small, oval-shaped buttons on either side of the watch case, where the band connects. These are the band release buttons.
- Press and Hold the Release Button:
- Using your fingertip, press and hold one of the band release buttons. You should feel a slight click as you press it down.
- Ensure you maintain firm pressure on the release button throughout the removal process. If you release the button prematurely, the band may not slide out smoothly.
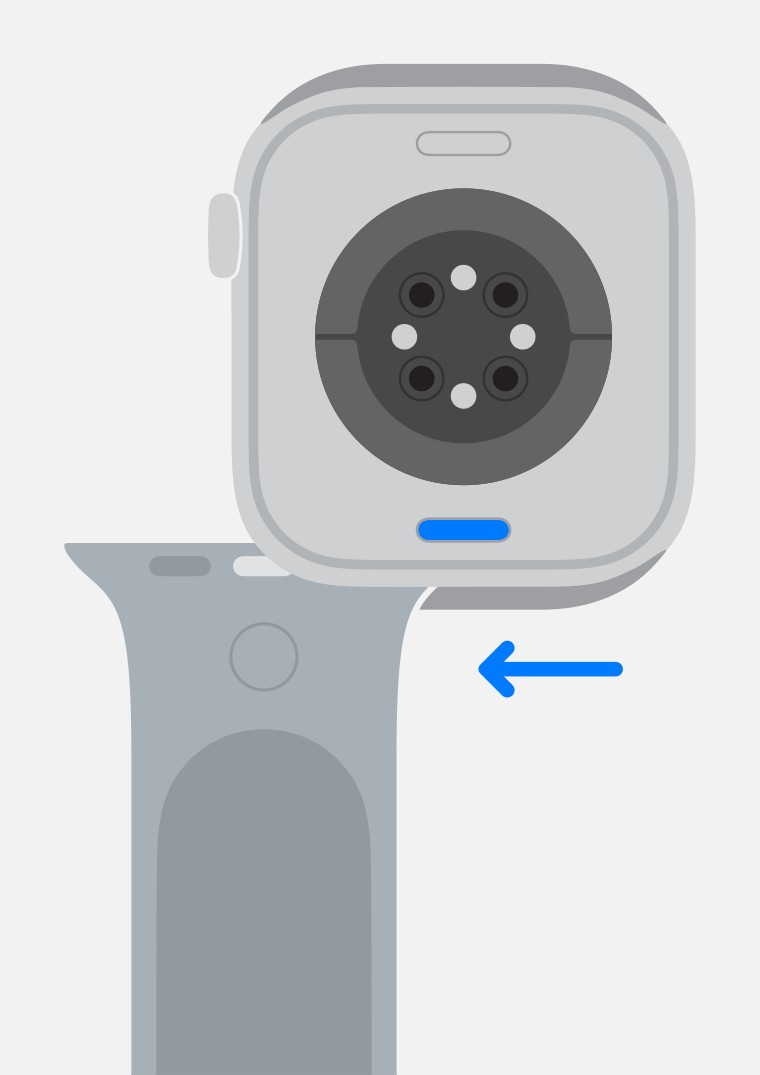
- Slide the Band Out:
- While holding down the release button, use your other hand to gently slide the band horizontally away from the watch case. The band should slide out smoothly with minimal resistance.
- If the band does not slide out easily, do not force it. Instead, check that you are pressing the release button firmly and try wiggling the band slightly as you slide it.
- Repeat on the Other Side:
- Once you have removed one side of the band, repeat the process on the other side. Press and hold the release button on the opposite side of the watch case, and slide the band out horizontally.
- Inspect the Connectors:
- After removing the band, inspect the band connectors on the watch case to ensure they are clean and free of any debris. Use a soft, dry cloth to wipe away any dirt or lint.
- Also, inspect the band itself to ensure there are no signs of damage or wear on the connectors.
- Troubleshooting:
- If you are having difficulty removing the band, make sure that you are pressing the release button fully and that you are sliding the band in the correct direction.
- If the band is stuck, try gently wiggling it back and forth while applying pressure to the release button.
- If you are still unable to remove the band, consider seeking assistance from an Apple Store or an authorized service provider to avoid damaging your watch.
4. Attaching a New Apple Watch Band
Once you’ve removed the old band, attaching a new one is a straightforward process. Follow these steps to ensure a secure fit.
- Question: What is the correct way to attach a new Apple Watch band?
Answer: To attach a new Apple Watch band, slide the band into the slot until you hear and feel a click, ensuring the text on the band is facing you. If it doesn’t click, slide it left and right while gently pushing it in.
Expanding on Attaching a New Apple Watch Band:
Attaching a new band to your Apple Watch is a simple process, but it’s important to do it correctly to ensure a secure fit and prevent accidental detachment. Here’s a more detailed guide:
- Orient the Band Correctly:
- Before you begin, make sure that the text or markings on the band are facing you. This ensures that the band is oriented correctly for installation.
- Check that the connectors on the band are clean and free of any debris. Use a soft, dry cloth to wipe away any dirt or lint.
- Slide the Band into the Slot:
- Align the band connector with the slot on the side of the Apple Watch case.
- Gently slide the band into the slot. You should feel a slight resistance as the connector engages with the internal mechanism.
- Listen for the Click:
- Continue sliding the band in until you hear and feel a distinct click. This indicates that the band is securely locked into place.
- If you do not hear a click, try wiggling the band slightly and pushing it in again. Make sure that the connector is fully seated in the slot.
- Test the Connection:
- After attaching the band, gently tug on it to ensure that it is securely attached to the watch case. The band should not move or detach easily.
- If the band feels loose or unstable, remove it and repeat the installation process.
- Repeat on the Other Side:
- Once you have attached one side of the band, repeat the process on the other side.
- Ensure that both sides of the band are securely attached before wearing your Apple Watch.
- Troubleshooting:
- If you are having difficulty attaching the band, make sure that you are aligning the connector correctly with the slot.
- If the band is not sliding in smoothly, check that the connector is clean and free of any debris.
- If you are still unable to attach the band, consider seeking assistance from an Apple Store or an authorized service provider to avoid damaging your watch.
5. Specific Band Types and How to Handle Them
Different Apple Watch bands have unique designs and mechanisms. Here’s how to handle some of the most popular types.
- Question: How do I handle specific Apple Watch band types like the Milanese Loop or Link Bracelet?
Answer: For Milanese Loop bands, slide the magnetic closure through the band connector to open it fully. With Link Bracelets, press the quick release button on a link to separate the band before removing it from the watch.
Expanding on Specific Band Types:
Apple Watch offers a variety of band types, each with its unique design and fastening mechanism. Understanding how to handle these different band types is crucial for a seamless user experience. Here’s a more detailed guide:
-
Solo Loop and Braided Solo Loop:
- The Solo Loop and Braided Solo Loop bands are designed to stretch over your wrist without any clasps or buckles.
- To put on the band, simply pull from the bottom and stretch it over your wrist.
- To remove the band, pull from the bottom again to stretch it over your wrist and off your hand.
- Ensure you choose the correct size for a comfortable and secure fit.
-
Milanese Loop:
- The Milanese Loop features a magnetic closure that allows for easy adjustment and a secure fit.
- To open the band, slide the magnetic closure through the band connector (lug). On older models, the closure may not slide through the lug.
- Adjust the band to your desired tightness and secure the magnetic closure.
- Ensure the magnetic closure is firmly attached to prevent accidental loosening.
-
Ocean Band, Alpine Loop, and Trail Loop:
- These bands are designed for rugged activities and are specifically made for the Apple Watch Ultra.
- Ensure the band edge (lug) is parallel to the watch case before inserting the band.
- Gently push the lug toward the case, with the metal tooth facing down.
- These bands are designed with a precision fit, so make sure they are properly aligned before securing them.
-
Modern Buckle:
- The Modern Buckle features a two-piece magnetic closure that provides a secure and stylish fit.
- To open the band, press the release buttons on the sides of the magnetic closure.
- Use the adjustment holes to resize the band to your desired fit.
- To close the band, line up the two-piece magnetic closure until the band locks into place.
-
Link Bracelet:
- The Link Bracelet is a more complex band that consists of multiple links.
- Before removing the band from your Apple Watch, separate it into two pieces by pressing the quick release button on a link.
- To adjust the length of the band, you may need to remove or add links using a link removal tool.
- Ensure the butterfly closure is properly closed before wearing the watch.
-
Titanium Milanese Loop:
- To adjust the Titanium Milanese Loop, lift the clamp on the buckle.
- With one finger on each side of the buckle, slide the buckle to the desired position, keeping the buckle parallel with the band.
- Press down to close the clamp and secure the band.
6. Tips for a Smooth Band Change
Here are some additional tips to make the process of changing your Apple Watch band as smooth as possible.
- Question: What tips can help ensure a smooth Apple Watch band replacement process?
Answer: Ensure a smooth band replacement by never forcing the band into the slot. If it doesn’t click, wiggle it gently. If the band still doesn’t lock, center it and push it into place. Don’t wear the watch if the band slides freely.
Expanding on Tips for a Smooth Band Change:
Changing your Apple Watch band should be a straightforward process. Here are additional tips to ensure a smooth experience:
- Never Force the Band:
- If the band does not slide into the slot easily, do not force it. Forcing the band can damage the connectors or the watch case.
- Instead, try wiggling the band slightly and making sure it is properly aligned before pushing it in.
- Check Alignment:
- Ensure that the band is properly aligned with the slot on the watch case. The connectors on the band should line up perfectly with the openings on the watch.
- If the band is misaligned, it will not slide in smoothly and may cause damage if forced.
- Wiggle Gently:
- If the band does not click into place immediately, try gently wiggling it back and forth while applying pressure.
- This can help the connectors engage properly and secure the band in place.
- Center the Band:
- If the band still does not lock, try centering it in the slot and pushing it in.
- Make sure that the band is evenly positioned on both sides of the watch case.
- Test the Connection:
- After attaching the band, always test the connection by gently tugging on it.
- The band should not slide freely or come loose. If it does, remove the band and repeat the installation process.
- Avoid Wearing if Sliding:
- If the band continues to slide or feel unstable, do not wear your Apple Watch.
- Wearing the watch with a loose band can be dangerous, as it may fall off and become damaged.
- Seek Professional Help:
- If you are having persistent difficulty changing your Apple Watch band, consider seeking assistance from an Apple Store or an authorized service provider.
- They can provide expert guidance and ensure that the band is properly installed without causing damage to your watch.
- Keep Connectors Clean:
- Regularly clean the band connectors and the slots on the watch case to remove any dirt or debris.
- This will help ensure a smooth and secure connection every time you change your band.
7. Common Issues and Troubleshooting
Sometimes, you may encounter issues when changing your Apple Watch band. Here are some common problems and how to troubleshoot them.
- Question: What should I do if I encounter issues while changing my Apple Watch band?
Answer: If you encounter issues, ensure the band is compatible and properly aligned. If it’s stuck, don’t force it; instead, gently wiggle it while pressing the release button.
Expanding on Common Issues and Troubleshooting:
Changing your Apple Watch band can sometimes present challenges. Here’s how to troubleshoot common issues:
- Band Won’t Slide Out:
- Problem: The band is stuck and won’t slide out even when the release button is pressed.
- Solution: Ensure that you are pressing the release button fully and maintaining firm pressure. Try wiggling the band slightly while sliding it to help dislodge any debris or misalignment. If it still won’t budge, seek professional help to avoid damaging the watch.
- Band Won’t Click In:
- Problem: The new band slides into the slot but doesn’t click into place, leaving it feeling loose.
- Solution: Make sure the band is oriented correctly with the text facing you. Check for any debris or obstructions in the slot or on the band connectors. Try sliding the band in while gently wiggling it until you hear the click.
- Release Button Stuck:
- Problem: The release button is stuck and won’t depress, preventing the band from being removed.
- Solution: Use a soft, non-metallic tool (like a toothpick) to gently clean around the release button and dislodge any debris that may be causing it to stick. Avoid using excessive force, which could damage the button.
- Incompatible Band:
- Problem: The band seems to fit but doesn’t function properly, or it’s too tight or too loose.
- Solution: Verify that the band is compatible with your Apple Watch model. Bands for 38mm, 40mm, and 41mm cases are compatible, as are bands for 42mm, 44mm, 45mm, and 49mm cases. Ensure you are using the correct size for your watch.
- Damaged Connectors:
- Problem: The connectors on the band or the slots on the watch case are damaged, making it difficult to attach or remove the band.
- Solution: If the connectors or slots are visibly damaged, it may be necessary to replace the band or seek professional repair for the watch. Avoid using damaged components, as they can cause further damage.
- Magnetic Closure Issues (Milanese Loop):
- Problem: The magnetic closure on the Milanese Loop is not holding securely, causing the band to loosen.
- Solution: Ensure that the magnetic closure is clean and free of any debris. Try adjusting the position of the closure to find a spot where it holds more securely. If the magnet is weak, the band may need to be replaced.
- Link Removal Issues (Link Bracelet):
- Problem: Difficulty removing or adding links to adjust the size of the Link Bracelet.
- Solution: Use a proper link removal tool and follow the instructions carefully. Make sure to push the pin in the correct direction and avoid using excessive force, which could damage the links.
8. Maintaining Your Apple Watch Band
Proper maintenance can extend the life of your Apple Watch band and keep it looking its best. Here are some tips.
- Question: How can I maintain my Apple Watch band to extend its lifespan?
Answer: Extend the life of your Apple Watch band by regularly cleaning it with a non-abrasive cloth. Avoid exposing it to harsh chemicals and store it properly when not in use.
Expanding on Maintaining Your Apple Watch Band:
Proper maintenance is crucial for extending the lifespan of your Apple Watch band. Here’s how to care for different band types:
- General Cleaning:
- Regularly clean your Apple Watch band to remove dirt, sweat, and other debris. Use a soft, lint-free cloth to wipe the band clean.
- For more thorough cleaning, you can use a slightly damp cloth with mild soap and water. Be sure to dry the band thoroughly after cleaning.
- Avoid using abrasive cleaners, solvents, or harsh chemicals, as they can damage the band material.
- Sport Bands and Solo Loops:
- Sport bands and Solo Loops are typically made of silicone or rubber, which are easy to clean.
- Rinse the band with water after workouts or exposure to sweat.
- Use a mild soap and water solution to remove any stubborn dirt or grime.
- Dry the band thoroughly before reattaching it to your Apple Watch.
- Leather Bands:
- Leather bands require special care to prevent damage and maintain their appearance.
- Avoid exposing leather bands to water, sweat, or humidity, as this can cause them to become discolored or cracked.
- Use a leather cleaner and conditioner to clean and protect the band.
- Store leather bands in a cool, dry place when not in use.
- Milanese Loop and Metal Bands:
- Milanese Loop and other metal bands can be cleaned with a soft, dry cloth.
- Use a slightly damp cloth to remove any stubborn dirt or grime.
- Avoid using abrasive cleaners, as they can scratch the metal.
- Dry the band thoroughly after cleaning.
- Fabric Bands:
- Fabric bands, such as the Sport Loop and Braided Solo Loop, can be cleaned by hand with mild soap and water.
- Gently scrub the band to remove any dirt or stains.
- Rinse the band thoroughly and allow it to air dry completely before reattaching it to your Apple Watch.
- Storage:
- When not in use, store your Apple Watch band in a clean, dry place.
- Avoid storing the band in direct sunlight or extreme temperatures, as this can damage the material.
- Consider using a band storage case or organizer to keep your bands neatly stored and protected.
- Regular Inspection:
- Periodically inspect your Apple Watch band for signs of wear and tear.
- Check for loose connectors, frayed edges, or damaged closures.
- Replace the band if you notice any significant damage to prevent it from detaching from your watch.
9. Choosing the Right Band for Your Lifestyle
Selecting the right Apple Watch band can enhance your style and comfort. Consider these factors when choosing a new band.
- Question: How do I choose an Apple Watch band that suits my lifestyle and activities?
Answer: When choosing an Apple Watch band, consider your daily activities. Opt for sport bands for workouts, leather or metal bands for formal occasions, and comfortable, adjustable bands for everyday wear.
Expanding on Choosing the Right Band:
Selecting the right Apple Watch band depends on your lifestyle and the activities you engage in. Here’s a guide:
- For Everyday Wear:
- Consider: Comfort, durability, and versatility.
- Options:
- Sport Band: Made of soft, flexible fluoroelastomer, the Sport Band is comfortable for all-day wear and easy to clean.
- Braided Solo Loop: Offers a comfortable, custom fit without clasps or buckles.
- Sport Loop: Features a soft, breathable nylon weave with an adjustable hook-and-loop fastener.
- For Workouts and Sports:
- Consider: Sweat resistance, breathability, and secure fit.
- Options:
- Sport Band: Waterproof and easy to clean, making it ideal for workouts.
- Nike Sport Band: Similar to the Sport Band but with perforations for added breathability.
- Ocean Band: Designed for water sports and diving, with a flexible fluoroelastomer material and corrosion-resistant titanium buckle.
- For Formal Occasions:
- Consider: Style, elegance, and sophistication.
- Options:
- Leather Band: Available in various styles and colors, leather bands add a touch of elegance to your Apple Watch.
- Milanese Loop: Features a woven stainless steel mesh with a magnetic closure, offering a sleek and sophisticated look.
- Link Bracelet: Made of stainless steel with a butterfly closure, the Link Bracelet is a classic choice for formal events.
- For Outdoor Adventures:
- Consider: Durability, ruggedness, and secure fit.
- Options:
- Alpine Loop: Made of two textile layers woven together into one continuous piece without stitching, the Alpine Loop is durable and secure for outdoor activities.
- Trail Loop: Features a soft nylon weave with a convenient pull tab for quick adjustments, ideal for hiking and running.
- Material Considerations:
- Fluoroelastomer (Sport Band): Durable, flexible, and easy to clean, making it ideal for active lifestyles.
- Leather: Stylish and comfortable, but requires special care to avoid damage from water and sweat.
- Stainless Steel: Durable and elegant, but can be heavy and may require adjustments for a perfect fit.
- Nylon: Soft, breathable, and lightweight, but may require more frequent cleaning.
10. Where to Buy Apple Watch Bands
Apple Watch bands are available from various retailers. Here are some of the best places to find a wide selection of bands.
- Question: Where can I find a wide variety of Apple Watch bands to purchase?
Answer: You can find Apple Watch bands at Apple Stores, authorized retailers like Best Buy, and online marketplaces like Amazon and the HOW.EDU.VN store, which offers expert-approved selections.
Expanding on Where to Buy Apple Watch Bands:
Apple Watch bands are widely available, but choosing the right source ensures you get quality products and a seamless shopping experience. Here’s where you can find a variety of Apple Watch bands:
- Apple Stores:
- Pros: Authentic Apple products, knowledgeable staff, and the ability to try on bands before purchasing.
- Cons: Can be more expensive than other retailers, and selection may be limited to Apple-branded bands.
- Experience: Visiting an Apple Store allows you to see and feel the bands in person, ensuring they meet your expectations. The staff can also provide assistance with sizing and compatibility.
- Authorized Retailers:
- Examples: Best Buy, Target, and other major electronics retailers.
- Pros: Wide selection of Apple and third-party bands, competitive pricing, and convenient return policies.
- Cons: Staff may not be as knowledgeable about Apple Watch bands as Apple Store employees.
- Experience: Authorized retailers offer a good balance of selection and convenience, making it easy to find the right band at a competitive price.
- Online Marketplaces:
- Examples: Amazon, eBay, and other online retailers.
- Pros: Vast selection of bands from various manufacturers, often at discounted prices.
- Cons: Quality can vary widely, and it may be difficult to verify authenticity.
- Experience: Online marketplaces offer the largest selection of Apple Watch bands, but it’s important to read reviews and check seller ratings before making a purchase.
- Direct from Manufacturers:
- Pros: Unique designs, high-quality materials, and direct customer support.
- Cons: Can be more expensive than other retailers, and shipping times may be longer.
- Experience: Purchasing directly from manufacturers ensures you get authentic products and access to the latest designs.
- HOW.EDU.VN Store:
- Pros: Expert-approved selections, high-quality products, and personalized customer support.
- Cons: Selection may be more curated than larger marketplaces.
- Experience: Shopping at the HOW.EDU.VN store ensures you get expert-vetted products and personalized assistance to help you find the perfect Apple Watch band for your needs.
Changing your Apple Watch band is a simple yet effective way to personalize your device and adapt it to various occasions. By following these steps and tips, you can ensure a smooth and safe band replacement process. For personalized advice and support, contact our team of experienced professionals at HOW.EDU.VN. We’re here to help you get the most out of your Apple Watch.
Are you struggling to find the perfect Apple Watch band or encountering issues during the replacement process? Contact the experts at HOW.EDU.VN today for personalized guidance and support. Our team of experienced professionals is ready to assist you with all your Apple Watch needs. Reach out to us at 456 Expertise Plaza, Consult City, CA 90210, United States, or call us at +1 (310) 555-1212. You can also visit our website at HOW.EDU.VN for more information.
FAQ: Frequently Asked Questions About Changing Apple Watch Bands
-
Question 1: Can I use any Apple Watch band with any Apple Watch model?
- Answer: No, but most are cross-compatible within size groups. Bands for 38mm, 40mm, and 41mm cases are compatible, and bands for 42mm, 44mm, 45mm, and 49mm cases are compatible.
-
Question 2: How do I know which size Apple Watch band to buy?
- Answer: Check the back of your Apple Watch to find the case size (e.g., 40mm, 44mm). Match this size with the band size listed on the product description.
-
Question 3: What should I do if my Apple Watch band is stuck?
- Answer: Ensure you’re pressing the release button firmly. Gently wiggle the band while sliding it. If it remains stuck, seek professional help to avoid damage.
-
Question 4: Can I clean my Apple Watch band with water?
- Answer: Yes, but it depends on the material. Sport bands can be rinsed with water. Leather bands should be cleaned with a leather cleaner to avoid damage.
-
Question 5: How often should I clean my Apple Watch band?
- Answer: Clean your band regularly, especially after workouts or exposure to sweat. A weekly cleaning is generally sufficient for everyday wear.
-
Question 6: What is the best type of Apple Watch band for working out?
- Answer: Sport bands and Nike Sport Bands are excellent for workouts due to their sweat resistance and breathability.
-
Question 7: How do I adjust the size of my Apple Watch Link Bracelet?
- Answer: Use a link removal tool to remove or add links until you achieve the desired fit.
-
Question 8: Can I wear my Apple Watch with a leather band while swimming?
- Answer: No, avoid wearing leather bands while swimming, as water can damage the leather.
-
Question 9: Are third-party Apple Watch bands safe to use?
- Answer: Yes, but ensure they are from reputable manufacturers and are compatible with your Apple Watch model. Check reviews before purchasing.
-
Question 10: How do I contact HOW.EDU.VN for more help with my Apple Watch band?
- Answer: Contact HOW.EDU.VN at 456 Expertise Plaza, Consult City, CA 90210, United States, call +1 (310) 555-1212, or visit how.edu.vn for expert assistance.