Do you want to know how to check how much RAM you have on your computer? This guide by HOW.EDU.VN provides detailed instructions for checking your RAM (Random Access Memory) on Windows and macOS, understanding RAM types, and managing RAM usage. By following these steps, you can optimize your computer’s performance and ensure it meets your computing needs, whether for gaming, professional work, or general use. Additionally, learn about RAM upgrade options and troubleshooting tips for memory-related issues.
Here are the 5 search intents addressed in this comprehensive guide:
- Informational: Users looking for guides and tutorials on how to check RAM on different operating systems (Windows, macOS).
- Comparative: Users researching the differences between RAM types (DDR3, DDR4, DDR5) and their impact on performance.
- Troubleshooting: Users seeking solutions to RAM-related issues, such as computer crashes or slowdowns.
- Evaluative: Users deciding whether to upgrade their RAM based on their usage needs and system specifications.
- Transactional: Users interested in optimizing their RAM usage and improving overall computer performance.
1. Why Checking Your RAM Matters
Random Access Memory (RAM) is your computer’s short-term memory, crucial for running applications and processes smoothly. Insufficient RAM can lead to sluggish performance, especially when multitasking or running resource-intensive programs. Understanding your computer’s RAM capacity and usage helps you optimize performance and decide if an upgrade is necessary. Checking your system’s memory and memory modules is crucial for smooth computing.
1.1. What is RAM and Why is it Important?
RAM temporarily stores data that your computer actively uses. Unlike a hard drive or SSD, which provides long-term storage, RAM allows for quick access to information, enabling faster loading times and smoother multitasking. The more RAM you have, the more data your computer can handle simultaneously, improving overall performance. According to a study by Kingston Technology, upgrading RAM can significantly reduce application loading times and improve system responsiveness.
1.2. Common Issues Related to Insufficient RAM
Insufficient RAM can cause several issues, including:
- Slow Performance: Applications take longer to load and respond.
- Freezing or Crashing: Your computer may freeze or crash when running multiple programs.
- Lagging: Noticeable delays when switching between applications.
- Error Messages: Frequent “Out of Memory” errors.
1.3. Who Needs to Check Their RAM?
Checking your RAM is beneficial for:
- Gamers: To ensure smooth gameplay and optimal graphics performance.
- Professionals: For video editing, graphic design, and other resource-intensive tasks.
- General Users: To maintain smooth computer operation and prevent performance issues.
2. How to Check RAM on Windows 11
Windows 11 offers a straightforward method to check your RAM capacity. Here’s how:
2.1. Step-by-Step Guide
- Open Settings:
- Click the Start button and select Settings.
- Alternatively, press Windows Key + I to open Settings directly.
- Navigate to System:
- In the Settings window, click on System.
- Select About:
- Scroll down and click on About.
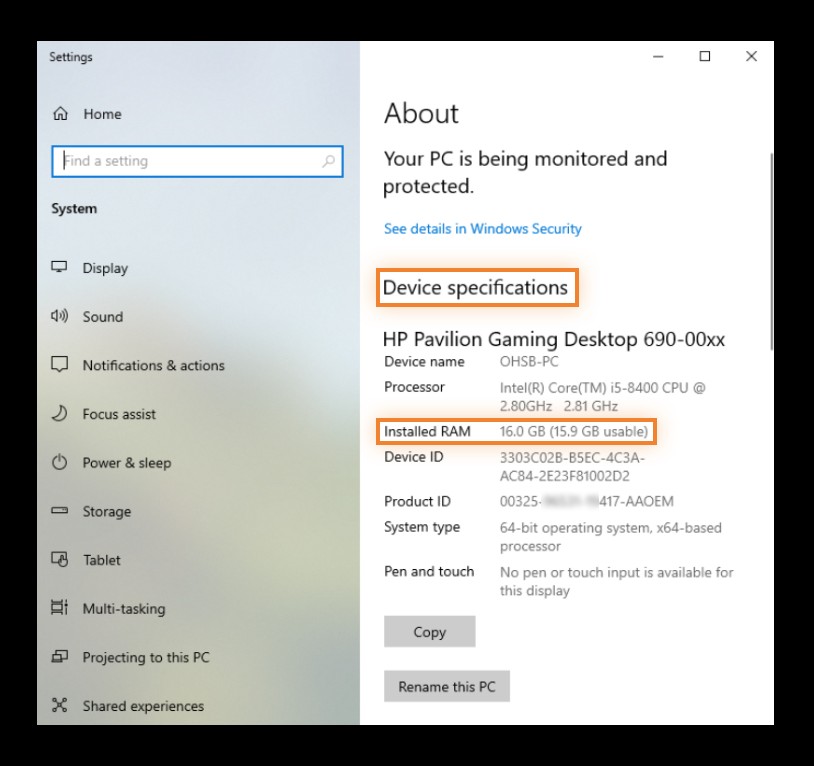
- View Installed RAM:
- Under the Device specifications section, you’ll find Installed RAM, which displays the total RAM capacity of your system.
2.2. Alternative Method: Using System Information
- Open System Information:
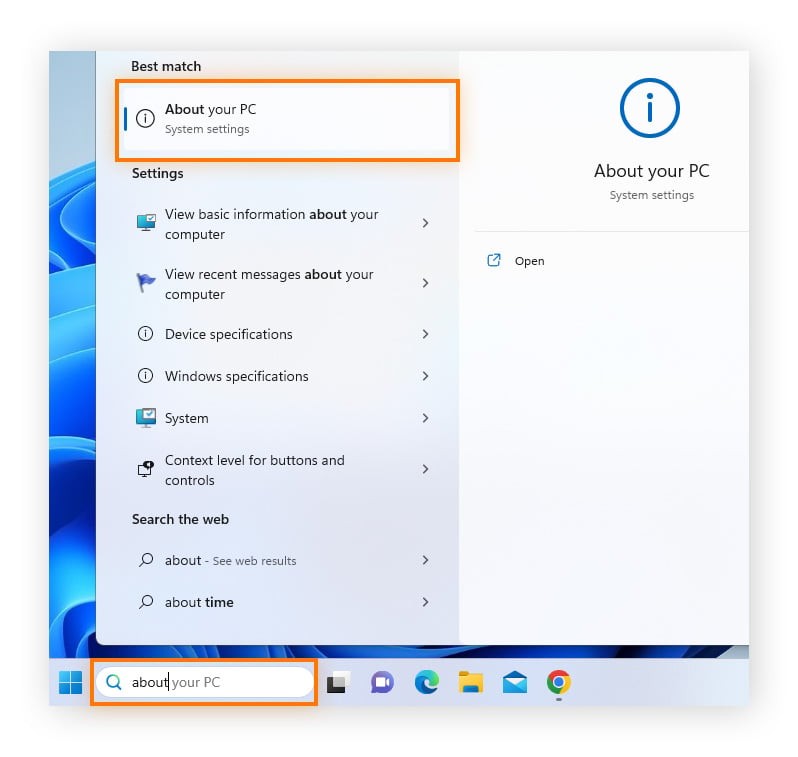
- Type System Information in the Windows search box and open the app.
- Find Installed Physical Memory (RAM):
- In the System Information window, look for Installed Physical Memory (RAM) to see your total RAM capacity.
2.3. Understanding the Results
The installed RAM value indicates the total amount of RAM your computer has. Note that the usable RAM might be slightly lower due to system processes and reserved hardware.
3. How to Check RAM on Windows 10
The process for checking RAM on Windows 10 is similar to Windows 11.
3.1. Step-by-Step Guide
- Open Settings:
- Click the Start button and select Settings.
- Alternatively, press Windows Key + I to open Settings directly.
- Navigate to System:
- In the Settings window, click on System.
- Select About:
- In the left sidebar, click on About.
- View Installed RAM:
- Under the Device specifications section, you’ll find Installed RAM, which displays the total RAM capacity of your system.
3.2. Alternative Method: Using System Information
- Open System Information:
- Type System Information in the Windows search box and open the app.
- Find Installed Physical Memory (RAM):
- In the System Information window, look for Installed Physical Memory (RAM) to see your total RAM capacity.
3.3. Understanding the Results
As with Windows 11, the installed RAM value indicates the total amount of RAM your computer has, and the usable RAM might be slightly lower.
4. How to Check RAM on Windows 7
For users still running Windows 7, checking RAM involves using the Task Manager.
4.1. Step-by-Step Guide
- Open Task Manager:
- Press Ctrl + Shift + Esc to open Task Manager directly.
- Alternatively, right-click the Taskbar and select Task Manager.
- Select Performance Tab:
- In Task Manager, click on the Performance tab.
- View Total RAM:
- Under the Physical Memory (MB) section, you’ll find Total, which displays your total RAM capacity in megabytes.
4.2. Understanding the Results
The total RAM value in Task Manager shows the total RAM installed on your system. Remember that Windows 7 might not fully support RAM capacities larger than 4 GB without specific updates.
5. How to Check RAM Type on PC
Knowing the type of RAM (DDR3, DDR4, DDR5) is crucial for upgrades, as different types are incompatible. Here’s how to check your RAM type:
5.1. Using CPU-Z
CPU-Z is a free tool that provides detailed information about your computer’s hardware.
- Download and Install CPU-Z:
- Download CPU-Z from the official website: CPU-Z.
- Install the application following the on-screen instructions.
- Open CPU-Z:
- Launch the CPU-Z application.
- Navigate to the Memory Tab:
- Click on the Memory tab.
- Find Memory Type:
- Under the General section, you’ll find the Type field, which displays the type of RAM installed (e.g., DDR3, DDR4).
5.2. Understanding DDR Generations
- DDR3: Older standard, slower speeds, and lower power consumption.
- DDR4: Current standard, faster speeds, and higher bandwidth than DDR3.
- DDR5: Latest standard, significantly faster speeds, and higher bandwidth than DDR4, improving overall system performance.
The higher the DDR number, the faster your CPU can access the data it needs.
6. How to Check RAM Usage on Windows
Monitoring RAM usage helps identify which applications are consuming the most memory, allowing you to optimize performance.
6.1. Using Task Manager
- Open Task Manager:
- Right-click the Taskbar and select Task Manager.
- Alternatively, press Ctrl + Shift + Esc.
- Select Performance Tab:
- Click on the Performance tab.
- Click Memory:
- In the left sidebar, click on Memory.
- View RAM Usage:
- The Memory section displays real-time RAM usage, including total RAM, available RAM, and usage percentage.
6.2. Identifying Memory-Intensive Processes
- Open Task Manager:
- Right-click the Taskbar and select Task Manager.
- Select Processes Tab:
- Click on the Processes tab.
- Sort by Memory Usage:
- Click on the Memory column to sort processes by memory usage.
- End Unnecessary Tasks:
- Right-click on any process consuming excessive memory and select End Task to free up RAM.
6.3. Tips for Reducing RAM Usage
- Close Unnecessary Applications: Close programs you’re not currently using.
- Disable Startup Programs: Prevent unnecessary programs from launching at startup.
- Update Drivers: Ensure your drivers are up to date for optimal performance.
- Run Disk Cleanup: Remove temporary files and other junk data.
7. How to Check RAM on macOS
Checking RAM on macOS is straightforward and provides essential information about your system’s memory.
7.1. Step-by-Step Guide
- Open Apple Menu:
- Click the Apple logo in the top-left corner of the screen.
- Select About This Mac:
- In the dropdown menu, click on About This Mac.
- View Memory Details:
- In the Overview tab, next to Memory, you’ll see the amount of RAM your Mac has and its specifications.
7.2. Understanding the Results
The Memory section displays the total RAM capacity and its speed (e.g., 8 GB 2400 MHz DDR4).
8. How to Check RAM Type on macOS
Identifying the type of RAM on your macOS system is important for compatibility when considering upgrades.
8.1. Using System Information
- Open Spotlight Search:
- Press Command + Spacebar to open Spotlight search.
- Type System Information:
- Type System Information and press Enter.
- Select Memory:
- In the System Information window, scroll down and click on Memory under the Hardware section.
- View RAM Details:
- Here, you’ll see detailed information about your RAM, including the type, speed, and size of each module.
8.2. Understanding the Results
The Memory section provides comprehensive details about your RAM, including the type (e.g., DDR4), speed (e.g., 2400 MHz), and the size of each installed module.
9. How to Check RAM Usage on macOS
Monitoring RAM usage on macOS helps you understand how efficiently your system is running and identify potential performance bottlenecks.
9.1. Using Activity Monitor
- Open Finder:
- Click on Finder in the Dock.
- Navigate to Utilities:
- Click on Go in the menu bar and select Utilities.
- Open Activity Monitor:
- Double-click Activity Monitor to open it.
- Select Memory Tab:
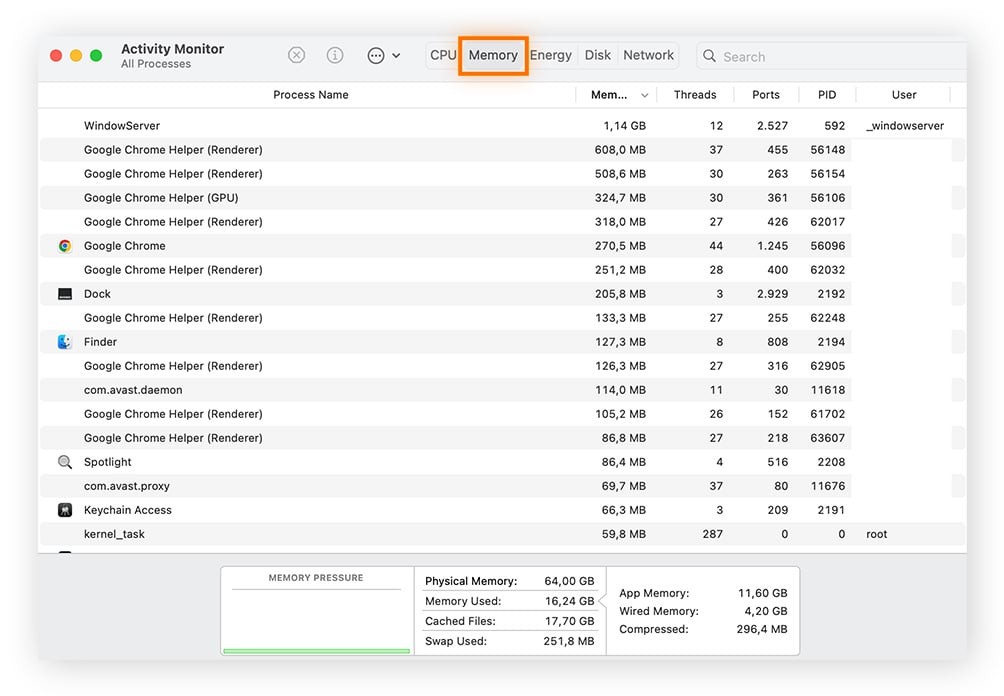
- In Activity Monitor, click on the Memory tab.
- View RAM Usage:
- The Memory tab displays real-time RAM usage, including memory pressure, used memory, cached files, and swap used.
9.2. Interpreting Activity Monitor Data
- Memory Pressure: Indicates how efficiently your Mac is using RAM. Low pressure is ideal.
- Used Memory: The amount of RAM currently in use by applications and system processes.
- Cached Files: Memory used for cached data, which can be quickly accessed when needed.
- Swap Used: The amount of hard drive space being used as virtual memory when RAM is full. High swap usage indicates that your Mac is running low on RAM.
9.3. Tips for Reducing RAM Usage on macOS
- Close Unused Applications: Quit applications you’re not currently using.
- Reduce Open Tabs: Limit the number of open tabs in your web browser.
- Disable Login Items: Prevent unnecessary applications from launching at startup.
- Use Activity Monitor to Identify Resource-Intensive Processes: Close processes consuming excessive memory.
10. Do I Need to Upgrade My RAM?
Deciding whether to upgrade your RAM depends on your computer usage and performance.
10.1. Signs You Need More RAM
- Slow Performance: Applications take longer to load, and your computer feels sluggish.
- Frequent Freezing or Crashing: Your computer freezes or crashes, especially when multitasking.
- “Out of Memory” Errors: You receive frequent error messages indicating insufficient memory.
- High Swap Usage: macOS users can check Activity Monitor to see if swap usage is high, indicating the system is relying heavily on virtual memory.
10.2. How Much RAM Do I Need?
The amount of RAM you need depends on your typical computer usage:
- 4 GB: Minimal for basic tasks like web browsing and word processing.
- 8 GB: Recommended for general use, including multitasking and running common applications.
- 16 GB: Ideal for gaming, video editing, and other resource-intensive tasks.
- 32 GB or More: Required for professional use, such as 3D modeling, video production, and software development.
Here’s a table to help you decide how much RAM you need based on your activities:
| RAM | Use Type | Activities |
|---|---|---|
| 8 – 16 GB | Entertainment / Light Work Apps | Playing games released before 2016, Data entry, Checking email, Standard business software, Entertainment (movies, music), Microsoft Office: Word, Excel, PowerPoint |
| 16 – 32 GB | Gaming / Multitasking / Heavier Apps | Playing/streaming the latest games with high performance settings, Multitasking between many programs, Having lots of tabs open in a web browser, Photoshop, Amateur music production in digital audio workstations (DAW) |
| 32 – 64 GB | Professional / Intensive Apps | Video editing, 3D modeling, design engineering, Software engineering, programming, database development, Graphic design, Medical imaging, Professional music performance/production |
10.3. Compatibility Considerations
Before upgrading RAM, consider the following:
- Motherboard Compatibility: Check your motherboard specifications to determine the maximum amount and type of RAM supported.
- RAM Type: Ensure you purchase the correct type of RAM (DDR3, DDR4, DDR5) that is compatible with your system.
- Operating System Limitations: Older operating systems might have limitations on the amount of RAM they can support.
11. How to Check Your Memory for Errors
If your computer is experiencing frequent crashes or freezes, checking your RAM for errors can help identify potential hardware issues.
11.1. Windows Memory Diagnostic Tool
Windows includes a built-in memory diagnostic tool to check for RAM errors.
- Open Windows Memory Diagnostic:
- Type Windows Memory Diagnostic in the Windows search box and open the app.
- Restart and Check:
- Click Restart now and check for problems (recommended).
- Your computer will restart and run the memory diagnostic tool.
- View Results:
- After the test is complete, your computer will restart, and the results will be displayed in the notification area.
11.2. Interpreting the Results
If the memory diagnostic tool finds errors, it indicates that your RAM might be faulty and needs to be replaced.
11.3. Alternative Diagnostic Tools
Memtest86 is a popular third-party memory diagnostic tool that provides more comprehensive testing.
12. Free Up More RAM the Easy Way
Even without upgrading your RAM, you can improve performance by optimizing RAM usage.
12.1. Using Avast Cleanup
Avast Cleanup is a utility that helps free up RAM and optimize system performance.
- Download and Install Avast Cleanup:
- Download Avast Cleanup from the official website: Avast Cleanup.
- Install the application following the on-screen instructions.
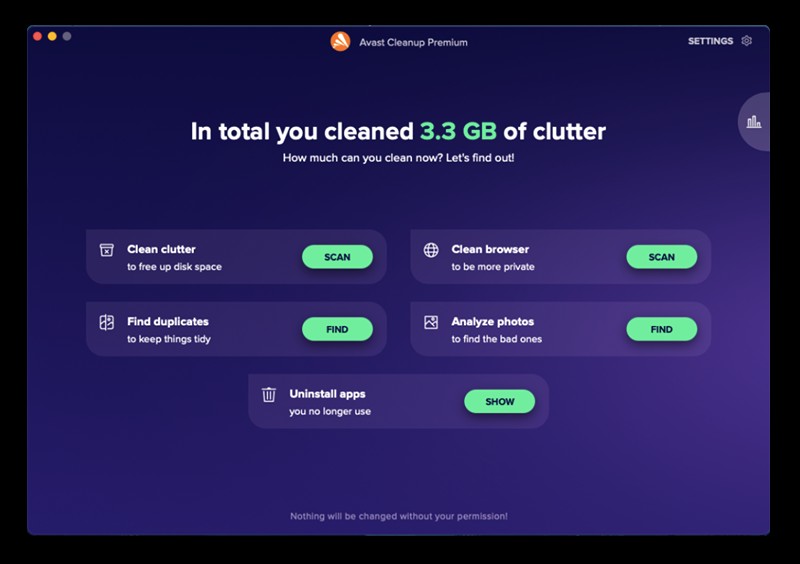
- Run Avast Cleanup:
- Open Avast Cleanup and run a scan to identify junk files, unnecessary applications, and other items that are consuming memory.
- Use Sleep Mode:
- Avast Cleanup includes a Sleep Mode feature that hibernates demanding processes you don’t currently need, freeing up RAM.
- Remove Junk Files:
- Delete junk files and temporary data to reclaim memory and improve performance.
12.2. Manual Optimization Tips
- Close Unnecessary Applications: Close programs you’re not currently using.
- Disable Startup Programs: Prevent unnecessary programs from launching at startup.
- Run Disk Cleanup: Remove temporary files and other junk data.
- Defragment Your Hard Drive: Optimize hard drive performance for faster data access.
- Update Drivers: Ensure your drivers are up to date for optimal performance.
13. Expert Consultation at HOW.EDU.VN
Navigating RAM-related issues can be complex, and ensuring your system operates at peak performance requires expert knowledge. At HOW.EDU.VN, we connect you with leading Ph.Ds. and experts who can provide personalized guidance.
13.1. Connect with Top Ph.Ds.
Our team of over 100 Ph.Ds. are available to offer expert advice on RAM upgrades, performance optimization, and troubleshooting. Whether you’re a gamer, professional, or general user, our experts can help you make informed decisions.
13.2. Personalized Advice
We understand that every user has unique needs. Our experts provide personalized advice tailored to your specific system and usage patterns, ensuring you get the most effective solutions.
13.3. Overcome Your Challenges
- Finding the Right Expert: We connect you with experts who have the right expertise and experience for your specific needs.
- Cost and Time Savings: Get high-quality advice quickly and efficiently, saving you time and money.
- Confidential and Reliable Advice: Our consultations are confidential and based on reliable, up-to-date information.
- Clear and Practical Solutions: Receive clear, actionable advice you can implement immediately.
Don’t let RAM issues slow you down. Contact the experts at HOW.EDU.VN today for personalized, reliable advice.
14. FAQs
14.1. Do I Need 8 GB or 16 GB RAM?
Whether you need 8 GB or 16 GB of RAM depends on your usage. If you use your computer for basic tasks like web browsing and word processing, 8 GB should be sufficient. However, if you use your computer for more demanding tasks like video editing or gaming, 16 GB of RAM will help ensure optimal performance.
14.2. How Much RAM Can My PC Take?
The maximum amount of RAM your PC can take depends on the model and motherboard. You can find this information in the documentation or by searching online for your PC’s specifications.
14.3. Will 32 GB RAM Be Faster Than 16 GB?
In most cases, 32 GB of RAM will not be noticeably faster than 16 GB for general computing tasks. However, when using memory-intensive applications for video editing or 3D rendering, you should see a performance improvement with 32 GB of RAM.
14.4. Can Too Much RAM Slow Down Your Computer?
Too much RAM will not slow down your computer, but it’s a waste of money if you don’t use any applications that could really benefit. Having too little RAM can cause your computer to run slowly or crash. Check the RAM memory to see if you have enough.
14.5. Will Upgrading to 32 GB of RAM Make a Difference?
Upgrading to 32 GB of RAM can make a difference if you use your computer for memory-intensive tasks like video editing. However, you probably won’t see any performance improvement if you primarily use your computer for basic tasks like web browsing and word processing.
14.6. How Do I Free Up RAM Without Upgrading?
You can free up RAM by closing unnecessary applications, disabling startup programs, running disk cleanup, and using optimization tools like Avast Cleanup.
14.7. What is DDR4 and DDR5?
DDR4 and DDR5 are types of RAM. DDR4 is the current standard, offering faster speeds and higher bandwidth than DDR3. DDR5 is the latest standard, providing even faster speeds and improved performance compared to DDR4.
14.8. How Can I Check Which Applications Are Using the Most RAM?
You can check which applications are using the most RAM by opening Task Manager (Windows) or Activity Monitor (macOS) and sorting processes by memory usage.
14.9. What Should I Do If My Computer Keeps Crashing?
If your computer keeps crashing, check your RAM for errors using the Windows Memory Diagnostic tool or Memtest86. Also, ensure your drivers are up to date and scan for malware.
14.10. How Do I Know If My RAM Is Faulty?
You can determine if your RAM is faulty by running a memory diagnostic tool. If the tool finds errors, it indicates that your RAM might be faulty and needs to be replaced.
Ready to Optimize Your Computer’s Performance?
Don’t let slow performance and memory issues hold you back. At HOW.EDU.VN, our team of over 100 Ph.Ds. is ready to provide expert guidance and personalized solutions to optimize your computer’s RAM and overall performance.
Here’s how HOW.EDU.VN can help:
- Connect with Top Experts: Get direct access to Ph.Ds. with specialized knowledge in computer hardware and performance optimization.
- Personalized Consultation: Receive tailored advice based on your specific needs and system configuration.
- Comprehensive Solutions: From RAM upgrades to software optimization, we offer a range of solutions to address your concerns.
Contact us today to get started:
- Address: 456 Expertise Plaza, Consult City, CA 90210, United States
- WhatsApp: +1 (310) 555-1212
- Website: HOW.EDU.VN
Take the first step towards a faster, more efficient computer. Reach out to how.edu.vn and let our experts help you unlock your system’s full potential.