Taking a screenshot on your PC is a valuable skill, and at HOW.EDU.VN, we’re here to guide you through the process with ease, ensuring you capture exactly what you need. Whether you’re documenting a process, saving important information, or reporting a technical issue, mastering the art of screen capturing empowers you to communicate visually and efficiently, improving productivity. Let’s explore the various methods of screen capture on your personal computer (PC), screen grabs, and image capturing.
1. What Exactly Is A Screenshot And Why Is It Important?
A screenshot, also known as a screen capture or screen grab, is a digital image of what’s displayed on your computer screen at a specific moment. Taking screenshots is crucial for various reasons:
- Documentation: Capture software interfaces, error messages, or specific steps in a process for tutorials or guides.
- Communication: Share visual information quickly with colleagues, friends, or tech support.
- Archiving: Preserve important information from websites or applications that might change over time.
- Troubleshooting: Document error messages or unexpected behavior for technical support purposes.
- Cyberbullying Evidence: Record instances of online harassment, crucial for reporting and legal action.
2. What Are The Different Methods To Take Screenshots On Windows?
Windows offers several built-in methods for capturing screenshots:
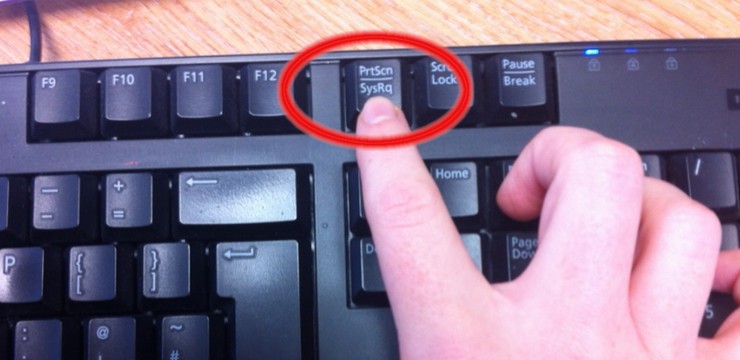
2.1. Using The Print Screen (PrtScn) Key
This is the most basic and universal method for capturing your entire screen.
- Press the PrtScn Key: Locate the “PrtScn” key on your keyboard (usually located in the upper-right corner). Pressing this key copies an image of your entire screen to your clipboard.
- Open an Image Editor: Open an image editing program like Paint, Word, or Photoshop.
- Paste the Screenshot: Press Ctrl + V (or right-click and select “Paste”) to paste the screenshot into the program.
- Edit (Optional): You can now crop, annotate, or edit the screenshot as needed.
- Save the Image: Save the file in your preferred image format (JPEG, PNG, GIF, etc.).
Pros:
- Simple and quick for capturing the entire screen.
- No additional software required.
Cons:
- Requires an image editor to view and save the screenshot.
- Doesn’t allow for selective capture of specific areas.
2.2. Using Alt + Print Screen (PrtScn) For The Active Window
This method captures only the currently active window, which is useful when you have multiple windows open.
- Select the Active Window: Make sure the window you want to capture is active (i.e., the one you’re currently working in).
- Press Alt + PrtScn: Press the “Alt” key and the “PrtScn” key simultaneously. This copies an image of the active window to your clipboard.
- Open an Image Editor: Open an image editing program.
- Paste the Screenshot: Paste the screenshot into the program (Ctrl + V).
- Edit and Save: Edit and save the image as desired.
Pros:
- Captures only the active window, avoiding unnecessary clutter.
- Still a quick and easy method.
Cons:
- Requires an image editor to view and save.
- Doesn’t allow for capturing specific areas within a window.
2.3. Using The Windows + Shift + S Shortcut (Snip & Sketch)
Introduced in Windows 10, this shortcut opens the Snip & Sketch tool, offering more flexible capture options.
- Press Windows + Shift + S: Press these three keys simultaneously. The screen will dim, and a small toolbar will appear at the top of the screen.
- Select a Capture Mode:
- Rectangular Snip: Drag a rectangle around the area you want to capture.
- Freeform Snip: Draw a freeform shape around the area.
- Window Snip: Click on a window to capture it.
- Full-screen Snip: Capture the entire screen.
- Screenshot to Clipboard: The screenshot is automatically copied to your clipboard. A notification will appear in the lower-right corner of the screen.
- Open Snip & Sketch (Optional): Click the notification to open the Snip & Sketch tool.
- Edit and Save: In Snip & Sketch, you can annotate, crop, and save the screenshot.
Pros:
- Offers flexible capture options, including rectangular, freeform, and window capture.
- Includes built-in annotation tools.
- Easy to use and efficient.
Cons:
- Slightly slower than the Print Screen method for full-screen captures.
- Requires Windows 10 or later.
2.4. Using The Snipping Tool Program
The Snipping Tool is a dedicated screenshot utility that has been included in Windows for many years. While it’s being phased out in favor of Snip & Sketch, it’s still available on many systems.
- Open the Snipping Tool: Search for “Snipping Tool” in the Start Menu and open the program.
- Select a Capture Mode: Click the “Mode” dropdown menu to choose a capture mode:
- Free-form Snip: Draw a freeform shape.
- Rectangular Snip: Drag a rectangle.
- Window Snip: Select a window.
- Full-Screen Snip: Capture the entire screen.
- Click “New”: Click the “New” button to start the capture process.
- Capture the Screenshot: Follow the on-screen instructions to capture the desired area.
- Edit and Save: The screenshot will open in the Snipping Tool window, where you can annotate, crop, and save it.
Pros:
- Offers multiple capture modes.
- Includes basic annotation tools.
- Available on older versions of Windows.
Cons:
- Being phased out in favor of Snip & Sketch.
- Lacks some of the advanced features of Snip & Sketch.
2.5. Using The Game Bar (Windows + Alt + PrtScn)
The Game Bar is primarily designed for recording gameplay, but it can also be used to take screenshots of any application.
- Open the Game Bar: Press Windows + G to open the Game Bar.
- Take a Screenshot: Click the “Screenshot” button (camera icon) or press Windows + Alt + PrtScn.
- Find the Screenshot: The screenshot will be saved in the “Captures” folder within your Videos library (usually located in C:Users[Your Username]VideosCaptures).
Pros:
- Quickly captures screenshots without needing to open another program.
- Automatically saves screenshots to a dedicated folder.
Cons:
- Requires the Game Bar to be enabled.
- Might not work with all applications.
3. How To Take Screenshots On MacOS?
macOS also offers several built-in methods for capturing screenshots:
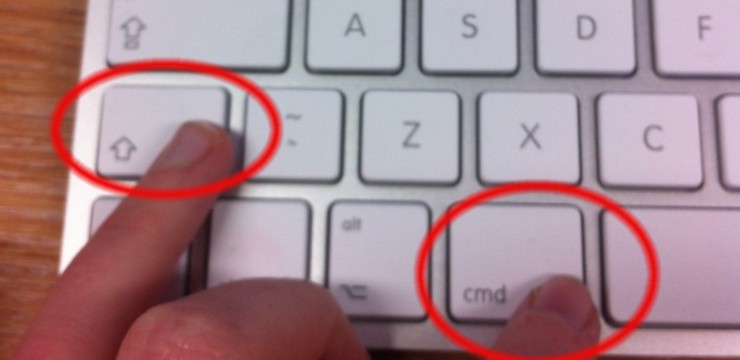
3.1. Using Command + Shift + 3 (Full Screen)
This shortcut captures the entire screen and saves it as a file on your desktop.
- Press Command + Shift + 3: Press these three keys simultaneously.
- Find the Screenshot: The screenshot will be saved as a PNG file on your desktop, named “Screenshot [date] at [time].png”.
Pros:
- Fast and easy for capturing the entire screen.
- Automatically saves the screenshot as a file.
Cons:
- Captures the entire screen only.
- Doesn’t offer editing options.
3.2. Using Command + Shift + 4 (Selected Area)
This shortcut allows you to select a specific area of the screen to capture.
- Press Command + Shift + 4: Press these three keys simultaneously. The cursor will change to a crosshair.
- Select the Area: Click and drag to draw a rectangle around the area you want to capture.
- Release the Mouse Button: Release the mouse button to capture the selected area.
- Find the Screenshot: The screenshot will be saved as a PNG file on your desktop.
Pros:
- Captures specific areas of the screen.
- Simple and intuitive to use.
Cons:
- Doesn’t offer editing options.
3.3. Using Command + Shift + 4 + Spacebar (Specific Window)
This combination allows you to capture a specific window, including its shadow.
- Press Command + Shift + 4: Press these three keys simultaneously.
- Press the Spacebar: The cursor will change to a camera icon.
- Click on the Window: Move the camera icon over the window you want to capture and click on it.
- Find the Screenshot: The screenshot will be saved as a PNG file on your desktop.
Pros:
- Captures a specific window with its shadow.
- Useful for capturing application windows.
Cons:
- Doesn’t offer editing options.
3.4. Using The Grab Utility (Older MacOS Versions)
The Grab utility is an older screenshot tool that was included in earlier versions of macOS. While it has been largely replaced by the keyboard shortcuts, it may still be available on some older systems.
- Open Grab: Open the Grab application (usually located in /Applications/Utilities/).
- Select a Capture Type: Choose a capture type from the “Capture” menu:
- Selection: Capture a selected area.
- Window: Capture a specific window.
- Screen: Capture the entire screen.
- Timed Screen: Capture the entire screen after a delay.
- Capture the Screenshot: Follow the on-screen instructions to capture the desired area.
- Save the Screenshot: Save the screenshot as a TIFF file.
Pros:
- Offers multiple capture types.
- Available on older versions of macOS.
Cons:
- Uses the older TIFF format by default.
- Largely replaced by the keyboard shortcuts.
4. What Are Some Third-Party Screenshot Tools?
While Windows and macOS offer excellent built-in screenshot tools, many third-party applications provide even more features and flexibility. Here are a few popular options:
4.1. Snagit
Snagit is a powerful screen capture and recording tool that offers a wide range of features, including:
- Advanced Capture Options: Capture scrolling windows, entire web pages, and more.
- Extensive Editing Tools: Annotate, blur, and add effects to your screenshots.
- Screen Recording: Record videos of your screen with audio.
- Easy Sharing: Share screenshots directly to various platforms.
Pros:
- Feature-rich and versatile.
- Excellent editing and annotation tools.
- Supports screen recording.
Cons:
- Paid software (though a free trial is available).
- Can be overwhelming for basic screenshot needs.
4.2. Lightshot
Lightshot is a simple and free screenshot tool that focuses on ease of use and quick editing.
- Easy Capture: Select an area to capture with just two clicks.
- Quick Editing: Add arrows, text, and shapes to your screenshots.
- Online Sharing: Upload screenshots to Lightshot’s servers and share them with a link.
Pros:
- Free and easy to use.
- Offers quick editing tools.
- Supports online sharing.
Cons:
- Limited features compared to Snagit.
- Relies on Lightshot’s servers for online sharing.
4.3. Greenshot
Greenshot is another free and open-source screenshot tool that offers a good balance of features and ease of use.
- Multiple Capture Modes: Capture full screen, window, or selected region.
- Annotation Tools: Add annotations, highlights, and obfuscation to your screenshots.
- Output Options: Save screenshots to file, clipboard, or printer.
- Plugins: Extend Greenshot’s functionality with plugins.
Pros:
- Free and open-source.
- Offers a good range of features.
- Supports plugins.
Cons:
- Interface can feel a bit dated.
- Lacks some of the advanced features of Snagit.
5. How Do You Take Scrolling Screenshots?
Sometimes, you need to capture content that extends beyond the visible area of your screen, such as a long webpage or document. This is where scrolling screenshots come in handy.
5.1. Using Snagit
Snagit has a built-in scrolling capture feature that works seamlessly with most applications and web browsers.
- Open Snagit: Launch Snagit and select the “Scrolling Window” capture type.
- Select the Window: Select the window you want to capture.
- Snagit Will Scroll Automatically: Snagit will automatically scroll through the window, capturing all the content.
- Edit and Save: The entire scrolling screenshot will be displayed in the Snagit editor, where you can edit and save it.
5.2. Using Web Browser Extensions
Several web browser extensions can capture scrolling screenshots of web pages:
- GoFullPage – Full Page Screen Capture (Chrome/Firefox): This extension captures the entire webpage in one click.
- Awesome Screenshot (Chrome/Firefox): This extension offers various capture options, including scrolling capture.
5.3. Using Built-in Features (Some Applications)
Some applications, such as certain PDF viewers, have built-in features for saving entire documents as images. Check the application’s documentation for details.
6. What Is The Best Screenshot Method For Different Scenarios?
Choosing the right screenshot method depends on your specific needs:
| Scenario | Recommended Method(s) |
|---|---|
| Capturing the Entire Screen | Print Screen (Windows), Command + Shift + 3 (macOS) |
| Capturing a Specific Window | Alt + Print Screen (Windows), Command + Shift + 4 + Spacebar (macOS) |
| Capturing a Selected Area | Windows + Shift + S (Windows), Command + Shift + 4 (macOS) |
| Annotating Screenshots | Snip & Sketch (Windows), Greenshot, Snagit |
| Capturing Scrolling Content | Snagit, Web Browser Extensions |
| Quick Screenshots for Sharing | Lightshot |
| Screen Recording | Snagit, Game Bar (Windows) |
7. Why You Should Consult Experts For Your Tech Needs
While taking screenshots is a relatively simple task, many other technical challenges can be more complex. Knowing when to seek expert advice can save you time, frustration, and potentially costly mistakes.
7.1. Complex Technical Issues
When you encounter issues that require in-depth knowledge of hardware, software, or networking, consulting an expert is often the best course of action.
7.2. Strategic Technology Decisions
Choosing the right technology solutions for your business or personal needs requires careful consideration of various factors. Experts can provide valuable insights and guidance to help you make informed decisions.
7.3. Troubleshooting Persistent Problems
If you’ve tried various solutions and still can’t resolve a technical issue, an expert can diagnose the problem and implement the appropriate fix.
7.4. Optimizing System Performance
Experts can analyze your system and identify areas for improvement, such as hardware upgrades, software optimization, or network configuration.
8. How HOW.EDU.VN Can Help You With Your Tech Questions
At HOW.EDU.VN, we understand the importance of having access to reliable expert advice. Our platform connects you with over 100 experienced PhDs across various fields, ready to provide personalized guidance and solutions to your technical challenges.
8.1. Access To Top Experts
Our network includes experts from diverse fields, ensuring that you can find the right specialist for your specific needs.
8.2. Personalized Advice
Our experts provide tailored advice and solutions based on your unique circumstances.
8.3. Save Time And Money
Getting expert advice can save you time and money by avoiding costly mistakes and quickly resolving technical issues.
8.4. Secure And Reliable
Our platform ensures the security and confidentiality of your information.
9. How To Get Started With HOW.EDU.VN
Getting expert advice from HOW.EDU.VN is easy:
- Visit Our Website: Go to HOW.EDU.VN.
- Browse Our Experts: Explore our directory of experts and select the one that matches your needs.
- Submit Your Question: Describe your issue or question in detail.
- Receive Expert Advice: Our experts will review your question and provide personalized guidance.
10. What Are Some Frequently Asked Questions About Screenshots and Tech Support?
Here are some common questions about taking screenshots and seeking tech support:
10.1. How Do I Take A Screenshot On My Phone?
The method varies depending on your phone model. Generally, you can press the power button and volume down button simultaneously.
10.2. How Can I Annotate A Screenshot?
Use built-in tools like Snip & Sketch (Windows) or third-party tools like Snagit or Lightshot.
10.3. How Do I Capture A Scrolling Screenshot?
Use Snagit or a web browser extension like GoFullPage.
10.4. What Is The Best Image Format For Screenshots?
PNG is generally preferred for screenshots due to its lossless compression, which preserves image quality.
10.5. How Do I Share A Screenshot?
You can save the screenshot as a file and attach it to an email, upload it to a cloud storage service, or use a dedicated screenshot sharing tool like Lightshot.
10.6. When Should I Contact Tech Support?
Contact tech support when you encounter complex technical issues, persistent problems, or need help with strategic technology decisions.
10.7. How Can HOW.EDU.VN Help Me With My Tech Questions?
HOW.EDU.VN connects you with experienced PhDs who can provide personalized guidance and solutions to your technical challenges.
10.8. Is It Safe To Share My Information With HOW.EDU.VN Experts?
Yes, HOW.EDU.VN ensures the security and confidentiality of your information.
10.9. How Much Does It Cost To Get Advice From HOW.EDU.VN Experts?
The cost varies depending on the expert and the complexity of the question. Please visit HOW.EDU.VN for detailed pricing information.
10.10. How Quickly Can I Get A Response From A HOW.EDU.VN Expert?
Response times vary depending on the expert’s availability. We strive to provide timely responses to all inquiries.
11. Call To Action – Get Expert Tech Advice Now
Don’t let technical challenges hold you back. Whether you need help with taking screenshots, troubleshooting complex issues, or making strategic technology decisions, HOW.EDU.VN is here to connect you with the experts you need.
Contact us today and experience the difference of having personalized guidance from top PhDs.
Address: 456 Expertise Plaza, Consult City, CA 90210, United States
WhatsApp: +1 (310) 555-1212
Website: HOW.EDU.VN
Let how.edu.vn empower you with the knowledge and expertise to overcome any technical hurdle and achieve your goals.