Drawing a wolf can seem daunting, but with the right guidance, it becomes an achievable and rewarding experience. At HOW.EDU.VN, we simplify the process with expert tips and step-by-step instructions, helping you master wolf drawings, wolf sketches, and create stunning wolf portraits. Learn to draw a realistic wolf, including mastering drawing wolf fur, with personalized guidance from our team of over 100 Ph.D. experts.
1. Understanding the Wolf Anatomy: The Foundation of Your Drawing
Before you even pick up a pencil, understanding the basic anatomy of a wolf is crucial for creating a realistic and believable drawing.
1.1. Skeletal Structure and Musculature
The skeletal structure of a wolf provides the underlying framework for its body shape and posture. Similarly, understanding the musculature helps you to accurately depict the contours and movements of the animal. According to a study by the University of British Columbia’s Department of Zoology, a wolf’s anatomy is optimized for endurance running and hunting, with powerful leg muscles and a flexible spine.
- Skull: The wolf skull is characterized by a long snout and strong jaws, essential for hunting and consuming prey.
- Spine: The flexible spine allows for a wide range of motion, enabling the wolf to turn quickly and maintain balance.
- Legs: The powerful leg muscles provide the strength and stamina needed for long-distance running and hunting.
1.2. Proportions and Key Features
Correct proportions are essential for capturing the likeness of a wolf in your drawing. Pay close attention to the relative sizes of different body parts, such as the head, torso, and legs. Key features such as the eyes, nose, and ears also contribute to the wolf’s unique appearance.
- Head-to-Body Ratio: A wolf’s head is typically smaller in proportion to its body compared to domestic dogs.
- Leg Length: Wolves have relatively long legs, which contribute to their speed and agility.
- Facial Features: The shape and placement of the eyes, nose, and ears are crucial for conveying the wolf’s expression and personality.
1.3. Observing Real Wolves or Reference Images
The best way to understand wolf anatomy is to observe real wolves or high-quality reference images. Pay attention to the way the muscles and bones interact beneath the skin, creating the contours of the animal’s body. Note the subtle details of the fur, which can add depth and realism to your drawing.
According to the International Wolf Center, observing wolves in their natural habitat can provide valuable insights into their behavior and physical characteristics.
2. Essential Materials for Drawing a Wolf
Gathering the right art supplies can significantly enhance your drawing experience and the final result.
2.1. Pencils: Graphite and Charcoal
- Graphite Pencils: These are ideal for creating detailed sketches and tonal variations. Use harder grades (e.g., 2H, HB) for light outlines and softer grades (e.g., 2B, 4B, 6B) for shading and adding depth.
- Charcoal Pencils: These are excellent for achieving rich, dark tones and creating dramatic contrasts. Charcoal is particularly useful for drawing fur and creating a sense of texture.
2.2. Paper: Texture and Weight
The type of paper you choose can affect the way your pencils and charcoal interact with the surface.
- Smooth Paper: Suitable for detailed drawings with fine lines and smooth shading.
- Textured Paper: Ideal for creating a more rugged, expressive look. The texture of the paper can help to create the illusion of fur and add depth to your drawing.
Consider using a medium-weight paper (around 70-100 lb) to prevent it from buckling under heavy shading.
2.3. Erasers: Kneaded and Plastic
- Kneaded Erasers: These are soft and pliable, allowing you to gently lift graphite or charcoal from the paper without damaging the surface. They are also useful for creating highlights and subtle tonal variations.
- Plastic Erasers: These are more rigid and precise, making them ideal for removing small details and cleaning up edges.
2.4. Blending Tools: Stumps and Tortillions
Blending tools help you to smooth out transitions between tones and create a more polished look.
- Stumps: These are tightly wound paper tools that are used to blend larger areas of shading.
- Tortillions: These are smaller, more pointed blending tools that are ideal for blending fine details.
2.5. Other Useful Tools
- Pencil Sharpener: Keep your pencils sharp to create crisp lines and fine details.
- Ruler: Use a ruler to draw straight lines and measure proportions.
- Reference Images: Gather a collection of high-quality reference images to guide your drawing.
3. Breaking Down the Drawing Process: A Step-by-Step Guide
Drawing a wolf can be broken down into a series of manageable steps, starting with a basic outline and gradually adding details and shading.
3.1. Basic Shapes and Proportions
Start by drawing a series of basic shapes to represent the main parts of the wolf’s body, such as the head, torso, and legs. Use light, loose lines to create a rough outline of the animal’s overall form. Pay close attention to the proportions of the different body parts, making sure that they are accurately represented in your sketch.
- Head: Draw a circle or oval to represent the head, and then add guidelines for the placement of the eyes, nose, and mouth.
- Torso: Draw an oval or rectangle to represent the torso, and then connect it to the head with a curved line for the neck.
- Legs: Draw simple lines to represent the legs, paying attention to their length and angle.
3.2. Refining the Outline
Once you have established the basic shapes and proportions, begin to refine the outline of the wolf’s body. Use smoother, more confident lines to define the contours of the muscles and bones beneath the skin. Pay attention to the subtle curves and angles that give the wolf its unique shape.
- Head: Refine the shape of the head, adding details such as the ears, snout, and jawline.
- Torso: Define the shape of the torso, paying attention to the curves of the chest and abdomen.
- Legs: Refine the shape of the legs, adding details such as the joints and paws.
3.3. Adding Facial Features: Eyes, Nose, and Mouth
The facial features are crucial for capturing the wolf’s expression and personality. Pay close attention to the shape, size, and placement of the eyes, nose, and mouth.
- Eyes: Draw the eyes as almond-shaped ovals, and then add details such as the pupils, irises, and eyelids. The eyes should be expressive and convey the wolf’s alertness and intelligence.
- Nose: Draw the nose as a dark, triangular shape, and then add details such as the nostrils and the bridge of the nose. The nose should be moist and sensitive, reflecting the wolf’s keen sense of smell.
- Mouth: Draw the mouth as a curved line, and then add details such as the lips and teeth. The mouth can be open or closed, depending on the expression you want to convey.
3.4. Creating Depth with Shading Techniques
Shading is essential for creating depth and volume in your drawing. Use a variety of shading techniques to create the illusion of light and shadow, bringing the wolf to life on the page.
- Hatching: This technique involves drawing a series of parallel lines to create areas of tone. The closer the lines are together, the darker the tone will be.
- Cross-Hatching: This technique involves drawing two or more sets of parallel lines that intersect each other, creating a denser, darker tone.
- Blending: This technique involves using a blending stump or tortillion to smooth out transitions between tones, creating a more gradual, realistic effect.
- Stippling: This technique involves creating small dots to create areas of tone. The closer the dots are together, the darker the tone will be.
3.5. Detailing the Fur Texture
The fur is one of the most distinctive features of a wolf, and it can add a great deal of realism to your drawing. Pay attention to the direction and texture of the fur, using a variety of techniques to create the illusion of individual hairs.
- Short Strokes: Use short, quick strokes to create the look of short fur, such as on the face and legs.
- Long Strokes: Use longer, flowing strokes to create the look of long fur, such as on the back and tail.
- Overlapping Strokes: Overlap the strokes to create depth and volume in the fur.
- Varying Tones: Use a variety of tones to create the illusion of light and shadow in the fur.
4. Mastering Different Wolf Poses and Expressions
Once you have mastered the basics of drawing a wolf, you can begin to experiment with different poses and expressions.
4.1. Dynamic Poses: Running, Howling, and Hunting
Drawing a wolf in a dynamic pose can convey a sense of energy and movement. Consider drawing a wolf running, howling, or hunting to capture its wild spirit.
- Running: Capture the wolf’s speed and agility by drawing its legs extended and its body leaning forward.
- Howling: Capture the wolf’s vocalization by drawing its head tilted back and its mouth open wide.
- Hunting: Capture the wolf’s predatory instincts by drawing it stalking its prey with a focused gaze.
4.2. Capturing Emotions: Aggression, Playfulness, and Curiosity
The facial expressions of a wolf can convey a wide range of emotions, from aggression to playfulness to curiosity. Pay attention to the subtle changes in the eyes, mouth, and ears to capture the wolf’s mood.
- Aggression: Capture the wolf’s aggression by drawing its teeth bared and its eyes narrowed.
- Playfulness: Capture the wolf’s playfulness by drawing its mouth open in a grin and its tail wagging.
- Curiosity: Capture the wolf’s curiosity by drawing its ears perked up and its head tilted to one side.
4.3. Using References for Accuracy
When drawing a wolf in a particular pose or expression, it is helpful to use reference images to ensure accuracy. Look for photos or videos of wolves in the desired pose or expression, and then use them as a guide for your drawing.
5. Advanced Techniques for Realistic Wolf Drawings
For those looking to take their wolf drawings to the next level, mastering advanced techniques is essential.
5.1. Understanding Light and Shadow
A deep understanding of how light interacts with forms is crucial for creating realistic drawings. Observe how light falls on a wolf’s body, creating highlights and shadows that define its shape and texture. Pay attention to the direction of the light source and how it affects the overall mood of the drawing.
- Highlights: These are the brightest areas of the drawing, where the light is hitting the surface directly.
- Shadows: These are the darkest areas of the drawing, where the light is blocked by the object itself.
- Mid-tones: These are the areas between the highlights and shadows, where the light is partially blocked.
5.2. Layering and Blending for Smooth Transitions
Layering and blending are advanced techniques that can help you to create smooth transitions between tones and add depth to your drawing.
- Layering: This technique involves applying multiple layers of shading to build up the tone gradually.
- Blending: This technique involves using a blending stump or tortillion to smooth out the transitions between tones, creating a more gradual, realistic effect.
5.3. Adding Fine Details: Whiskers, Fur Strands, and Textures
Adding fine details such as whiskers, fur strands, and textures can significantly enhance the realism of your wolf drawing.
- Whiskers: Draw the whiskers as thin, curved lines that extend from the wolf’s muzzle.
- Fur Strands: Add individual fur strands to create the illusion of texture and depth in the fur.
- Textures: Add subtle textures to the skin, fur, and other surfaces to create a more realistic look.
6. Common Mistakes to Avoid When Drawing Wolves
Even experienced artists can make mistakes when drawing wolves. Here are some common pitfalls to avoid:
6.1. Disproportionate Body Parts
One of the most common mistakes is drawing body parts that are out of proportion. Double-check your measurements and proportions throughout the drawing process to ensure accuracy.
6.2. Flat, Lifeless Eyes
The eyes are the windows to the soul, and they can make or break a drawing. Avoid drawing flat, lifeless eyes by paying attention to the shape, size, and placement of the pupils, irises, and eyelids.
6.3. Inconsistent Fur Direction
The direction of the fur should be consistent throughout the drawing. Avoid drawing fur that changes direction abruptly or looks unnatural.
6.4. Lack of Depth and Shading
Without proper shading, your drawing will look flat and two-dimensional. Use a variety of shading techniques to create depth and volume in your drawing.
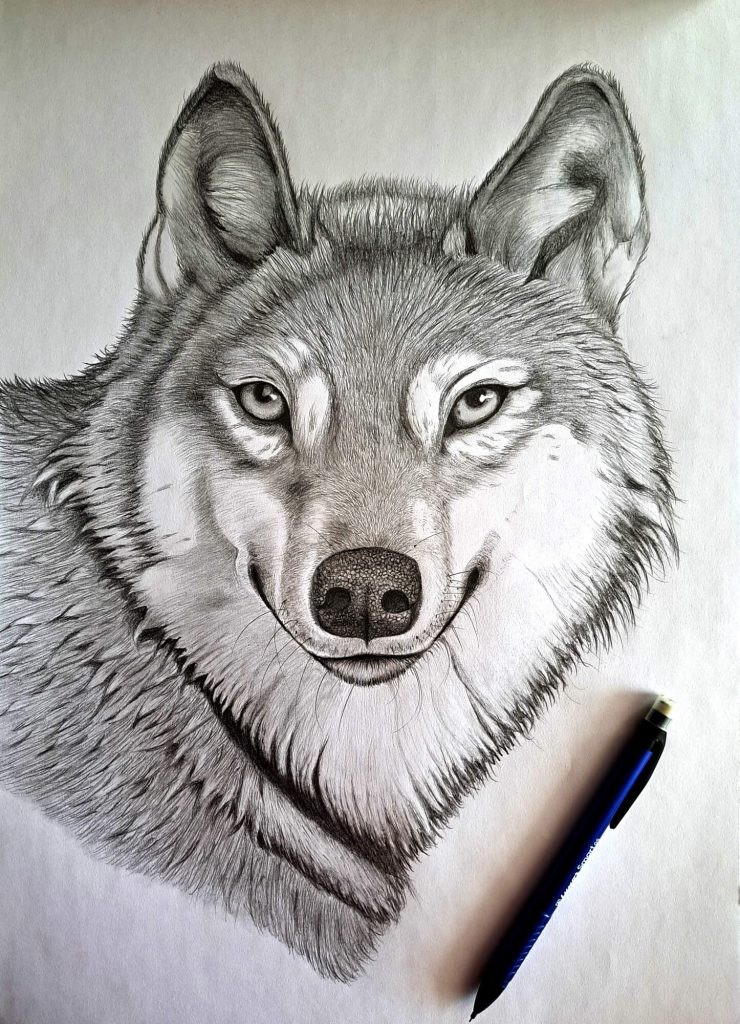
7. How To Draw A Wolf: Drawing a Wolf Head
This section focuses on learning How To Draw A Wolf head, emphasizing essential techniques and details.
7.1. Start with Basic Shapes: Circle, Oval, and Lines
Begin by sketching a circle for the cranium and an oval for the snout. Use light lines to map out the basic proportions and placement of the facial features.
7.2. Add Facial Features: Eyes, Nose, and Mouth
Carefully draw the eyes, positioning them symmetrically and adding details like pupils and eyelids. Sketch the nose as a dark, triangular shape, and then add the mouth, paying attention to the expression you want to convey.
7.3. Drawing the Fur Around the Face
Use short, overlapping strokes to create the look of fur around the face. Vary the tone and direction of the strokes to add depth and texture.
7.4. Shading Techniques for Depth and Volume
Apply shading to create depth and volume in the wolf’s head. Use darker tones in the shadows and lighter tones in the highlights. Blend the tones to create smooth transitions.
8. Where to Find Inspiration and References
Finding quality references and inspiration is crucial for improving your wolf drawings.
8.1. Online Resources: Websites and Social Media
Explore online resources such as art websites, social media platforms, and online galleries to find inspiration and references. Look for drawings and photographs of wolves that you admire, and then use them as a guide for your own work.
8.2. Books and Art Tutorials
Invest in books and art tutorials that focus on drawing animals, particularly wolves. These resources can provide valuable insights into anatomy, shading techniques, and other aspects of drawing.
8.3. Observing Wolves in Nature or Zoos
If possible, visit a zoo or wildlife sanctuary to observe wolves in person. Pay attention to their anatomy, behavior, and expressions, and then use your observations to inform your drawings.
9. The Benefits of Seeking Expert Guidance on HOW.EDU.VN
Drawing a wolf can be challenging, but with expert guidance, you can overcome obstacles and achieve your artistic goals.
9.1. Personalized Feedback from Ph.D. Experts
At HOW.EDU.VN, you can receive personalized feedback from our team of over 100 Ph.D. experts. Our experts can provide guidance on anatomy, shading techniques, and other aspects of drawing, helping you to improve your skills and create more realistic and expressive wolf drawings.
9.2. Customized Learning Plans
We can create customized learning plans tailored to your individual needs and goals. Whether you are a beginner or an experienced artist, we can help you to develop your skills and reach your full potential.
9.3. Access to a Community of Artists
Join our community of artists to share your work, receive feedback, and connect with like-minded individuals. Our community provides a supportive and collaborative environment where you can learn, grow, and develop your artistic skills.
10. Unleashing Your Creativity: Beyond Realistic Drawings
Once you have mastered the basics of drawing wolves, you can begin to explore your creativity and develop your own unique style.
10.1. Experimenting with Different Mediums: Watercolor, Ink, and Digital Art
Experiment with different mediums to discover new ways to express your creativity.
- Watercolor: Use watercolor to create soft, dreamy effects in your wolf drawings.
- Ink: Use ink to create bold, graphic effects in your wolf drawings.
- Digital Art: Use digital art software to create complex, detailed wolf drawings with a variety of effects.
10.2. Developing Your Unique Style
Develop your own unique style by experimenting with different techniques, compositions, and subject matter. Let your personality shine through in your drawings, and don’t be afraid to break the rules.
10.3. Telling Stories Through Your Art
Use your wolf drawings to tell stories and express your emotions. Create scenes that capture the wolf’s wild spirit, its interactions with other animals, or its connection to the natural world.
FAQ: Frequently Asked Questions About Drawing Wolves
Q1: What are the essential materials for drawing a wolf?
Essential materials include graphite pencils (2H, HB, 2B, 4B, 6B), charcoal pencils, smooth and textured paper, kneaded and plastic erasers, blending stumps, a pencil sharpener, and reference images.
Q2: How do I start drawing a wolf if I’m a beginner?
Start with basic shapes like circles and ovals to outline the body. Then, refine the outline, add facial features, and use shading techniques to create depth.
Q3: What are some common mistakes to avoid when drawing wolves?
Avoid disproportionate body parts, flat eyes, inconsistent fur direction, and lack of shading. Always double-check your proportions and use references.
Q4: How can I make my wolf drawing look more realistic?
Use advanced techniques like understanding light and shadow, layering and blending for smooth transitions, and adding fine details such as whiskers and fur strands.
Q5: Where can I find inspiration and references for drawing wolves?
Explore online resources, art books, tutorials, and observe wolves in nature or zoos. High-quality references are crucial for accurate drawings.
Q6: How can HOW.EDU.VN help me improve my wolf drawing skills?
HOW.EDU.VN provides personalized feedback from Ph.D. experts, customized learning plans, and access to a community of artists.
Q7: What is the best way to draw realistic fur?
Use short strokes for short fur and longer strokes for longer fur. Overlap the strokes and vary the tones to create depth and volume.
Q8: How do I capture different emotions in my wolf drawings?
Pay attention to the subtle changes in the eyes, mouth, and ears. Use references to accurately depict aggression, playfulness, curiosity, and other emotions.
Q9: What are some advanced techniques for shading a wolf drawing?
Advanced shading techniques include hatching, cross-hatching, blending, and stippling. Practice these techniques to create depth and realism.
Q10: Can I draw a wolf using digital art software?
Yes, digital art software offers a wide range of tools and effects that can enhance your wolf drawings. Experiment with different brushes, layers, and blending modes to achieve unique results.
Ready to Unleash Your Inner Artist?
Drawing a wolf is not just about replicating an image; it’s about understanding the animal’s anatomy, capturing its spirit, and expressing your creativity. With the right guidance and practice, you can create stunning wolf drawings that you can be proud of.
Don’t let the challenges hold you back. At HOW.EDU.VN, our team of over 100 Ph.D. experts is ready to provide you with the personalized support and guidance you need to succeed. Whether you’re a beginner or an experienced artist, we can help you to develop your skills, unleash your creativity, and create wolf drawings that are truly exceptional.
Contact us today to learn more about our services and how we can help you to achieve your artistic goals.
Address: 456 Expertise Plaza, Consult City, CA 90210, United States
Whatsapp: +1 (310) 555-1212
Website: HOW.EDU.VN
Let HOW.EDU.VN be your trusted partner in your artistic journey. Our commitment to excellence, combined with the expertise of our Ph.D. professionals, ensures that you receive the highest quality guidance and support. Embrace the opportunity to learn from the best and transform your artistic aspirations into reality. Start your journey with how.edu.vn today, and let us help you create wolf drawings that are not only realistic but also full of life and emotion.