Are you looking for ways How To Make Pumpkin Seeds? At HOW.EDU.VN, we’ll guide you through the entire process, from cleaning to roasting, ensuring you get perfectly crisp and flavorful pumpkin seeds every time. Learn the secrets to achieving the best texture and taste with our expert tips and tricks to enjoy a healthy and delicious snack. With insights into seed preparation, seasoning variations, and optimal roasting techniques, discover the secrets to elevating your pumpkin seed game.
1. Understanding the Basics of Pumpkin Seeds
Pumpkin seeds, also known as pepitas, are nutrient-rich seeds found inside pumpkins. These seeds are not only delicious but also packed with health benefits. They are a great source of protein, healthy fats, and essential minerals such as magnesium and zinc. Incorporating pumpkin seeds into your diet can contribute to improved heart health, better sleep, and enhanced immune function. Before diving into how to make pumpkin seeds, it’s important to understand the different varieties and their characteristics. Some pumpkins have larger seeds, while others have smaller, hull-less seeds. Knowing what type of seeds you’re working with can help you adjust your roasting technique for the best results.
1.1 Nutritional Benefits of Pumpkin Seeds
Pumpkin seeds are a nutritional powerhouse, offering a wide range of health benefits. According to a study published in the Journal of Agricultural and Food Chemistry, pumpkin seeds are rich in antioxidants, which help protect your cells from damage caused by free radicals. Additionally, they are a good source of magnesium, which is essential for maintaining healthy blood pressure and bone density. The high fiber content in pumpkin seeds also aids in digestion and promotes a feeling of fullness, making them a great snack for weight management.
Here’s a quick overview of the key nutrients found in pumpkin seeds:
| Nutrient | Amount per 1 oz Serving | Health Benefit |
|---|---|---|
| Magnesium | 37% DV | Supports nerve and muscle function, regulates blood sugar levels |
| Zinc | 23% DV | Boosts immune system, supports cell growth and division |
| Iron | 9% DV | Carries oxygen throughout the body, prevents anemia |
| Healthy Fats | 13 g | Supports heart health, provides energy |
| Protein | 7 g | Builds and repairs tissues, supports muscle growth |

1.2 Different Types of Pumpkin Seeds
There are several types of pumpkin seeds, each with its unique characteristics. The most common are the traditional, hull-covered seeds that you find inside carving pumpkins. These seeds require a bit more preparation but offer a satisfying crunch. Hull-less pumpkin seeds, also known as pepitas, are another popular option. These seeds have a tender texture and a slightly nutty flavor. They are often found in specialty pumpkins like the Styrian pumpkin. Understanding the differences between these types of seeds can help you choose the best option for your taste and culinary needs.
Here’s a comparison of the two main types of pumpkin seeds:
| Type | Characteristics | Preparation Required | Best For |
|---|---|---|---|
| Hull-Covered Seeds | Crunchy texture, white outer shell | Requires cleaning and shell removal (optional) | Roasting, snacking, adding to trail mix |
| Hull-less Seeds | Tender texture, no outer shell (green in color) | Minimal cleaning required | Snacking, salads, baking, pesto |
2. Gathering Your Supplies and Ingredients
Before you start learning how to make pumpkin seeds, you’ll need to gather a few essential supplies and ingredients. First, ensure you have a good quality pumpkin. Whether you’re using a carving pumpkin or a specialty variety, the fresher the pumpkin, the better the seeds will taste. Next, you’ll need a large bowl for cleaning the seeds, a pot for boiling them, and a baking sheet for roasting. For ingredients, you’ll need salt, oil (such as olive oil, coconut oil, or walnut oil), and your favorite spices. Having everything on hand will make the process smoother and more enjoyable.
2.1 Essential Supplies
Having the right tools can make the process of how to make pumpkin seeds much easier. A sturdy spoon or ice cream scoop is useful for removing the seeds from the pumpkin. A colander or sieve is essential for rinsing and draining the seeds. Parchment paper is great for lining your baking sheet, preventing the seeds from sticking and making cleanup a breeze. A clean kitchen towel is also necessary for drying the seeds before roasting.
Here’s a checklist of essential supplies:
- Large bowl
- Spoon or ice cream scoop
- Colander or sieve
- Large pot
- Baking sheet
- Parchment paper
- Clean kitchen towel
2.2 Choosing the Right Ingredients
The quality of your ingredients can significantly impact the flavor of your roasted pumpkin seeds. For oil, consider using a high-quality olive oil for a savory flavor or coconut oil for a subtle sweetness. Nut oils like walnut oil can add a unique depth of flavor. Salt is crucial for seasoning the seeds, so use a fine sea salt or kosher salt for the best results. As for spices, the possibilities are endless. Experiment with different blends to find your favorite flavor profile.
Here are some recommended ingredients:
- Oil: Olive oil, coconut oil, walnut oil
- Salt: Fine sea salt, kosher salt
- Spices:
- Pumpkin pie spice
- Curry powder
- Harissa
- Chili powder
- Garlic powder
- Smoked paprika
3. Step-by-Step Guide: How to Make Pumpkin Seeds
Now, let’s get to the heart of the matter: how to make pumpkin seeds. Follow these simple steps for perfectly roasted pumpkin seeds every time:
- Scoop out the seeds: Remove the seeds from the pumpkin and place them in a large bowl.
- Clean the seeds: Swish the seeds in cold water to remove any stringy pulp.
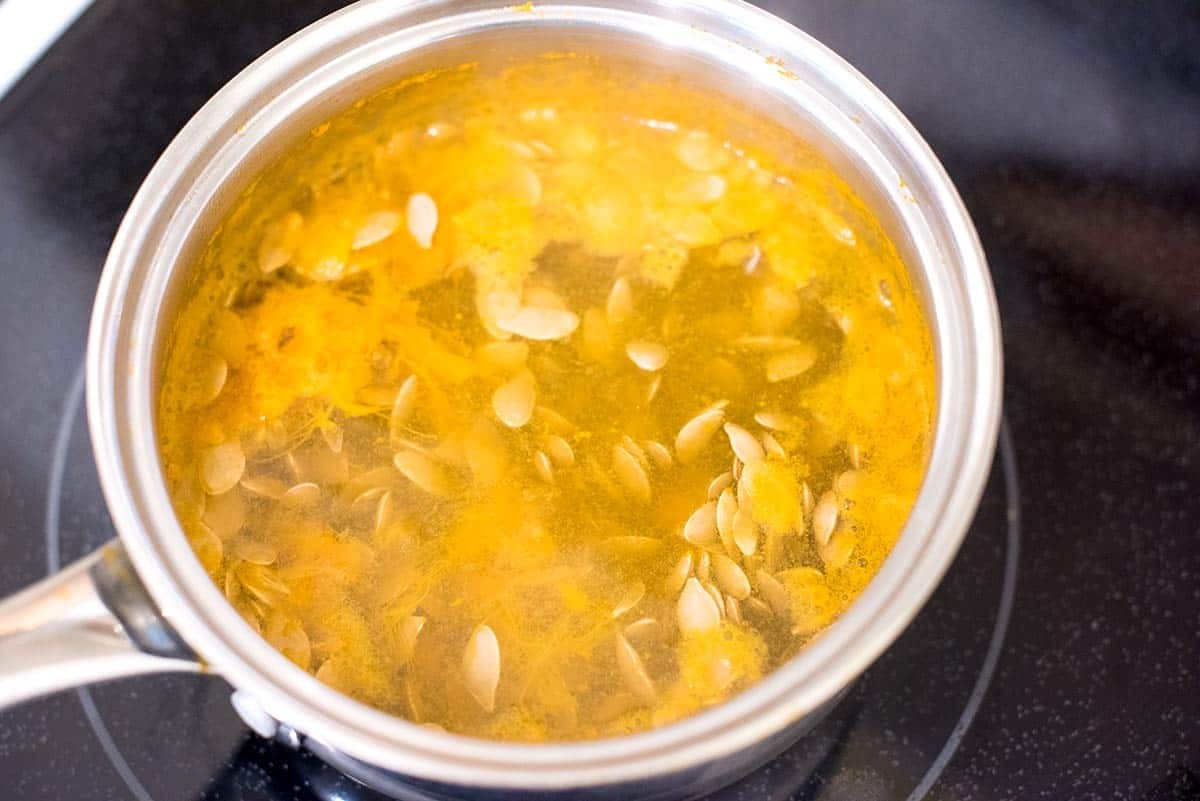
- Boil the seeds: Simmer the cleaned seeds in salted water for 5 minutes.
- Dry the seeds: Drain and pat the seeds dry with a clean kitchen towel.
- Season the seeds: Toss the dried seeds with oil and your favorite spices.
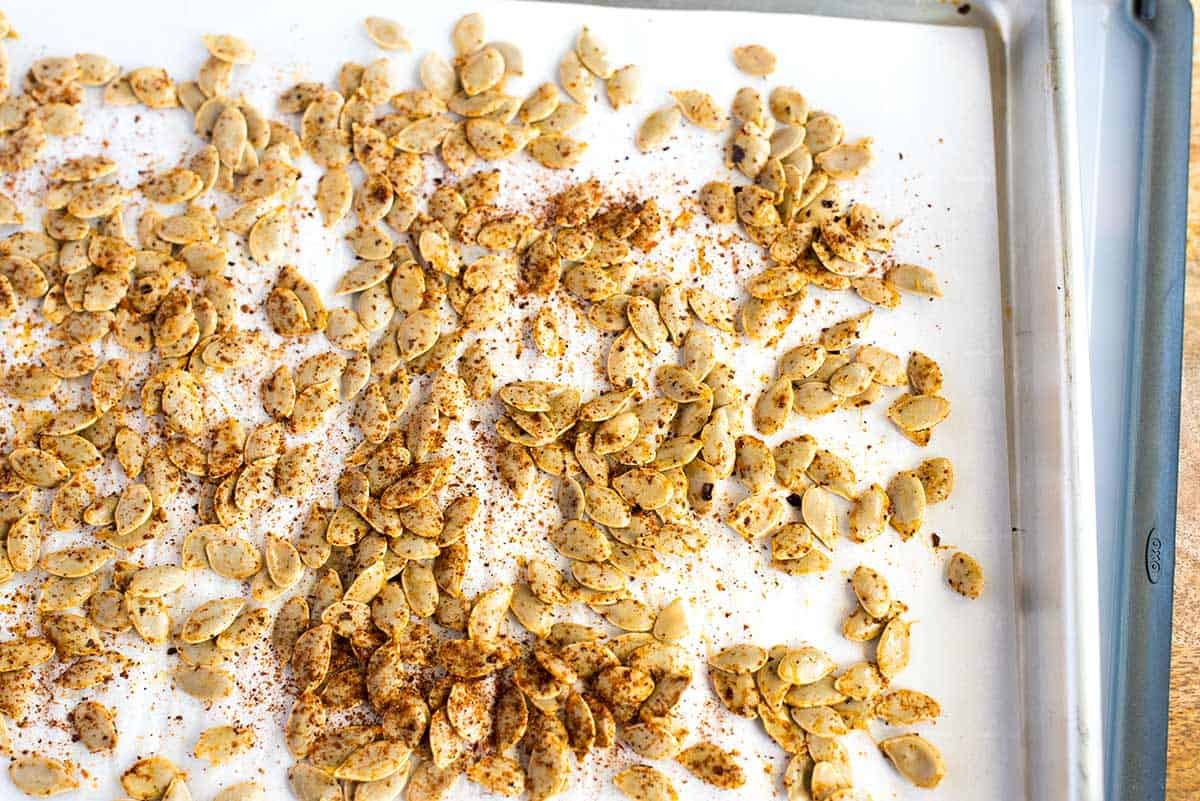
- Roast the seeds: Spread the seeds in a single layer on a baking sheet and roast at 350°F (177°C) for 10-25 minutes, stirring occasionally.
3.1 Cleaning and Preparing the Seeds
The first step in learning how to make pumpkin seeds is properly cleaning and preparing them. This involves removing the seeds from the pumpkin and separating them from the stringy pulp. To do this, use a sturdy spoon or ice cream scoop to scrape the seeds out of the pumpkin and into a large bowl. Fill the bowl with cold water and swish the seeds around to loosen any remaining pulp. The clean seeds will float to the top, making it easy to scoop them out and transfer them to a colander.
3.2 Boiling the Seeds for Enhanced Flavor
Boiling the pumpkin seeds before roasting is a crucial step that enhances their flavor and texture. Simmering the seeds in salted water helps to clean them further and seasons them from the inside out, similar to how you would salt pasta water. This process also plumps up the seeds, resulting in a more tender and flavorful roasted snack. Bring a pot of water to a boil, add 2 teaspoons of salt, and then add the cleaned pumpkin seeds. Simmer for 5 minutes, then drain and rinse the seeds under cold water.
3.3 Drying and Seasoning the Seeds
After boiling the pumpkin seeds, it’s essential to dry them thoroughly before roasting. The drier the seeds, the crispier they will become in the oven. Spread the seeds out on a clean kitchen towel and pat them dry. You can also let them air dry for a few hours if you have the time. Once the seeds are dry, it’s time to add your favorite seasonings. Toss the seeds with oil (such as olive oil, coconut oil, or walnut oil) and your chosen spice blend. Make sure the seeds are evenly coated for maximum flavor.
Here are some seasoning ideas:
- Savory: Olive oil, salt, garlic powder, smoked paprika
- Sweet: Coconut oil, cinnamon, sugar, nutmeg
- Spicy: Olive oil, chili powder, cumin, cayenne pepper
3.4 Roasting the Seeds to Perfection
The final step in learning how to make pumpkin seeds is roasting them to perfection. Preheat your oven to 350°F (177°C) and line a baking sheet with parchment paper. Spread the seasoned pumpkin seeds in a single layer on the baking sheet. This ensures that the seeds roast evenly and become crispy. Bake for 10-25 minutes, stirring occasionally, until the seeds are fragrant and golden brown around the edges. Keep a close eye on them to prevent burning.
4. Creative Variations and Flavor Combinations
One of the best parts of learning how to make pumpkin seeds is experimenting with different flavors and variations. From sweet to savory to spicy, the possibilities are endless. Try adding a sprinkle of cinnamon and sugar for a sweet treat, or go for a savory option with garlic powder and parmesan cheese. For those who like a bit of heat, chili powder and cayenne pepper can add a fiery kick. Get creative and discover your own signature pumpkin seed recipe.
4.1 Sweet and Savory Options
For a sweet twist on roasted pumpkin seeds, consider adding a mixture of cinnamon, sugar, and nutmeg before roasting. This combination creates a warm and comforting flavor that is perfect for fall. Alternatively, you can drizzle the roasted seeds with honey or maple syrup for extra sweetness. On the savory side, garlic powder, onion powder, and smoked paprika can create a delicious and savory snack. You can also add a sprinkle of parmesan cheese or nutritional yeast for a cheesy flavor.
Here are some sweet and savory flavor combinations to try:
| Flavor Profile | Ingredients |
|---|---|
| Sweet | Cinnamon, sugar, nutmeg, honey, maple syrup |
| Savory | Garlic powder, onion powder, smoked paprika, parmesan cheese, nutritional yeast |
4.2 Spicy and Herb-Infused Recipes
If you enjoy a bit of heat, try adding chili powder, cayenne pepper, and cumin to your roasted pumpkin seeds. This combination creates a spicy and flavorful snack that is perfect for those who like a bit of kick. For a more subtle heat, you can add a pinch of red pepper flakes. Herb-infused pumpkin seeds are also a great option. Toss the seeds with dried herbs like rosemary, thyme, or oregano for a fragrant and flavorful snack.
Here are some spicy and herb-infused flavor combinations:
| Flavor Profile | Ingredients |
|---|---|
| Spicy | Chili powder, cayenne pepper, cumin, red pepper flakes |
| Herb-Infused | Rosemary, thyme, oregano, basil |
5. Tips and Tricks for Perfect Pumpkin Seeds
Mastering how to make pumpkin seeds requires a few tips and tricks to ensure the best possible results. First and foremost, make sure to dry the seeds thoroughly before roasting. This is crucial for achieving a crispy texture. Additionally, spread the seeds in a single layer on the baking sheet to ensure even roasting. Stir the seeds occasionally during baking to prevent burning and promote even browning. Finally, keep a close eye on the seeds as they roast, as they can go from perfectly golden to burnt in a matter of minutes.
5.1 Achieving the Perfect Crunch
The key to achieving the perfect crunch in your roasted pumpkin seeds is to dry them thoroughly before roasting. Any moisture on the seeds will steam them in the oven, resulting in a soft and chewy texture. After boiling the seeds, spread them out on a clean kitchen towel and pat them dry. You can also let them air dry for a few hours if you have the time. Additionally, roasting the seeds at a lower temperature for a longer period can help to dry them out and create a crispier texture.
Here are some tips for achieving the perfect crunch:
- Dry the seeds thoroughly before roasting
- Roast at a lower temperature (300°F) for a longer period (30-40 minutes)
- Stir the seeds occasionally during baking
5.2 Storing and Preserving Your Roasted Seeds
Once you’ve mastered how to make pumpkin seeds, it’s important to know how to store and preserve them properly. Allow the roasted seeds to cool completely before storing them in an airtight container. This will prevent moisture from building up and causing the seeds to become soft. Store the seeds at room temperature for up to two weeks, or in the freezer for up to three months. When freezing, spread the seeds out on a baking sheet to prevent them from clumping together.
Here are some tips for storing and preserving your roasted seeds:
- Allow the seeds to cool completely before storing
- Store in an airtight container
- Store at room temperature for up to two weeks
- Store in the freezer for up to three months
6. Common Mistakes to Avoid When Roasting Pumpkin Seeds
Even with the best intentions, it’s easy to make mistakes when learning how to make pumpkin seeds. One of the most common mistakes is not cleaning the seeds thoroughly. Any remaining pulp can burn in the oven and create a bitter flavor. Another mistake is not drying the seeds properly, which can result in a soft and chewy texture. Overcrowding the baking sheet can also prevent the seeds from roasting evenly. Finally, not monitoring the seeds closely during baking can lead to burning.
6.1 Overcrowding the Baking Sheet
Overcrowding the baking sheet is a common mistake that can prevent your pumpkin seeds from roasting evenly. When the seeds are packed too closely together, they steam instead of roast, resulting in a soft and chewy texture. To avoid this, spread the seeds in a single layer on the baking sheet. If you have too many seeds to fit in one layer, use two baking sheets or roast them in batches.
6.2 Burning the Seeds
Burning the seeds is another common mistake that can ruin your roasted pumpkin seeds. Pumpkin seeds can go from perfectly golden to burnt in a matter of minutes, so it’s important to monitor them closely during baking. To prevent burning, stir the seeds occasionally and keep a close eye on them as they roast. If you notice that the seeds are browning too quickly, lower the oven temperature or reduce the baking time.
7. Exploring Pumpkin Seeds from Other Winter Squash
While most people associate pumpkin seeds with carving pumpkins, you can also roast the seeds from other winter squash, such as butternut squash, spaghetti squash, and delicata squash. Each type of squash seed has its unique flavor and texture, so experimenting with different varieties can add some variety to your snack routine. The process for roasting these seeds is the same as for pumpkin seeds, although you may need to adjust the baking time depending on the size and thickness of the seeds.
7.1 Butternut Squash Seeds
Butternut squash seeds are smaller and more delicate than pumpkin seeds, but they are equally delicious. They have a slightly nutty flavor and a tender texture. To roast butternut squash seeds, follow the same steps as for pumpkin seeds, but reduce the baking time to 8-15 minutes. Keep a close eye on them as they roast, as they can burn easily.
7.2 Spaghetti Squash Seeds
Spaghetti squash seeds are similar in size and texture to pumpkin seeds, but they have a milder flavor. They are a great option for those who prefer a more subtle taste. To roast spaghetti squash seeds, follow the same steps as for pumpkin seeds, but adjust the baking time as needed.
8. The Expertise of HOW.EDU.VN
Navigating the world of culinary arts can be challenging, especially when you’re looking for expert advice and reliable guidance. At HOW.EDU.VN, we connect you with a team of over 100 distinguished PhDs and experts from various fields, ready to provide personalized insights and solutions to your culinary queries. Whether you’re struggling with how to make pumpkin seeds or seeking innovative cooking techniques, our experts offer unparalleled support.
8.1 Connect with Culinary Experts
Do you find yourself overwhelmed by the vast amount of information available online? Are you looking for personalized guidance from experienced professionals? HOW.EDU.VN offers a unique platform where you can connect directly with culinary experts and receive tailored advice. Our team of PhDs and seasoned chefs are equipped to address your specific needs and challenges, ensuring you receive the most accurate and effective solutions.
8.2 Personalized Culinary Advice
At HOW.EDU.VN, we understand that every individual’s culinary journey is unique. That’s why we offer personalized advice tailored to your specific needs and goals. Whether you’re a beginner looking to learn the basics or an experienced cook seeking to refine your skills, our experts can provide the guidance and support you need to succeed.
Here’s how HOW.EDU.VN can help you:
- Direct Access to Experts: Connect with leading PhDs and culinary professionals.
- Personalized Solutions: Receive tailored advice specific to your needs.
- Save Time and Money: Avoid costly mistakes with expert guidance.
- Secure and Confidential: Your consultations are always private and protected.
8.3 Benefits of Seeking Expert Advice
Seeking advice from experts at HOW.EDU.VN offers numerous benefits. You’ll save time and money by avoiding costly mistakes, gain access to specialized knowledge, and receive personalized solutions tailored to your unique needs. Our experts provide objective and unbiased advice, helping you make informed decisions and achieve your culinary goals.
9. Call to Action: Get Expert Advice Today
Are you ready to take your culinary skills to the next level? Do you have burning questions about how to make pumpkin seeds or other cooking techniques? Don’t struggle alone. Contact HOW.EDU.VN today and connect with our team of over 100 PhDs and experts. Get personalized advice, save time and money, and achieve your culinary goals with confidence.
9.1 Contact Us for Expert Guidance
Don’t let culinary challenges hold you back. Contact HOW.EDU.VN today and discover the benefits of expert guidance. Our team is ready to help you with any culinary issue, big or small. Reach out to us via:
- Address: 456 Expertise Plaza, Consult City, CA 90210, United States
- WhatsApp: +1 (310) 555-1212
- Website: HOW.EDU.VN
9.2 Transform Your Culinary Journey
Transform your culinary journey with HOW.EDU.VN. Our experts provide the knowledge, skills, and support you need to succeed. Whether you’re a beginner or an experienced cook, we can help you achieve your culinary goals and unlock your full potential.
10. Frequently Asked Questions (FAQs) About Making Pumpkin Seeds
10.1 Can I eat the shell of pumpkin seeds?
Yes, you can eat the shell of pumpkin seeds. Many people enjoy the added crunch and fiber that the shell provides. However, if you prefer, you can remove the shell after roasting by cracking it open with your teeth.
10.2 How do I store roasted pumpkin seeds?
Store roasted pumpkin seeds in an airtight container at room temperature for up to two weeks, or in the freezer for up to three months.
10.3 What are some good spices to use on pumpkin seeds?
Some popular spices for pumpkin seeds include salt, garlic powder, smoked paprika, cinnamon, sugar, nutmeg, chili powder, and cayenne pepper.
10.4 How do I clean pumpkin seeds?
To clean pumpkin seeds, scoop them out of the pumpkin and place them in a large bowl. Fill the bowl with cold water and swish the seeds around to loosen any remaining pulp. The clean seeds will float to the top, making it easy to scoop them out.
10.5 Do I need to boil pumpkin seeds before roasting them?
Boiling pumpkin seeds before roasting them is not required, but it helps to clean them further and seasons them from the inside out. It also plumps up the seeds, resulting in a more tender and flavorful roasted snack.
10.6 How long do I roast pumpkin seeds for?
Roast pumpkin seeds at 350°F (177°C) for 10-25 minutes, stirring occasionally, until the seeds are fragrant and golden brown around the edges.
10.7 Can I roast seeds from other types of squash?
Yes, you can roast the seeds from other types of winter squash, such as butternut squash, spaghetti squash, and delicata squash.
10.8 What is the best oil to use for roasting pumpkin seeds?
Some good oils to use for roasting pumpkin seeds include olive oil, coconut oil, and walnut oil.
10.9 How do I dry pumpkin seeds before roasting them?
To dry pumpkin seeds, spread them out on a clean kitchen towel and pat them dry. You can also let them air dry for a few hours if you have the time.
10.10 How do I prevent pumpkin seeds from burning in the oven?
To prevent pumpkin seeds from burning in the oven, stir them occasionally and keep a close eye on them as they roast. If you notice that the seeds are browning too quickly, lower the oven temperature or reduce the baking time.
By following this comprehensive guide, you’ll be able to master how to make pumpkin seeds and enjoy a delicious and healthy snack. And remember, for any culinary challenges or questions, how.edu.vn is here to provide expert guidance and support.