Taking a screenshot on Windows is a fundamental skill for anyone using the operating system. Whether you need to capture an error message, share a funny moment, or document a process, knowing how to take a screenshot is essential. HOW.EDU.VN provides expert guidance to master this skill quickly and efficiently. This guide will explore various methods to take screenshots on Windows, ensuring you can capture your screen exactly as needed. Learn about screen capture techniques, screen clipping tools, and image saving options.
1. Why is Taking Screenshots on Windows Important?
Screenshots have become an integral part of our daily digital interactions. They provide a quick and easy way to share information, document processes, and collaborate with others. Here are several reasons why mastering the art of taking screenshots on Windows is essential:
- Documentation: Screenshots are invaluable for creating tutorials, guides, and documentation. Visual aids can significantly enhance understanding and make instructions easier to follow.
- Communication: Sharing screenshots is often the quickest way to illustrate a point or explain a problem. Whether it’s highlighting an error message or showcasing a design concept, screenshots can convey information more effectively than words alone.
- Collaboration: In collaborative projects, screenshots can help team members stay on the same page. Annotating screenshots to provide feedback or suggest changes can streamline the review process.
- Record Keeping: Capturing screenshots can serve as a record of important information, such as receipts, invoices, or online transactions. These visual records can be useful for future reference or dispute resolution.
- Troubleshooting: When encountering technical issues, screenshots can help IT support professionals diagnose and resolve problems more efficiently. Providing a visual representation of the issue can save time and reduce miscommunication.
As our lives become increasingly digital, the ability to capture and share screenshots has become an essential skill. By mastering the various methods available on Windows, you can enhance your productivity, improve your communication, and streamline your workflows.
2. Understanding Different Screenshot Methods on Windows
Windows offers several built-in methods for taking screenshots, each with its own advantages and use cases. Let’s explore these methods in detail:
- Print Screen Key (PrtScn): The most basic method involves pressing the “Print Screen” key on your keyboard. This captures the entire screen and copies it to your clipboard. You can then paste the screenshot into an image editor like Paint or a document.
- Alt + Print Screen: This combination captures only the active window, excluding the rest of the screen. This is useful when you want to focus on a specific application or window without capturing unnecessary background elements.
- Windows Key + Print Screen: This method captures the entire screen and automatically saves it as a PNG file in the “Screenshots” folder within your “Pictures” library. This is a quick way to save screenshots without needing to paste them into an image editor.
- Windows Key + Shift + S: This opens the Snip & Sketch tool, allowing you to select a specific area of the screen to capture. You can choose between rectangular snip, freeform snip, window snip, or full-screen snip. The captured snip is copied to your clipboard for pasting into other applications.
- Game Bar (Windows Key + G): The Game Bar, primarily designed for gamers, also includes a screenshot feature. Pressing Windows Key + Alt + Print Screen captures the active game window and saves it as a file in the “Captures” folder within your “Videos” library.
- Snipping Tool: The Snipping Tool is a dedicated screenshot utility that offers various capture modes, including free-form snip, rectangular snip, window snip, and full-screen snip. It also allows you to annotate screenshots with a pen or highlighter before saving them.
- Snip & Sketch: The Snip & Sketch tool is a modern replacement for the Snipping Tool, offering similar capture modes and annotation features. It also includes a delay feature, allowing you to capture screenshots after a specified time interval.
Understanding the nuances of each method allows you to choose the most appropriate one for your specific needs. Whether you need to capture the entire screen, a specific window, or a selected area, Windows provides the tools to get the job done efficiently.
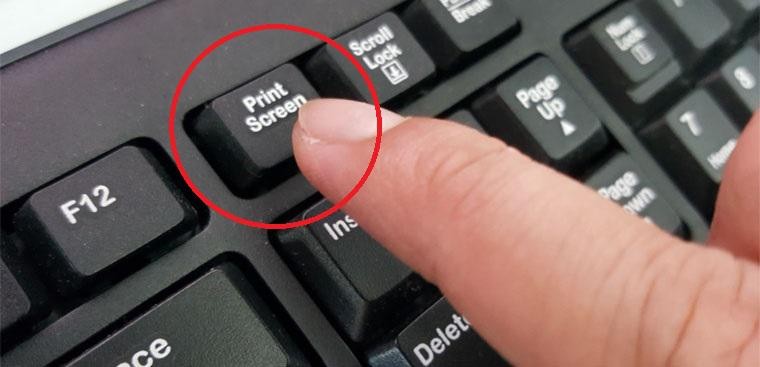
3. Step-by-Step Guide: How to Use the Print Screen Key
The “Print Screen” key, often labeled as “PrtScn” or “Print Scrn,” is the quickest way to capture your entire screen on Windows. Here’s a step-by-step guide:
- Identify the Print Screen Key: Locate the “Print Screen” key on your keyboard. It’s usually found in the upper-right corner, near the function keys.
- Prepare Your Screen: Make sure the content you want to capture is visible on your screen. Arrange the windows and applications as desired.
- Press the Print Screen Key: Press the “Print Screen” key. This action captures the entire screen and copies it to your clipboard.
- Open an Image Editor: Open an image editor like Paint, which comes pre-installed with Windows. You can find it by searching for “Paint” in the Start menu.
- Paste the Screenshot: In Paint, press “Ctrl + V” or right-click and select “Paste” to paste the screenshot from your clipboard onto the canvas.
- Edit (Optional): Use Paint’s tools to crop, annotate, or make other adjustments to the screenshot.
- Save the Screenshot: Click on “File” > “Save As” to save the screenshot as an image file. Choose a file format (such as PNG or JPG), enter a file name, and select a location to save the file.
Tips for Using the Print Screen Key:
- Combine with Alt Key: To capture only the active window, press “Alt + Print Screen” instead of just “Print Screen.”
- Automatic Saving: To capture the entire screen and automatically save it as a file, press “Windows Key + Print Screen.”
- Clipboard Management: If you frequently take screenshots, consider using a clipboard manager to store multiple screenshots and access them later.
4. Capturing a Specific Window: Using Alt + Print Screen
Sometimes, you only need to capture a specific window instead of the entire screen. The “Alt + Print Screen” shortcut allows you to do just that. Here’s how:
- Select the Target Window: Click on the window you want to capture to make it the active window. The active window is the one you’re currently working in.
- Press Alt + Print Screen: Press the “Alt” key and the “Print Screen” key simultaneously. This captures the active window and copies it to your clipboard.
- Open an Image Editor: Open an image editor like Paint.
- Paste the Screenshot: In Paint, press “Ctrl + V” or right-click and select “Paste” to paste the screenshot of the active window onto the canvas.
- Edit (Optional): Make any necessary edits or annotations.
- Save the Screenshot: Save the screenshot as an image file.
Benefits of Using Alt + Print Screen:
- Focus on Relevant Content: Capturing only the active window eliminates distractions and focuses on the specific information you need.
- Privacy: By excluding the rest of the screen, you can avoid accidentally capturing sensitive information that may be visible in other windows.
- Efficiency: Capturing a smaller area can reduce the file size of the screenshot, making it easier to share and store.
5. Saving Screenshots Automatically: Windows Key + Print Screen
For a more streamlined screenshot experience, Windows offers a shortcut that automatically saves screenshots as image files. Here’s how to use the “Windows Key + Print Screen” method:
- Prepare Your Screen: Arrange the content you want to capture.
- Press Windows Key + Print Screen: Press the “Windows” key and the “Print Screen” key simultaneously. The screen will briefly dim, indicating that a screenshot has been captured.
- Locate the Screenshot: The screenshot is automatically saved as a PNG file in the “Screenshots” folder within your “Pictures” library. You can access this folder through File Explorer.
Advantages of Automatic Saving:
- Speed: This method is faster than using the “Print Screen” key alone, as it eliminates the need to open an image editor and paste the screenshot manually.
- Organization: Screenshots are automatically organized into a dedicated folder, making it easier to find and manage them.
- Convenience: This is a convenient option for capturing multiple screenshots in quick succession, as each screenshot is saved automatically without requiring any additional steps.
6. Capturing a Specific Area: Using Windows Key + Shift + S (Snip & Sketch)
The “Windows Key + Shift + S” shortcut opens the Snip & Sketch tool, which allows you to capture a specific area of your screen. This is particularly useful when you only need a portion of the screen.
- Press Windows Key + Shift + S: Press the “Windows” key, the “Shift” key, and the “S” key simultaneously. The screen will dim, and the Snip & Sketch toolbar will appear at the top of the screen.
- Select a Capture Mode: Choose one of the following capture modes:
- Rectangular Snip: Drag a rectangle around the area you want to capture.
- Freeform Snip: Draw a freeform shape around the area you want to capture.
- Window Snip: Click on a window to capture it.
- Full-screen Snip: Capture the entire screen.
- Capture the Screenshot: After selecting a capture mode, follow the on-screen instructions to capture the screenshot.
- Edit and Save (Optional): The captured snip is copied to your clipboard. A notification will also appear, allowing you to open the Snip & Sketch tool to edit and save the screenshot.
Features of Snip & Sketch:
- Annotation Tools: The Snip & Sketch tool includes a pen, highlighter, and eraser for annotating screenshots.
- Delay Feature: You can set a delay of up to 10 seconds before the screenshot is captured, allowing you to prepare the screen.
- Clipboard Integration: The captured snip is automatically copied to your clipboard, making it easy to paste into other applications.
7. Using the Game Bar for Screenshots
The Game Bar, primarily designed for gamers, also offers a convenient way to take screenshots, especially while gaming. Here’s how to use it:
- Open the Game Bar: Press the “Windows Key + G” to open the Game Bar.
- Capture a Screenshot: Click the screenshot icon on the Game Bar, or press “Windows Key + Alt + Print Screen.”
- Locate the Screenshot: The screenshot is saved in the “Captures” folder within your “Videos” library.
Game Bar Features:
- Gaming-Specific Features: In addition to screenshots, the Game Bar offers features like screen recording, performance monitoring, and social sharing, making it a valuable tool for gamers.
- Accessibility: The Game Bar can be accessed quickly and easily using the “Windows Key + G” shortcut, even while in full-screen mode.
8. Exploring the Snipping Tool: A Classic Screenshot Utility
The Snipping Tool is a classic screenshot utility that has been a part of Windows for many years. While it’s been partially replaced by Snip & Sketch, it’s still a reliable option for capturing screenshots.
- Open the Snipping Tool: Search for “Snipping Tool” in the Start menu and click on the app to open it.
- Select a Capture Mode: Choose one of the following capture modes from the “Mode” dropdown menu:
- Free-form Snip: Draw a freeform shape around the area you want to capture.
- Rectangular Snip: Drag a rectangle around the area you want to capture.
- Window Snip: Click on a window to capture it.
- Full-screen Snip: Capture the entire screen.
- Capture the Screenshot: Click the “New” button and follow the on-screen instructions to capture the screenshot.
- Edit and Save: The captured snip will open in the Snipping Tool window, where you can annotate it with a pen or highlighter. Click the “Save” button to save the screenshot as an image file.
9. Customizing Your Screenshot Experience
Windows offers several ways to customize your screenshot experience to suit your needs:
- Change the Default Save Location: While screenshots captured with “Windows Key + Print Screen” are automatically saved to the “Screenshots” folder, you can change the default save location by modifying the registry. However, this is an advanced procedure and should be done with caution.
- Use Third-Party Screenshot Tools: Numerous third-party screenshot tools offer advanced features like scrolling capture, scheduled capture, and cloud storage integration. Some popular options include Snagit, Greenshot, and Lightshot.
- Customize Keyboard Shortcuts: While you can’t change the default keyboard shortcuts for the built-in screenshot methods, some third-party tools allow you to customize keyboard shortcuts to your liking.
- Adjust Annotation Settings: Both Snip & Sketch and the Snipping Tool allow you to customize the color and thickness of the pen and highlighter tools.
By exploring these customization options, you can create a screenshot workflow that is tailored to your specific needs and preferences.
10. Troubleshooting Common Screenshot Issues
While taking screenshots on Windows is generally straightforward, you may encounter some issues from time to time. Here are some common problems and their solutions:
- Print Screen Key Not Working:
- Make sure the “Print Screen” key is not disabled in your BIOS or UEFI settings.
- Check if any third-party applications are intercepting the “Print Screen” key.
- Try restarting your computer.
- Screenshot is Blank:
- Make sure the content you’re trying to capture is visible on the screen.
- If you’re capturing a video, make sure the video player is not using hardware acceleration, which can prevent screenshots from being captured correctly.
- Try using a different screenshot method.
- Screenshot is Not Saving:
- Make sure you have sufficient disk space to save the screenshot.
- Check if you have the necessary permissions to save files to the selected location.
- Try saving the screenshot to a different location.
- Snip & Sketch or Snipping Tool Not Working:
- Make sure the Snip & Sketch or Snipping Tool app is not disabled in your Windows settings.
- Try resetting the app in the Windows settings.
- Reinstall the app from the Microsoft Store.
11. The Benefits of Expert Guidance from HOW.EDU.VN
Navigating the world of technology can be challenging, but with expert guidance from HOW.EDU.VN, you can overcome any obstacle. Our team of experienced professionals is dedicated to providing clear, concise, and actionable advice to help you master essential skills like taking screenshots on Windows.
Here are some of the benefits of seeking guidance from HOW.EDU.VN:
- Expertise: Our team comprises seasoned IT professionals with years of experience in their respective fields.
- Clarity: We break down complex concepts into simple, easy-to-understand steps, ensuring that even beginners can follow along.
- Accuracy: We provide accurate and up-to-date information, based on thorough research and testing.
- Personalization: We understand that everyone’s needs are different, so we offer personalized advice and support to help you achieve your goals.
- Accessibility: Our website is accessible 24/7, so you can get the help you need whenever you need it.
By leveraging the expertise of HOW.EDU.VN, you can accelerate your learning, improve your productivity, and achieve your full potential.
12. Real-World Applications of Screenshot Skills
Mastering the art of taking screenshots on Windows can have a significant impact on your personal and professional life. Here are some real-world applications of these skills:
- Customer Support: When providing customer support, screenshots can help you quickly understand and resolve customer issues. By asking customers to send screenshots of their problems, you can diagnose the issue more efficiently and provide targeted solutions.
- Training and Education: Screenshots are invaluable for creating training materials and educational resources. Visual aids can significantly enhance understanding and make instructions easier to follow.
- Web Design and Development: Screenshots can help web designers and developers capture and share design ideas, identify layout issues, and document website changes.
- Software Testing: During software testing, screenshots can be used to document bugs, capture error messages, and provide visual evidence of software defects.
- Content Creation: Screenshots are essential for creating blog posts, articles, and social media content. They can be used to illustrate points, add visual interest, and enhance engagement.
As technology continues to evolve, the ability to capture and share screenshots will become increasingly important. By mastering these skills, you can enhance your communication, improve your productivity, and stay ahead of the curve.
13. What are the Intended Search results of “How to Take Screenshot on Windows?”
Understanding the search intent behind “How To Take Screenshot On Windows” helps tailor content to meet users’ needs effectively. Here are five common search intents:
- Informational: Users want to learn the basic methods for taking screenshots on Windows, including using the Print Screen key, Alt + Print Screen, and Windows Key + Print Screen. They seek step-by-step instructions and explanations of each method.
- Tutorial: Users are looking for detailed, visual guides on how to use specific screenshot tools like Snip & Sketch or the Snipping Tool. They want to understand the features and options available in these tools.
- Troubleshooting: Users are experiencing issues with taking screenshots and need solutions to common problems, such as the Print Screen key not working or screenshots not saving correctly.
- Comparison: Users want to compare different screenshot methods and tools to determine which one is best suited for their needs. They seek information on the advantages and disadvantages of each method.
- Specific Task: Users have a specific task in mind, such as capturing a particular window or area of the screen. They need instructions on how to accomplish this task using the appropriate screenshot method.
14. Why Consult a HOW.EDU.VN Expert?
While this guide provides a comprehensive overview of how to take screenshots on Windows, you may still have questions or need personalized advice. That’s where HOW.EDU.VN comes in.
Our team of experienced IT professionals is available to provide expert guidance and support on a wide range of technology-related topics, including:
- Troubleshooting: If you’re experiencing persistent issues with taking screenshots, our experts can help you diagnose the problem and find a solution.
- Customization: If you want to customize your screenshot experience to suit your specific needs, our experts can provide personalized recommendations and guidance.
- Advanced Techniques: If you’re looking to learn advanced screenshot techniques, such as scrolling capture or scheduled capture, our experts can provide step-by-step instructions and tips.
- Software Recommendations: If you’re looking for the best third-party screenshot tools, our experts can provide unbiased recommendations based on your needs and budget.
By consulting a HOW.EDU.VN expert, you can get the personalized advice and support you need to master the art of taking screenshots on Windows.
15. Call to Action: Get Expert Help from HOW.EDU.VN Today
Are you struggling to take screenshots on Windows? Do you want to learn advanced screenshot techniques? Or do you simply need personalized advice and support?
Then contact HOW.EDU.VN today. Our team of experienced IT professionals is available to provide expert guidance and support on all your technology-related needs.
Don’t let technology frustrate you. Let HOW.EDU.VN help you master the skills you need to succeed in today’s digital world.
Contact us today:
- Address: 456 Expertise Plaza, Consult City, CA 90210, United States
- WhatsApp: +1 (310) 555-1212
- Website: HOW.EDU.VN
Our team of over 100 renowned Ph.D. experts is ready to provide you with the insights and solutions you need. Connect with us at how.edu.vn, and let us help you achieve your goals.