Knowing How To Tell How Much Ram I Have is crucial for optimizing your computer’s performance. This article, brought to you by HOW.EDU.VN, provides a detailed guide on checking your RAM, understanding its usage, and determining if you need an upgrade. By understanding your system’s memory, you can ensure smooth operation and efficient multitasking. Learn about memory specifications and available memory with our complete guide.
1. Why Knowing Your RAM Matters
Knowing your RAM (Random Access Memory) capacity and usage is essential for several reasons. RAM is your computer’s short-term memory, used for running applications and processes. Understanding how much RAM you have and how it’s being used can help you:
- Identify Performance Bottlenecks: If your computer is running slowly, it could be due to insufficient RAM. Monitoring RAM usage can help you determine if you need more memory.
- Optimize System Performance: By knowing which applications are consuming the most RAM, you can close unnecessary programs and improve overall system speed.
- Determine Upgrade Needs: If you consistently run out of RAM, it might be time to upgrade. Knowing your current RAM capacity helps you choose the right amount for an upgrade.
- Ensure Compatibility: When upgrading, knowing your current RAM type (e.g., DDR4, DDR5) ensures you purchase compatible memory modules.
- Troubleshoot Issues: Memory-related errors or crashes can sometimes be attributed to faulty RAM. Checking your RAM can help diagnose hardware problems.
Understanding your RAM is a fundamental step in maintaining and optimizing your computer’s performance.
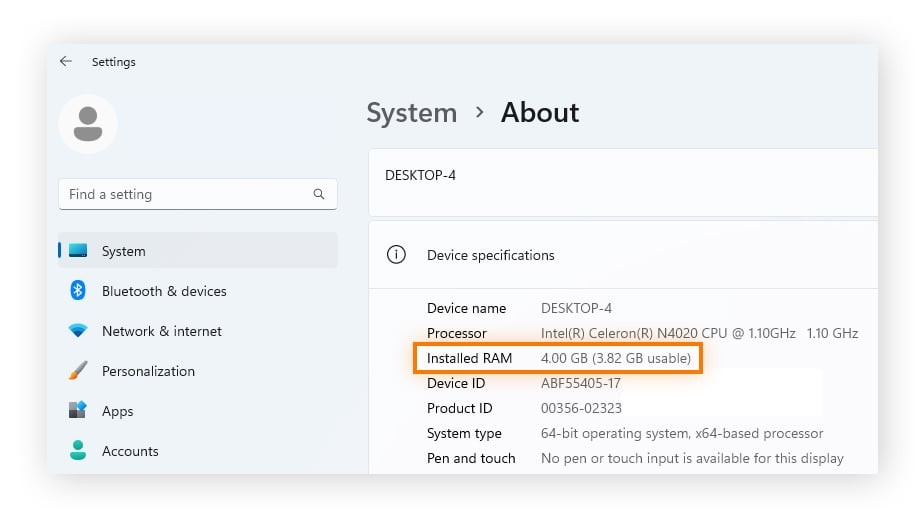
2. How to Check RAM on Windows 11
Checking your RAM on Windows 11 is straightforward. Follow these steps to find out how much RAM your system has:
- Open Settings: Click on the Windows Start button and select the “Settings” icon (gear icon).
- Navigate to System: In the Settings window, click on “System”.
- Go to About: Scroll down in the left sidebar and click on “About”.
- Check Device Specifications: In the “About” section, look for “Installed RAM.” This displays the total amount of RAM installed on your computer.
This method provides a quick and easy way to find out how much RAM your Windows 11 system has, helping you to understand your computer’s capabilities and plan for any necessary upgrades.
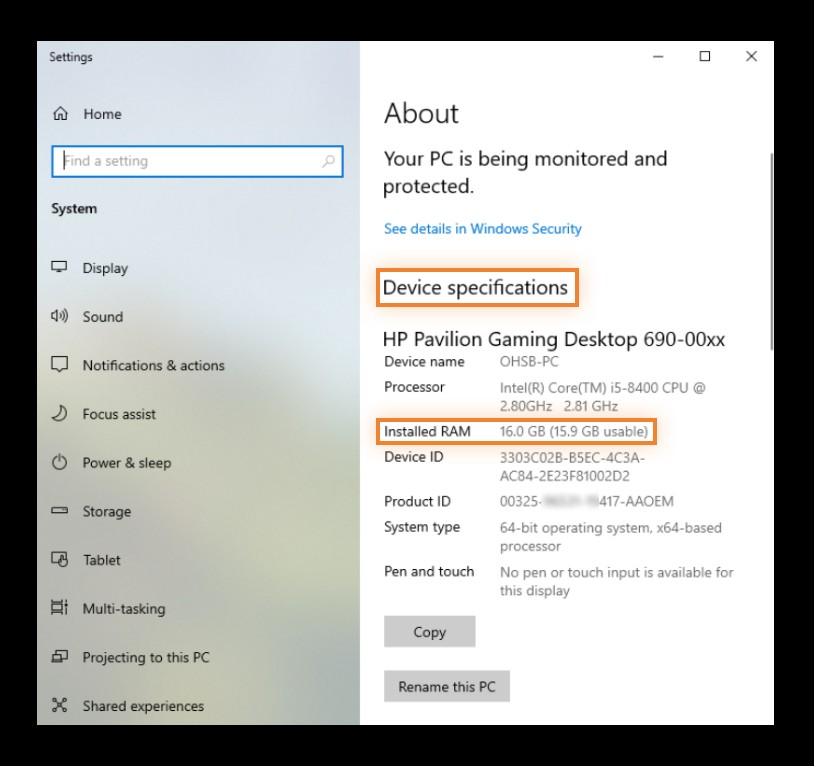
3. How to Check RAM on Windows 10
For users on Windows 10, checking RAM is a simple process. Here’s how you can do it:
- Open Settings: Click on the Windows Start button and select the “Settings” icon.
- Navigate to System: In the Settings window, click on “System”.
- Go to About: In the left sidebar, scroll down and click on “About”.
- Check Device Specifications: Look for the “Installed RAM” entry under the “Device Specifications” section. This tells you the total amount of RAM your computer has.
This method allows Windows 10 users to quickly access information about their RAM, aiding in performance monitoring and upgrade decisions.
4. How to Check RAM on Windows 7
If you’re still using Windows 7, you can use Task Manager to check your RAM. Here’s how:
- Open Task Manager: Press
Ctrl + Shift + Escto launch Task Manager. Alternatively, right-click on the Taskbar and select “Task Manager”. - Select the Performance Tab: In Task Manager, click on the “Performance” tab.
- View Memory Information: Look for the “Memory” section. It displays your total RAM capacity under “Physical Memory”.
Using Task Manager is a reliable method for Windows 7 users to check their RAM, ensuring they know their system’s memory capacity.
5. Understanding RAM Types: DDR3, DDR4, and DDR5
Understanding RAM types like DDR3, DDR4, and DDR5 is crucial because they are not interchangeable and significantly impact performance. Here’s what you need to know:
- DDR3: An older standard, DDR3 is slower and less energy-efficient compared to newer types. It’s typically found in older computers.
- DDR4: The current mainstream standard, DDR4 offers faster speeds and better energy efficiency than DDR3. Most modern computers use DDR4.
- DDR5: The latest standard, DDR5 provides even faster speeds and greater bandwidth than DDR4. It’s gradually becoming more common in newer high-end systems.
Each generation of DDR (Double Data Rate) offers improvements in speed and efficiency. DDR5, for example, can handle much higher bandwidth than DDR4. The higher the DDR, the faster your CPU can access needed data.
Here’s a simple table summarizing the key differences:
| Feature | DDR3 | DDR4 | DDR5 |
|---|---|---|---|
| Release Year | 2007 | 2014 | 2020 |
| Speed | Lower | Higher | Significantly Higher |
| Energy Efficiency | Lower | Higher | Higher |
| Compatibility | Older motherboards | Modern motherboards | Latest motherboards |

Knowing your RAM type is essential when upgrading, as each type requires a compatible motherboard slot.
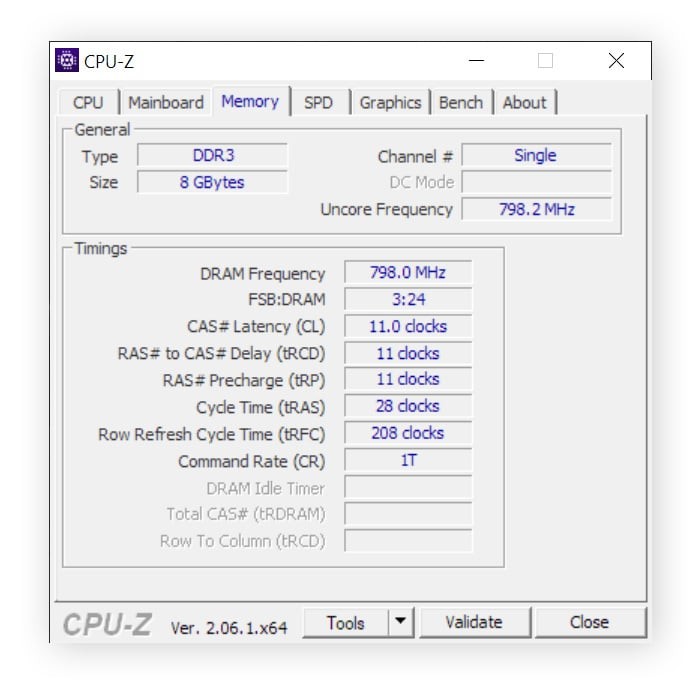
6. How to Check RAM Type on PC
To determine the type of RAM installed on your PC, you can use a third-party tool called CPU-Z. Here’s how:
- Download CPU-Z: Visit the CPU-Z website and download the software.
- Install CPU-Z: Run the downloaded file and follow the installation instructions.
- Launch CPU-Z: Open the CPU-Z application.
- Navigate to the Memory Tab: Click on the “Memory” tab at the top of the CPU-Z window.
- Check Memory Type: Under the “General” section, find the “Type” field. This will display the type of RAM installed on your system (e.g., DDR3, DDR4).
CPU-Z provides a comprehensive overview of your system’s hardware, including the RAM type, making it an invaluable tool for identifying your memory specifications.
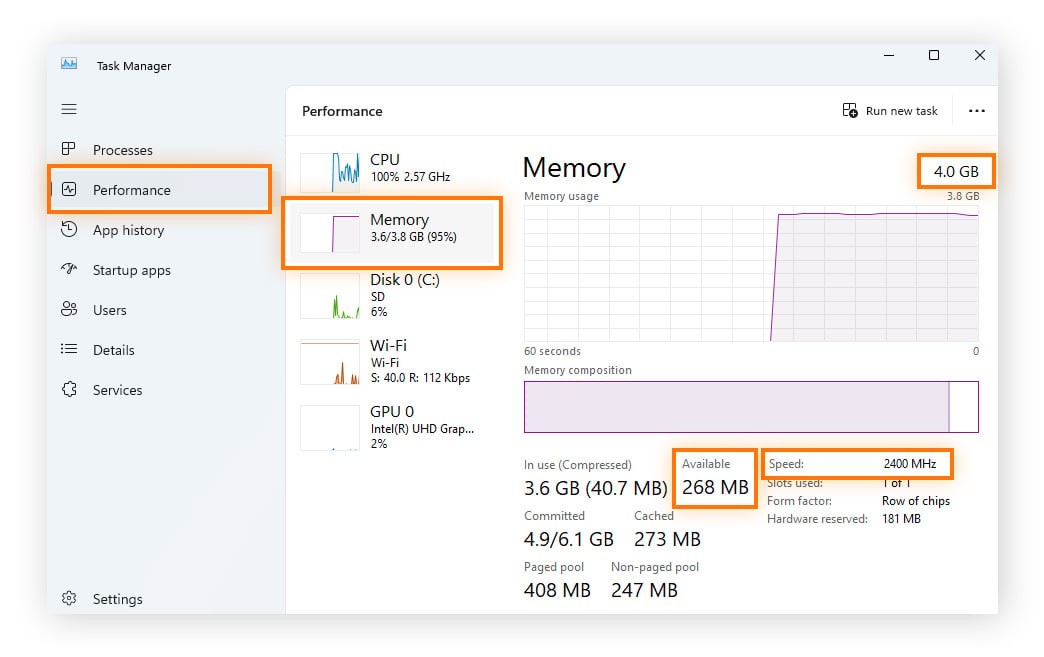
7. Monitoring RAM Usage on Windows
Checking your RAM usage is crucial for identifying performance issues and optimizing your system. Here’s how to monitor RAM usage on Windows 10 and 11:
- Open Task Manager: Right-click on the Taskbar and select “Task Manager”.
- Select Performance Tab: In Task Manager, click on the “Performance” tab.
- Click Memory: In the left sidebar, click on “Memory”.
Here, you can see real-time information about your RAM usage, including:
- Total RAM: The total amount of RAM installed on your system.
- Available RAM: The amount of RAM that is currently free and available for use.
- In Use (Compressed): The amount of RAM currently being used by processes and applications.
- Cache: The amount of RAM being used for cached data.
- Speed: The speed of your RAM.
To see which tasks are using the most RAM:
- Open Processes Tab: Click on the “Processes” tab in Task Manager.
- Sort by Memory: Click on the “Memory” column to sort processes by RAM usage.
You can force any task to quit by right-clicking the process and selecting “End Task” if you need to reduce current RAM usage.
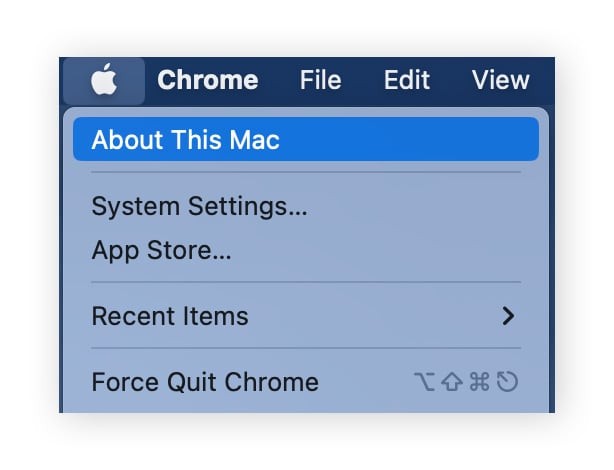
8. How to Check RAM on macOS
Checking RAM on macOS is straightforward. Here’s how to find out how much RAM is installed on your Mac:
- Open Apple Menu: Click on the Apple icon in the top-left corner of your screen.
- Select About This Mac: In the dropdown menu, click on “About This Mac”.
- View Memory Information: In the “Overview” tab, you’ll see the amount of RAM listed next to “Memory”.
This simple method provides you with the essential information about your Mac’s RAM, allowing you to assess its performance and plan for upgrades if necessary.
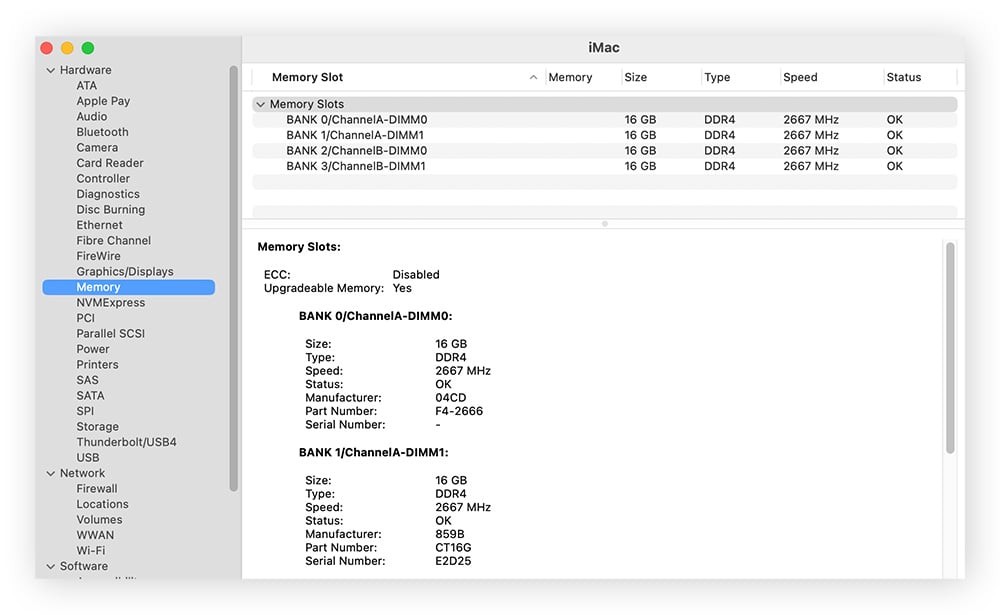
9. Determining RAM Type on macOS
To check the RAM type on your macOS, follow these steps:
- Open Spotlight Search: Click the magnifying glass icon in the menu bar or press
Command + Space. - Type System Information: Type “System Information” and press Enter.
- Navigate to Memory: In the left sidebar, scroll down and click on “Memory”.
- View RAM Details: You’ll see detailed information about your RAM, including the type, speed, and size of each module.
Knowing your RAM type is crucial when considering upgrades, ensuring you purchase compatible memory modules for your Mac.
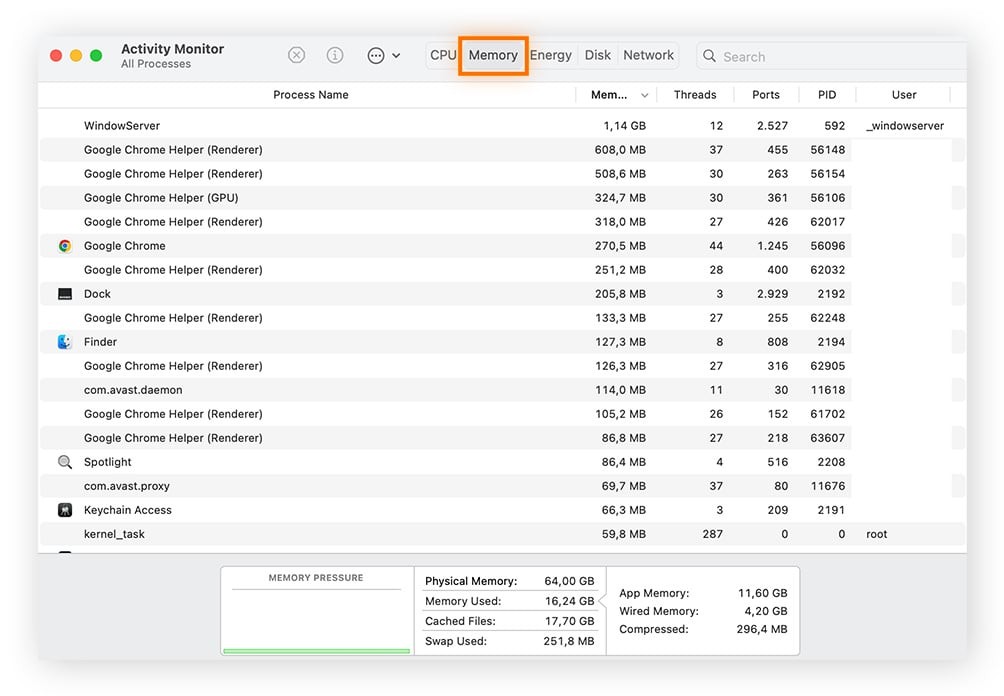
10. Monitoring RAM Usage on macOS
Monitoring RAM usage on macOS helps you understand how your system is utilizing memory and identify potential performance bottlenecks. Here’s how to check RAM usage:
- Open Finder: Click on the Finder icon in the Dock.
- Go to Utilities: In the menu bar, click “Go” and select “Utilities”.
- Open Activity Monitor: In the Utilities folder, double-click on “Activity Monitor”.
- Click Memory Tab: In Activity Monitor, click on the “Memory” tab.
Here, you’ll see real-time information about your RAM usage, including:
- Memory Used: The total amount of RAM currently being used.
- Cached Files: The amount of RAM being used for cached data.
- Swap Used: The amount of disk space being used as virtual memory.
You can also see all running processes and how much memory each is using, helping you identify memory-intensive applications and manage your system resources effectively.
11. Do You Need a RAM Upgrade?
Determining whether you need to upgrade your RAM involves assessing your computer’s performance and usage patterns. Here are some signs that indicate you might need more RAM:
- Slow Performance: Your computer runs slowly, especially when multiple applications are open.
- Frequent Freezing: Applications freeze or become unresponsive frequently.
- Error Messages: You receive error messages related to low memory.
- Slow Application Loading: Applications take a long time to load.
- High Disk Usage: Your hard drive is constantly working hard because the system is using virtual memory (paging).
If you experience these issues despite optimizing your system, it might be time to consider a RAM upgrade.
12. How Much RAM Do You Need?
The amount of RAM you need depends on how you use your computer. Here’s a general guideline:
- 4 GB: Suitable for very basic tasks like web browsing and word processing.
- 8 GB: Good for general use, including web browsing, word processing, and light gaming.
- 16 GB: Recommended for gaming, multitasking, and running more demanding applications like Adobe Photoshop.
- 32 GB or More: Ideal for professional use, such as video editing, 3D modeling, and software development.
Here’s a detailed table to help you decide:
| RAM | Use Type | Activities |
|---|---|---|
| 4 GB | Basic Use | Web browsing, word processing, email |
| 8 – 16 GB | Entertainment / Light Work Apps | Playing games released before 2016, data entry, checking email, standard business software, entertainment (movies, music), Microsoft Office |
| 16 – 32 GB | Gaming / Multitasking / Heavier Apps | Playing/streaming the latest games with high-performance settings, multitasking between many programs, Photoshop, amateur music production |
| 32 – 64 GB | Professional / Intensive Apps | Video editing, 3D modeling, design engineering, software engineering, programming, database development, graphic design, medical imaging |
Remember to check your motherboard’s specifications to ensure it supports the amount and type of RAM you plan to install.
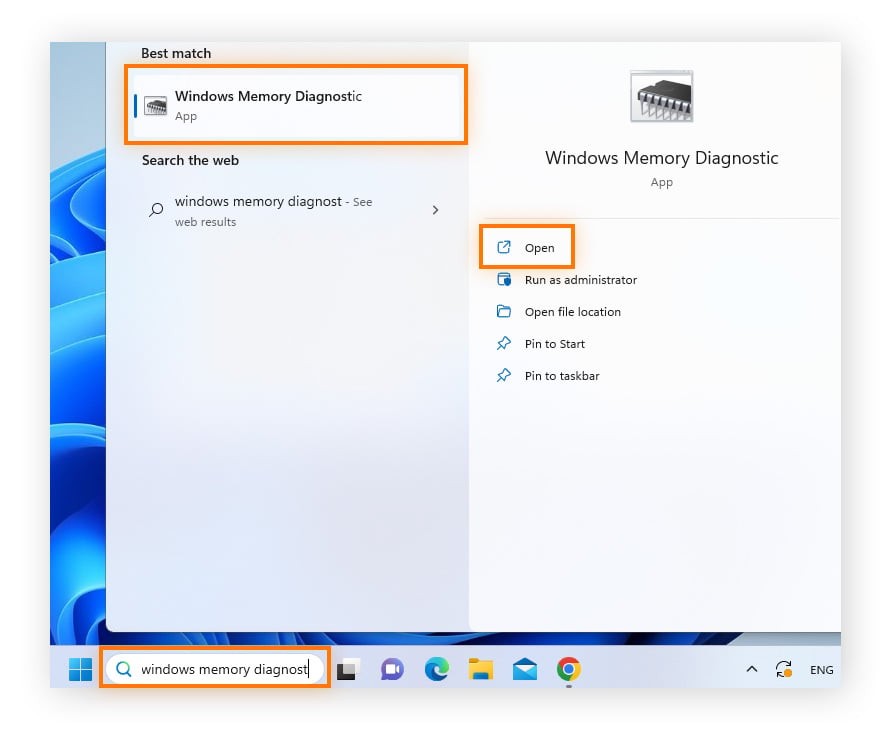
13. Checking for Memory Errors
If your computer is crashing or freezing randomly, it could be due to memory errors. Windows has a built-in memory diagnostic tool to help you check your RAM:
- Open Windows Memory Diagnostic: Type “Windows Memory Diagnostic” into the Windows search box and open it.
- Restart and Check: In the dialog box, click “Restart now and check for problems”.
- Wait for the Test: Your PC will reboot and run a memory test. Wait while Windows checks your RAM for errors.
- View Results: After the test, your PC will reboot back into Windows. The results of the test will be displayed in the notification area.
If the diagnostic tool finds a problem, you should consider replacing your RAM.
14. Freeing Up RAM
Freeing up RAM can improve your computer’s performance. Here are some tips:
- Close Unnecessary Programs: Close any applications you’re not currently using.
- Disable Startup Programs: Disable programs that automatically start when you boot your computer.
- Uninstall Unused Software: Remove any software you no longer need.
- Run Disk Cleanup: Use Disk Cleanup to remove temporary files and other unnecessary data.
- Defragment Your Hard Drive: Defragmenting your hard drive can improve performance by organizing files more efficiently.
By following these steps, you can free up RAM and improve your computer’s overall performance.
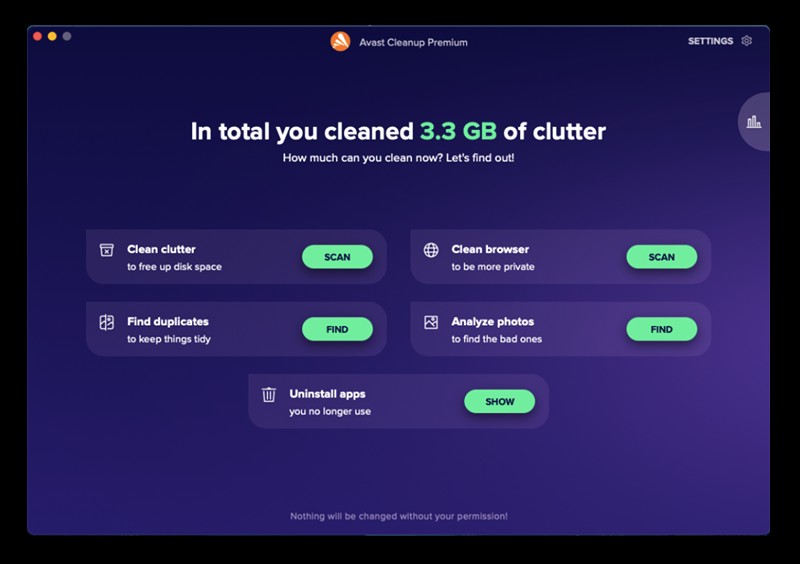
15. Using Avast Cleanup to Optimize RAM Usage
Avast Cleanup is a tool designed to optimize your computer’s performance, including RAM usage. It includes features like Sleep Mode, which hibernates resource-draining processes, and regular automatic cleaning to remove junk files.
By using Avast Cleanup, you can reclaim RAM and improve your computer’s performance.
16. FAQs About RAM
1. Do I need 8 GB or 16 GB RAM?
Whether you need 8 GB or 16 GB of RAM depends on your usage. 8 GB is sufficient for basic tasks like web browsing and word processing, while 16 GB is recommended for gaming and more demanding applications.
2. How much RAM can my PC take?
The maximum amount of RAM your PC can take depends on your motherboard. Check your motherboard’s specifications to find out the maximum supported RAM.
3. Will 32 GB RAM be faster than 16 GB?
In most cases, 32 GB of RAM will not be noticeably faster than 16 GB for general computing tasks. However, you may see a performance improvement when using memory-intensive applications.
4. Can too much RAM slow down your computer?
Too much RAM will not slow down your computer, but it may be a waste of money if you don’t use applications that benefit from it.
5. Will upgrading to 32 GB of RAM make a difference?
Upgrading to 32 GB of RAM can make a difference if you use your computer for memory-intensive tasks like video editing.
Understanding your RAM is crucial for optimizing your computer’s performance. By following the steps outlined in this guide, you can easily check your RAM, monitor its usage, and determine if you need an upgrade. For personalized advice and expert solutions, consult with the experienced professionals at HOW.EDU.VN.
Navigating the complexities of computer hardware can be daunting. At HOW.EDU.VN, we understand the challenges you face and are committed to providing expert guidance tailored to your unique needs. Our team of over 100 PhDs and specialists are ready to assist you with any technical queries you may have.
Are you struggling with slow computer performance or unsure whether to upgrade your RAM? Our experts can offer personalized recommendations and solutions to optimize your system.
Contact us today for expert assistance:
- Address: 456 Expertise Plaza, Consult City, CA 90210, United States
- WhatsApp: +1 (310) 555-1212
- Website: HOW.EDU.VN
Let how.edu.vn be your trusted partner in achieving optimal computer performance and resolving your technical challenges. We’re here to provide the expertise you need.