Uninstalling applications on your Mac is essential for freeing up storage space, resolving software conflicts, and maintaining a clean, efficient system. At HOW.EDU.VN, we provide expert guidance to help you navigate this process seamlessly. This comprehensive guide will walk you through various methods to uninstall applications, ensuring you can keep your Mac running smoothly and efficiently.
1. What Are The Different Ways To Uninstall Applications On Mac?
There are several methods to uninstall applications on a Mac, each suited for different types of apps and user preferences. Understanding these methods will help you choose the most effective approach for your specific situation.
1.1 Using Launchpad
Launchpad is a convenient way to uninstall apps downloaded from the Mac App Store. It provides a visual interface similar to that of an iPhone or iPad, making it easy to find and remove apps.
Steps:
- Ensure the app is not running. Close it if it is open.
- Open Launchpad from the Dock or the Applications folder. Alternatively, pinch closed with your thumb and three fingers on your trackpad.
- Locate the app you want to uninstall. If you have multiple pages, swipe left or right on your trackpad or use the search bar at the top.
- Press and hold the Option key or click and hold any app until the icons start to jiggle.
- Click the “X” (Delete) button that appears on the app icon, then confirm by clicking “Delete.”
Limitations: The Delete button only appears for apps downloaded from the App Store.
1.2 Using Finder
The Finder is the primary file management system on macOS. It can be used to uninstall most applications, especially those not downloaded from the App Store.
Steps:
- Quit the application you wish to uninstall.
- Open Finder by clicking on the desktop or the Finder icon in the Dock.
- Navigate to the “Applications” folder. You can find it in the sidebar or by using the “Go” menu (Go > Applications).
- Locate the app you want to uninstall.
- Drag the app to the Trash icon in the Dock, or right-click the app and select “Move to Trash.” Alternatively, select the app and press Command-Delete.
- If prompted, enter your administrator username and password.
- Empty the Trash by right-clicking the Trash icon in the Dock and selecting “Empty Trash.”
1.3 Using a Dedicated Uninstaller
Some applications, especially larger or more complex software packages, come with their own dedicated uninstallers. These uninstallers are designed to remove all associated files and components, ensuring a clean uninstall.
Steps:
- Locate the application’s folder in the “Applications” folder.
- Look for an “Uninstall” application or a file with a similar name (e.g., “Uninstall [App Name]”).
- Double-click the uninstaller and follow the on-screen instructions.
- Once the uninstaller has completed, empty the Trash to remove any remaining files.
1.4 Using Third-Party Uninstallers
Several third-party uninstaller applications are available for macOS. These tools often offer advanced features, such as the ability to find and remove orphaned files and registry entries left behind by incomplete uninstallations. Popular options include AppCleaner, CleanMyMac X, and iMyMac PowerMyMac.
2. Why Is It Important To Completely Uninstall Applications On Mac?
Completely uninstalling applications on your Mac is crucial for maintaining system performance, security, and overall efficiency. Leaving residual files can lead to various issues that affect your Mac’s operation.
2.1 Freeing Up Storage Space
Applications can consume a significant amount of storage space, not just the main application file but also associated files like caches, logs, and support documents. Completely removing these files frees up valuable storage, allowing you to store more important data and applications.
2.2 Preventing Software Conflicts
When an application is not fully uninstalled, its residual files can sometimes conflict with other applications. These conflicts can lead to unexpected errors, crashes, or performance issues. Ensuring a clean uninstall minimizes the risk of such conflicts.
2.3 Improving System Performance
Leftover files from uninstalled applications can clutter your system and slow down performance. Over time, these files can accumulate and impact your Mac’s speed and responsiveness. Removing them helps keep your system running smoothly.
2.4 Enhancing Security
Some applications may leave behind files that contain sensitive information or vulnerabilities. Completely uninstalling these applications reduces the risk of potential security breaches or unauthorized access to your data.
2.5 Maintaining System Stability
Incomplete uninstallations can sometimes corrupt system files or create instability. This can lead to system crashes, errors, or other unexpected behavior. A thorough uninstall ensures that your system remains stable and reliable.
3. How Do You Prepare To Uninstall Applications On Mac?
Before uninstalling applications on your Mac, there are several steps you can take to ensure a smooth and complete removal process. Proper preparation can prevent data loss, system errors, and other potential issues.
3.1 Back Up Your Data
Before making any significant changes to your system, it is always a good idea to back up your data. This ensures that you can restore your files and settings in case something goes wrong during the uninstallation process. You can use Time Machine, Apple’s built-in backup utility, or a third-party backup solution.
3.2 Close The Application
Make sure the application you want to uninstall is completely closed. If the application is running, even in the background, the uninstallation process may be interrupted or incomplete. Check the Dock and the menu bar to ensure the application is not active. You can also use Activity Monitor to force quit the application if necessary.
3.3 Disable Startup Items
Some applications may launch automatically when you start your Mac. To prevent these applications from interfering with the uninstallation process, disable them in System Preferences.
Steps:
- Go to System Preferences > Users & Groups.
- Select your user account.
- Click on the “Login Items” tab.
- Select the application you want to disable and click the “–” (minus) button.
3.4 Gather Necessary Information
Before uninstalling an application, gather any necessary information, such as license keys or serial numbers. You may need this information if you plan to reinstall the application in the future. Also, take note of any custom settings or preferences you have configured in the application.
3.5 Check For Dependencies
Some applications may rely on other applications or system components to function properly. Before uninstalling an application, check for any dependencies. Removing an application that is required by another application can cause unexpected issues.
4. How To Use Launchpad To Uninstall Applications On Mac?
Launchpad is a convenient tool for uninstalling applications downloaded from the Mac App Store. It provides a simple and intuitive interface for removing apps quickly and easily.
4.1 Accessing Launchpad
There are several ways to access Launchpad on your Mac:
- From the Dock: Click the Launchpad icon in the Dock.
- From the Applications Folder: Open the Applications folder in Finder and double-click the Launchpad icon.
- Using a Trackpad Gesture: Pinch closed with your thumb and three fingers on your trackpad.
4.2 Locating The Application
Once Launchpad is open, locate the application you want to uninstall. If you have many applications installed, you may need to swipe left or right on your trackpad to navigate between pages. You can also use the search bar at the top of Launchpad to find the application by name.
4.3 Initiating The Uninstallation Process
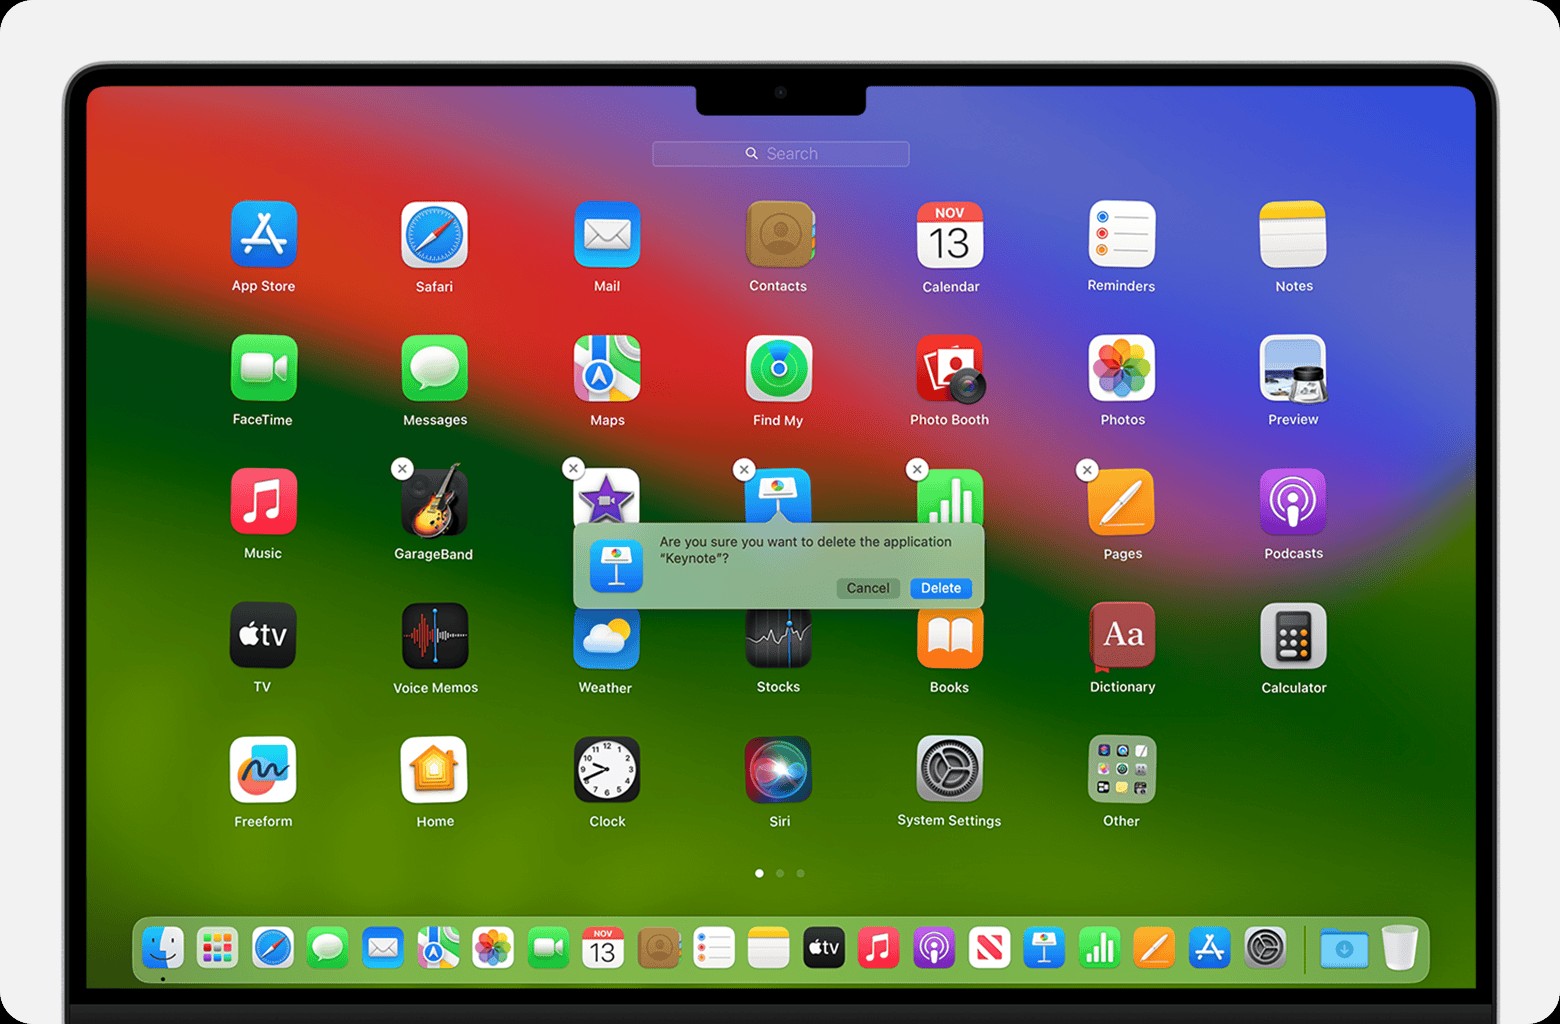
To initiate the uninstallation process, press and hold the Option key or click and hold any app icon until the icons start to jiggle. This indicates that you are in edit mode and can uninstall applications.
4.4 Confirming The Uninstallation
Once the icons are jiggling, a small “X” (Delete) button will appear on the top-left corner of each app icon. Click the “X” button on the app you want to uninstall. A confirmation dialog will appear, asking if you are sure you want to delete the application. Click “Delete” to confirm.
4.5 Completing The Uninstallation
After you click “Delete,” the application will be immediately uninstalled from your Mac. The app icon will disappear from Launchpad, and the application will no longer be available on your system.
4.6 Troubleshooting Issues
If you encounter issues while uninstalling an application using Launchpad, try the following troubleshooting steps:
- Restart Your Mac: Sometimes, a simple restart can resolve issues that prevent applications from being uninstalled.
- Check For Updates: Make sure your macOS is up to date. Outdated software can sometimes cause compatibility issues.
- Use Activity Monitor: Check Activity Monitor to ensure the application is not running in the background. If it is, force quit the application and try again.
5. How To Use Finder To Uninstall Applications On Mac?
The Finder is the primary file management system on macOS, and it can be used to uninstall most applications, especially those not downloaded from the App Store. This method involves locating the application in the Finder and moving it to the Trash.
5.1 Opening Finder
To open Finder, click on the desktop or the Finder icon in the Dock. The Finder icon looks like a blue and white smiling face.
5.2 Navigating To The Applications Folder
Once Finder is open, navigate to the “Applications” folder. You can find it in the sidebar of any Finder window, or by using the “Go” menu (Go > Applications).
5.3 Locating The Application
In the “Applications” folder, locate the application you want to uninstall. You can use the search bar in the top-right corner of the Finder window to find the application by name.
5.4 Moving The Application To The Trash
Once you have located the application, there are several ways to move it to the Trash:
- Drag and Drop: Click and drag the application icon to the Trash icon in the Dock.
- Right-Click: Right-click the application icon and select “Move to Trash” from the context menu.
- Keyboard Shortcut: Select the application icon and press Command-Delete.
5.5 Providing Authentication
If prompted, enter your administrator username and password. This is required to authorize the removal of the application from your system.
5.6 Emptying The Trash
After you have moved the application to the Trash, you need to empty the Trash to permanently uninstall the application. To do this, right-click the Trash icon in the Dock and select “Empty Trash.” A confirmation dialog will appear, asking if you are sure you want to permanently erase the items in the Trash. Click “Empty Trash” to confirm.
5.7 Troubleshooting Issues
If you encounter issues while uninstalling an application using Finder, try the following troubleshooting steps:
- Restart Your Mac: Sometimes, a simple restart can resolve issues that prevent applications from being uninstalled.
- Check For Updates: Make sure your macOS is up to date. Outdated software can sometimes cause compatibility issues.
- Use Activity Monitor: Check Activity Monitor to ensure the application is not running in the background. If it is, force quit the application and try again.
6. How To Use A Dedicated Uninstaller To Uninstall Applications On Mac?
Some applications, especially larger or more complex software packages, come with their own dedicated uninstallers. These uninstallers are designed to remove all associated files and components, ensuring a clean uninstall.
6.1 Locating The Uninstaller
To locate the uninstaller, navigate to the application’s folder in the “Applications” folder. Look for an “Uninstall” application or a file with a similar name (e.g., “Uninstall [App Name]”).
6.2 Running The Uninstaller
Double-click the uninstaller to launch it. The uninstaller will typically guide you through a series of steps to remove the application and its associated files. Follow the on-screen instructions carefully.
6.3 Providing Authentication
If prompted, enter your administrator username and password. This is required to authorize the removal of the application from your system.
6.4 Completing The Uninstallation
Once the uninstaller has completed, it may prompt you to restart your Mac. Follow the instructions provided by the uninstaller.
6.5 Emptying The Trash
After the uninstaller has completed, empty the Trash to remove any remaining files. This ensures that all associated files and components are completely removed from your system.
6.6 Troubleshooting Issues
If you encounter issues while uninstalling an application using a dedicated uninstaller, try the following troubleshooting steps:
- Restart Your Mac: Sometimes, a simple restart can resolve issues that prevent applications from being uninstalled.
- Check For Updates: Make sure your macOS is up to date. Outdated software can sometimes cause compatibility issues.
- Contact The Software Vendor: If you are unable to uninstall the application using the dedicated uninstaller, contact the software vendor for assistance.
7. How To Use Third-Party Uninstallers To Uninstall Applications On Mac?
Third-party uninstaller applications can provide a more thorough and comprehensive uninstallation process compared to the built-in methods. These tools often offer advanced features, such as the ability to find and remove orphaned files and registry entries left behind by incomplete uninstallations.
7.1 Selecting A Third-Party Uninstaller
There are several third-party uninstaller applications available for macOS. Some popular options include:
- AppCleaner: A free and lightweight uninstaller that can find and remove associated files.
- CleanMyMac X: A comprehensive system maintenance tool that includes an uninstaller feature.
- iMyMac PowerMyMac: A powerful system optimizer that includes an uninstaller and other useful tools.
7.2 Installing The Uninstaller
Download the third-party uninstaller of your choice and follow the installation instructions.
7.3 Launching The Uninstaller
Once the uninstaller is installed, launch it from the Applications folder.
7.4 Selecting The Application To Uninstall
The uninstaller will typically display a list of installed applications. Select the application you want to uninstall from the list.
7.5 Initiating The Uninstallation Process
Follow the on-screen instructions to initiate the uninstallation process. The uninstaller will typically scan your system for all associated files and components.
7.6 Reviewing And Removing Associated Files
After the scan is complete, the uninstaller will display a list of associated files and components. Review the list carefully and select the files you want to remove. Be cautious when removing files, as some files may be required by other applications.
7.7 Completing The Uninstallation
Once you have reviewed and selected the files to remove, click the “Uninstall” button to complete the uninstallation process.
7.8 Emptying The Trash
After the uninstaller has completed, empty the Trash to remove any remaining files. This ensures that all associated files and components are completely removed from your system.
7.9 Troubleshooting Issues
If you encounter issues while uninstalling an application using a third-party uninstaller, try the following troubleshooting steps:
- Restart Your Mac: Sometimes, a simple restart can resolve issues that prevent applications from being uninstalled.
- Check For Updates: Make sure the third-party uninstaller is up to date. Outdated software can sometimes cause compatibility issues.
- Contact The Software Vendor: If you are unable to uninstall the application using the third-party uninstaller, contact the software vendor for assistance.
8. What To Do After Uninstalling Applications On Mac?
After uninstalling applications on your Mac, there are several steps you should take to ensure a clean and efficient system. These post-uninstallation tasks help remove any remaining files, optimize system performance, and prevent potential issues.
8.1 Empty The Trash
After moving applications to the Trash, it is essential to empty the Trash to permanently remove the files from your system. Right-click the Trash icon in the Dock and select “Empty Trash.” Confirm the action when prompted.
8.2 Check For Remaining Files
Even after using an uninstaller or moving an application to the Trash, some files may still be left behind. These files can include caches, logs, preferences, and support files. To check for and remove these files:
- Open Finder and select “Go” > “Go to Folder” from the menu bar.
- Enter the following paths, one at a time, and press Enter:
~/Library/Application Support~/Library/Caches~/Library/Preferences/Library/Application Support/Library/Caches/Library/Preferences
- Look for folders or files associated with the uninstalled application and move them to the Trash.
- Empty the Trash to permanently remove the files.
8.3 Restart Your Mac
Restarting your Mac after uninstalling applications can help clear temporary files and refresh the system. This can improve performance and prevent potential issues.
8.4 Repair Disk Permissions
Repairing disk permissions can help resolve issues caused by incorrect file permissions. To repair disk permissions:
- Open Disk Utility (Applications > Utilities).
- Select your startup disk in the sidebar.
- Click “First Aid” and then click “Run” to repair disk permissions.
8.5 Clear Browser Data
If the uninstalled application had browser extensions or plugins, clear your browser data to remove any remaining traces. This includes cookies, cache, and browsing history.
8.6 Rebuild Launch Services Database
Rebuilding the Launch Services database can help resolve issues with application icons and associations. To rebuild the Launch Services database:
- Open Terminal (Applications > Utilities).
- Enter the following command and press Enter:
/System/Library/Frameworks/CoreServices.framework/Frameworks/LaunchServices.framework/Support/lsregister -kill -r -domain local -domain system -domain user - Wait for the command to complete, then restart your Mac.
9. Common Problems When Uninstalling Applications On Mac & How To Solve Them
Uninstalling applications on a Mac is usually a straightforward process, but sometimes you may encounter problems. Understanding these common issues and how to solve them can help you troubleshoot and complete the uninstallation successfully.
9.1 Application Is In Use
Problem: You cannot uninstall an application because your Mac says it is in use.
Solution:
- Quit The Application: Make sure the application is completely closed. Check the Dock and the menu bar to ensure the application is not active.
- Use Activity Monitor: Open Activity Monitor (Applications > Utilities) and look for the application in the list of running processes. If you find it, select it and click the “Quit Process” button.
- Restart Your Mac: If you cannot quit the application, restart your Mac. This will force the application to close and allow you to uninstall it.
- Safe Mode: Start your Mac in Safe Mode. This will prevent third-party applications from running and allow you to uninstall the application.
9.2 Insufficient Permissions
Problem: You do not have sufficient permissions to uninstall the application.
Solution:
- Administrator Account: Make sure you are logged in to an administrator account.
- Provide Authentication: When prompted, enter your administrator username and password to authorize the removal of the application.
- Change Permissions: If you still cannot uninstall the application, you may need to change the permissions on the application folder. Right-click the application folder, select “Get Info,” and change the permissions to allow your user account to read and write.
9.3 Application Cannot Be Found
Problem: You cannot find the application in the Applications folder or Launchpad.
Solution:
- Check The Correct Location: Make sure you are looking in the correct location. The application may be in a different folder or drive.
- Use Spotlight: Use Spotlight to search for the application by name. This will help you locate the application on your system.
- Reinstall The Application: If you cannot find the application, you may need to reinstall it before you can uninstall it.
9.4 Uninstaller Is Not Working
Problem: The dedicated uninstaller is not working or is not uninstalling all associated files.
Solution:
- Restart Your Mac: Sometimes, a simple restart can resolve issues with the uninstaller.
- Check For Updates: Make sure the uninstaller is up to date. Outdated software can sometimes cause compatibility issues.
- Use A Third-Party Uninstaller: If the dedicated uninstaller is not working, try using a third-party uninstaller to remove the application and its associated files.
9.5 Remaining Files After Uninstallation
Problem: There are still files remaining after uninstalling the application.
Solution:
- Check For Remaining Files: Manually check for remaining files in the following locations:
~/Library/Application Support~/Library/Caches~/Library/Preferences/Library/Application Support/Library/Caches/Library/Preferences
- Use A Third-Party Uninstaller: Use a third-party uninstaller to scan your system for remaining files and remove them.
10. How Does Uninstalling Apps On Mac Differ From Windows?
Uninstalling applications on macOS and Windows involves distinct processes and tools, reflecting the different architectures and philosophies of the two operating systems. Understanding these differences can help users transition smoothly between platforms and manage their applications effectively.
10.1 Uninstallation Methods
macOS:
- Launchpad: For apps downloaded from the Mac App Store, Launchpad offers a simple, iOS-like uninstallation method.
- Finder: The primary method for uninstalling most applications involves dragging the app to the Trash.
- Dedicated Uninstallers: Some applications come with their own uninstallers for a more thorough removal.
- Third-Party Uninstallers: Tools like AppCleaner and CleanMyMac X provide advanced uninstallation features.
Windows:
- Control Panel: The traditional method involves using the “Programs and Features” option in the Control Panel.
- Settings App: In newer versions of Windows, applications can be uninstalled through the Settings app (Apps > Apps & features).
- Dedicated Uninstallers: Many Windows applications also come with their own uninstallers.
- Third-Party Uninstallers: Tools like Revo Uninstaller and IObit Uninstaller offer advanced features for removing residual files.
10.2 File Management
macOS:
- macOS uses a hierarchical file system with the Library folder containing application support files, caches, and preferences.
- Residual files are often located in the
~/Libraryand/Librarydirectories.
Windows:
- Windows uses a registry to store system and application settings.
- Residual files are often located in the Program Files, AppData, and registry entries.
10.3 User Interface
macOS:
- macOS provides a more streamlined and intuitive user interface for uninstalling applications.
- Launchpad and Finder offer simple drag-and-drop functionality for removing apps.
Windows:
- Windows offers a more traditional interface for uninstalling applications through the Control Panel or Settings app.
- The process can sometimes be more complex, requiring users to navigate through multiple menus and dialog boxes.
10.4 Registry vs. File System
macOS:
- macOS relies more on the file system for storing application settings and data.
- Uninstalling an application primarily involves removing files and folders from the file system.
Windows:
- Windows relies heavily on the registry for storing application settings and data.
- Uninstalling an application involves removing files from the file system and cleaning up registry entries.
10.5 Third-Party Tools
macOS:
- Third-party uninstallers on macOS focus on removing associated files and caches to ensure a clean uninstall.
Windows:
- Third-party uninstallers on Windows focus on removing registry entries and residual files to ensure a complete uninstall.
11. Can You Reinstall An Application After Uninstalling It On Mac?
Yes, you can typically reinstall an application after uninstalling it on your Mac, but the process depends on how you originally installed the application and whether you have retained the necessary installation files or account information.
11.1 App Store Applications
If you originally downloaded the application from the Mac App Store, reinstalling it is usually straightforward:
- Open The Mac App Store: Click the App Store icon in the Dock or the Applications folder.
- Sign In: Sign in with the Apple ID you used to purchase or download the application.
- Go To Purchased: Click the “Purchased” or “My Apps” tab.
- Find The Application: Locate the application in the list of purchased apps.
- Click Install: Click the “Install” button to download and install the application again.
11.2 Applications Downloaded From The Internet
If you downloaded the application from the internet (e.g., from the developer’s website), you will need to locate the original installation file or download it again:
- Locate The Installation File: Check your Downloads folder or any other location where you may have saved the installation file (e.g., a .dmg or .pkg file).
- Download The Installation File: If you cannot find the original installation file, visit the developer’s website and download the latest version of the application.
- Install The Application: Double-click the installation file and follow the on-screen instructions to install the application again.
11.3 Applications Installed From A Disc
If you installed the application from a CD or DVD, you will need to use the disc to reinstall the application:
- Insert The Disc: Insert the CD or DVD into your Mac’s optical drive.
- Run The Installer: Open the disc and run the installer.
- Follow The On-Screen Instructions: Follow the on-screen instructions to install the application again.
11.4 License Keys And Serial Numbers
When reinstalling an application, you may need to enter a license key or serial number to activate the application. Make sure you have this information available before you begin the reinstallation process.
11.5 Data And Settings
In some cases, reinstalling an application may restore your previous data and settings. However, this depends on whether the application stores its data in a separate location and whether you have backed up your data.
12. How To Keep Your Mac Organized And Free Of Unwanted Applications?
Maintaining an organized Mac and preventing the accumulation of unwanted applications requires a proactive approach. Regular maintenance, smart installation habits, and the use of system management tools can help keep your Mac running smoothly and efficiently.
12.1 Regular Maintenance
1. Uninstall Unused Applications: Regularly review your installed applications and uninstall those you no longer use. This frees up storage space and prevents clutter.
2. Clean Up Downloads: Periodically clean up your Downloads folder by moving files to their appropriate locations or deleting them if they are no longer needed.
3. Empty The Trash: Make it a habit to empty the Trash regularly to permanently remove deleted files and applications.
4. Update Software: Keep your macOS and applications up to date to ensure optimal performance and security.
5. Run Disk Utility: Use Disk Utility to repair disk permissions and verify the integrity of your file system.
12.2 Smart Installation Habits
1. Download From Trusted Sources: Only download applications from trusted sources, such as the Mac App Store or the developer’s website.
2. Read Installation Prompts Carefully: Pay attention to the installation prompts and avoid installing bundled software or unwanted components.
3. Use Custom Installation Options: When available, use custom installation options to choose which components to install and where to install them.
4. Avoid Installing Unnecessary Applications: Only install applications that you actually need and will use.
12.3 Using System Management Tools
1. CleanMyMac X: A comprehensive system maintenance tool that can help you clean up junk files, uninstall applications, and optimize system performance.
2. OnyX: A free and powerful system utility that can help you clean up caches, rebuild databases, and customize system settings.
3. AppCleaner: A free and lightweight uninstaller that can help you remove associated files and components.
12.4 Organizing Files And Folders
1. Create A Logical Folder Structure: Create a logical folder structure to organize your files and folders.
2. Use Descriptive Names: Use descriptive names for your files and folders to make them easy to find.
3. Delete Unnecessary Files: Regularly review your files and folders and delete those that are no longer needed.
12.5 Automating Maintenance Tasks
1. Use Automator: Use Automator to create automated workflows for performing routine maintenance tasks.
2. Schedule Maintenance Tasks: Schedule maintenance tasks to run automatically at regular intervals.
13. FAQ About Uninstalling Applications On Mac
13.1 How do I uninstall an app that doesn’t show up in Launchpad or the Applications folder?
Use Finder to search for the application by name. If found, drag it to the Trash. If not, it might be a system component and cannot be uninstalled.
13.2 Can I uninstall pre-installed apps on my Mac?
Most pre-installed apps cannot be uninstalled, as they are essential for the operation of macOS.
13.3 How do I completely remove all traces of an application?
Use a third-party uninstaller like AppCleaner or CleanMyMac X to remove associated files and caches.
13.4 What should I do if I can’t uninstall an app because it’s “in use”?
Quit the application, use Activity Monitor to force quit it, or restart your Mac.
13.5 Is it safe to use third-party uninstallers?
Yes, but download them from trusted sources and review the files they propose to delete.
13.6 How do I reinstall an app I purchased from the App Store?
Open the App Store, sign in, go to “Purchased,” and click “Install” next to the app.
13.7 What happens to my data when I uninstall an app?
Uninstalling an app typically doesn’t remove your data, but it’s always good to back up important files.
13.8 How do I uninstall a browser extension?
Open your browser’s settings and remove the extension from the extensions or add-ons section.
13.9 How do I free up space on my Mac?
Uninstall unused apps, delete unnecessary files, and use a system cleaning tool to remove junk files.
13.10 What is the best way to keep my Mac running smoothly?
Regularly uninstall unused apps, keep your system updated, and use system management tools to optimize performance.
Uninstalling applications on your Mac is essential for maintaining system performance and efficiency. By following the methods outlined in this comprehensive guide, you can ensure a clean and organized system. If you encounter any challenges or have further questions, don’t hesitate to reach out to our team of experts at HOW.EDU.VN. We are here to provide personalized guidance and support to help you optimize your Mac experience.
At HOW.EDU.VN, our team of over 100 renowned PhDs is dedicated to providing expert advice tailored to your specific needs. Whether you’re facing complex technical issues or seeking strategic guidance, our experts are here to help. Contact us today for personalized solutions and expert insights. Visit us at 456 Expertise Plaza, Consult City, CA 90210, United States, or reach out via WhatsApp at +1 (310) 555-1212. For more information, visit our website at how.edu.vn and experience the difference expert consultation can make.