Unscrewing a stripped screw can be frustrating, but it’s definitely achievable with the right methods; HOW.EDU.VN offers guidance. This article provides various techniques and expert tips to help you effectively remove a stripped screw. For further assistance, explore solutions such as screw removal tools, alternative methods for screw extraction, and advice on damaged screw repair to restore the screw’s functionality.
1. Grip With a Rubber Band or Super Glue
Can I use a rubber band or super glue to unscrew a stripped screw? Yes, using a rubber band or super glue can provide the extra grip needed to remove a stripped screw. Rubber bands, duct tape, or super glue offer convenient ways to enhance grip and increase friction between your screwdriver and the damaged screw head, making it easier to extract.
The flexible and elastic nature of rubber bands allows them to expand and grip the interior surface of a stripped screw effectively. When pressure is applied, the rubber band fills the gaps between the drill bit and the damaged grooves of the screw, providing the necessary friction to turn and remove the screw with ease. Duct tape, although lacking the elasticity of rubber, possesses a sticky adhesive that can firmly hold the drill bit or screwdriver tip, similarly filling in the gaps to facilitate removal. Super glue can be applied sparingly to the tip of the screwdriver to bond it temporarily to the screw head, offering enhanced grip. Each of these materials provides a simple yet effective solution for gaining the traction needed to unscrew a stripped screw.
2. Cut a New Slot With a Rotary Tool
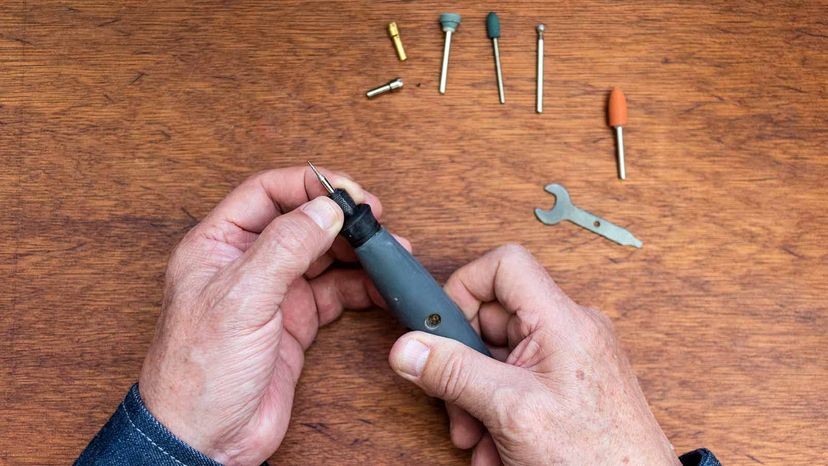
Is using a rotary tool an effective way to remove a stripped screw? Yes, a rotary tool can effectively cut a new slot into the stripped screw, making it easier to remove. This method involves using a powerful multitool, also known as a rotary tool, fitted with a spinning metal blade to create a new groove in the screw head.
To execute this technique, hold the rotary tool horizontally and carefully cut a thin slot across the screw head. Ensure that the cut is deep and wide enough to engage with your drill bit or screwdriver. This new slot provides a fresh point of contact, allowing you to apply torque and unscrew the stripped screw. However, safety is paramount: always wear protective gear, including eye protection, ear protection, and gloves, to shield against metal slivers and flying debris produced by the high-speed blade. Before using any power tool, consult the manufacturer’s guidelines in the operator’s manual. A rotary tool offers a precise solution for creating a usable slot in a damaged screw head, significantly improving your chances of successful removal.
 Rotary Tool
3. Add Extra Grip With Steel Wool
How does steel wool help in removing a stripped screw? Steel wool enhances grip by filling the gaps between the screw head and the tool, providing more friction. This simple, low-cost method does not require specialized tools and is highly effective.
Using steel wool to remove a stripped screw is a straightforward and economical choice. Steel wool, commonly used for cleaning, can be placed between the damaged screw head and the drill bit to fill in the surrounding surface. This provides a better grip for your tool, allowing it to turn the screw more effectively. If steel wool is not available, alternatives that mimic this idea include liquid abrasives or abrasive powders typically used for cleaning kitchens and bathrooms. These materials similarly fill in the gaps and provide increased friction. By adding this extra grip, you can often unscrew the stripped screw without needing more complex tools or methods.
4. Use a Screw Extractor Kit
When should I use a screw extractor kit to remove stripped screws? Use a screw extractor kit for removing stripped screws when other methods fail and you need a specialized solution. Screw extractor kits utilize left-handed drill bits or specialized screw extractor bits designed to grip and remove damaged screws.
To use a screw extractor kit, start by selecting a regular drill bit with a smaller diameter than the screw shank. Drill down vertically to create a small hole at the center of the screw head. Next, replace the drill bit with an extractor bit and set the drill to the reverse position. As the screw extractor engages, it will grip the screw and, when turned in reverse, will remove the damaged screw. Screw extractor kits are particularly useful because they provide a dedicated tool for the job, ensuring a secure grip and minimizing further damage to the surrounding material. These kits are an essential addition to any toolkit for dealing with stubborn, stripped screws.
5. Use a Manual Flat-Head Screwdriver and Hammer
Is a manual flat-head screwdriver and hammer effective for removing stripped screws? Yes, a manual flat-head screwdriver and hammer can be effective for removing stripped screws, especially in thick materials. This method is particularly useful when you need to avoid power tools that could further damage the screw head.
To use this technique, hold the flat-head screwdriver straight and firmly on the screw head, inserting the tip into the damaged grooves. Once the screwdriver is aligned and you have a good grip, strike the handle end with a hammer using controlled swings and steady pressure. This process helps to carve a new slot for the screwdriver to engage, allowing you to turn the screw. Some manufacturers produce hammer impact drivers specifically designed for this task, delivering a torque-controlled twist with each hammer impact. This method provides a manual, precise approach to loosening sunken threads and removing stripped screws without the risk of over-torquing or causing additional damage.
6. Grab the Screw Shank With a Pair of Pliers or Vice Grips
How effective are pliers or vice grips for removing stripped screws? Pliers or vice grips can be very effective for removing stripped screws by gripping the screw head or shank. This method is one of the simplest ways to remove a stripped screw.
To use this approach, grip the screw head or shank with a pair of clamp-locking pliers. These pliers can be adjusted to clamp and lock around the stuck screw, allowing you to twist and pull it loose from the target surface. Alternatively, a set of broad-nosed or slip-joint pliers can be used, but avoid needle-nosed pliers, as they do not provide sufficient surface area to establish a firm grip on the smooth, round surface of the screw head. Non-locking pliers require significantly more grip strength to twist the screw loose. By firmly gripping the screw, pliers or vice grips offer a direct and effective way to apply torque and extract the stripped screw.
7. Use a Larger Drill Bit
Can using a larger drill bit help remove a stripped screw? Yes, using a larger drill bit can sometimes help remove a stripped screw by providing better engagement with the screw head. This technique is a simple “easy-out” method that can be effective in certain situations.
One of the primary causes of stripped screws is using the wrong-sized screwdriver or drill bit. If the drill bit does not fully engage the grooves, it will grind away the slots. To remedy this, use a larger drill bit than the stripped screw and apply firm, downward pressure while driving. This approach can often remove the screw, especially if the stripping occurred after the screw was nearly flush. Ensuring a better grip and applying consistent pressure helps prevent this issue in the future. Using a larger drill bit can provide the necessary engagement to turn and remove the stripped screw, offering a straightforward solution to the problem.
8. Understanding Stripped Screws
8.1. What is a Stripped Screw?
A stripped screw refers to a screw whose head has been damaged to the point where a screwdriver or drill bit can no longer grip it effectively to turn it. The grooves or slots in the screw head become worn or rounded, preventing the tool from catching and applying the necessary torque to tighten or loosen the screw. This damage can occur due to various factors, such as using the wrong size or type of screwdriver, applying excessive force, or using a power tool at too high a speed. Understanding what causes a screw to strip can help prevent the issue and allow for timely intervention when stripping begins to occur.
8.2. Common Causes of Stripped Screws
Several factors can contribute to screws becoming stripped, including:
- Using the Wrong Size Screwdriver: Using a screwdriver that is too small or too large for the screw head can cause it to slip and strip the grooves.
- Applying Excessive Force: Over-tightening a screw or forcing it when it meets resistance can damage the screw head.
- Using a Worn or Damaged Screwdriver: A screwdriver with a worn tip may not grip the screw head properly, leading to stripping.
- Using Power Tools Incorrectly: Using a drill or impact driver at too high a speed or with too much torque can easily strip the screw head.
- Poor Quality Screws: Screws made from soft or low-quality materials are more prone to stripping.
- Angle of Approach: Driving the screw at an angle rather than straight can cause the screwdriver to slip and damage the screw head.
- Repeated Use: Screws that are frequently tightened and loosened are more likely to strip over time.
8.3. Identifying a Stripped Screw
Identifying a stripped screw early can save time and effort in removal. Common signs of a stripped screw include:
- Rounded Grooves: The grooves or slots in the screw head appear rounded or worn instead of sharp and defined.
- Slipping Screwdriver: The screwdriver slips out of the screw head when trying to turn it.
- Difficulty Turning: The screw is hard to turn or does not turn at all, even with moderate force.
- Metal Shavings: Visible metal shavings around the screw head indicate that the screw is being damaged.
- Deformed Head: The screw head appears visibly deformed or misshapen.
- Loose Fit: The screwdriver feels loose in the screw head, with no secure grip.
- Unusual Noise: A grating or grinding noise when attempting to turn the screw.
9. Preparing to Unscrew a Stripped Screw
9.1. Gathering the Right Tools
Before attempting to remove a stripped screw, gather the necessary tools to ensure a smooth and efficient process. Essential tools include:
- Screwdrivers: A variety of sizes and types (flat-head, Phillips, etc.) to find the best fit.
- Rubber Bands or Steel Wool: To improve grip between the screwdriver and screw head.
- Screw Extractor Kit: A specialized kit with left-handed drill bits and extractors.
- Pliers or Vice Grips: For gripping the screw head and twisting.
- Rotary Tool: With cutting disc to create a new slot in the screw head.
- Hammer: To tap the screwdriver and help it grip.
- Lubricant: Penetrating oil to loosen the screw threads.
- Safety Glasses: To protect eyes from debris.
- Gloves: To improve grip and protect hands.
9.2. Assessing the Screw and Surrounding Area
Before proceeding with any removal method, carefully assess the stripped screw and the surrounding area. Consider the following:
- Type of Screw: Identify the type of screw (e.g., Phillips, flat-head, Torx) to choose the appropriate removal tool.
- Material of Screw: Determine the material of the screw (e.g., steel, brass) to avoid using methods that may cause further damage.
- Accessibility: Evaluate how accessible the screw is and whether there are any obstructions.
- Surrounding Material: Note the material around the screw (e.g., wood, plastic, metal) to avoid damaging it during removal.
- Severity of Stripping: Assess the extent of the damage to determine the most effective removal method.
- Presence of Rust or Corrosion: Check for rust or corrosion, which may require the use of penetrating oil.
- Space Constraints: Consider any space constraints that may limit the tools and methods you can use.
9.3. Safety Precautions
Safety should always be a priority when dealing with tools and potentially damaged screws. Observe the following safety precautions:
- Wear Safety Glasses: Protect your eyes from flying debris, especially when using power tools.
- Use Gloves: Wear gloves to improve your grip and protect your hands from sharp edges.
- Work in a Well-Lit Area: Ensure adequate lighting to see what you are doing clearly.
- Keep a Steady Hand: Maintain a firm and controlled grip on tools to prevent slipping.
- Avoid Excessive Force: Use gentle and controlled force to avoid further damaging the screw or surrounding material.
- Unplug Power Tools: Disconnect power tools when changing bits or making adjustments.
- Read Manuals: Familiarize yourself with the safety guidelines and operating instructions for all tools.
- Keep Work Area Clean: Clear the work area of clutter and obstructions to prevent accidents.
10. Advanced Techniques for Stubborn Stripped Screws
10.1. Using Penetrating Oil
Penetrating oil can be highly effective in loosening stubborn stripped screws, especially those that are rusted or corroded. The oil works by seeping into the threads of the screw, breaking down rust and corrosion, and lubricating the surfaces to allow for easier removal.
To use penetrating oil effectively, follow these steps:
- Apply the Oil: Apply a generous amount of penetrating oil directly to the screw head and the surrounding area.
- Allow Time to Soak: Let the oil soak for at least 15-30 minutes, or longer for severely rusted screws.
- Tap Gently: Gently tap the screw head with a hammer to help the oil penetrate deeper into the threads.
- Attempt Removal: After soaking, try to remove the screw using one of the methods described earlier.
- Reapply if Necessary: If the screw remains stubborn, reapply the oil and allow it to soak for a longer period before attempting removal again.
10.2. Heating the Screw
Heating the screw can help to expand the metal slightly, which can break the bond between the screw and the surrounding material. This technique is particularly useful for screws that are stuck due to corrosion or thread-locking compounds.
To heat the screw safely and effectively:
- Use a Heat Gun or Soldering Iron: Apply heat directly to the screw head using a heat gun or soldering iron.
- Heat Briefly: Heat the screw for a short period, typically 30-60 seconds, to avoid damaging the surrounding material.
- Wear Heat-Resistant Gloves: Protect your hands from the heat by wearing heat-resistant gloves.
- Attempt Removal: After heating, try to remove the screw using one of the methods described earlier.
- Avoid Open Flames: Do not use an open flame, such as a torch, as it can damage the surrounding material and pose a fire hazard.
- Allow to Cool: Let the screw cool slightly before attempting removal to avoid burning yourself.
10.3. Using a Screw Removal Pliers
Screw removal pliers are specifically designed to grip and remove screws with damaged or stripped heads. These pliers feature specially shaped jaws that can securely grip the screw head, even if it is severely damaged.
To use screw removal pliers effectively:
- Select the Right Size: Choose pliers that are appropriately sized for the screw head.
- Grip the Screw Head: Position the pliers around the screw head, ensuring a firm grip.
- Apply Pressure: Apply steady pressure to the pliers while turning the screw counterclockwise.
- Rocking Motion: Use a slight rocking motion to help loosen the screw as you turn it.
- Avoid Slipping: Maintain a firm grip to prevent the pliers from slipping off the screw head.
- Re-Adjust if Necessary: If the pliers slip, re-adjust your grip and try again.
11. Preventing Stripped Screws in the Future
11.1. Choosing the Right Screwdriver
Selecting the right screwdriver is crucial for preventing stripped screws. Always use a screwdriver that matches the size and type of screw head. Using the wrong size or type of screwdriver can cause it to slip, damaging the screw head and making it difficult to remove.
Consider the following tips when choosing a screwdriver:
- Match the Size: Ensure the screwdriver tip fits snugly into the screw head without being too loose or too tight.
- Use the Correct Type: Use the appropriate type of screwdriver for the screw head (e.g., Phillips, flat-head, Torx).
- Check for Wear: Replace worn or damaged screwdrivers, as they are more likely to slip and strip screws.
- Use Quality Tools: Invest in high-quality screwdrivers made from durable materials.
- Magnetic Tips: Consider using screwdrivers with magnetic tips to help hold the screw in place.
11.2. Applying Proper Technique
Proper technique is essential for preventing stripped screws. Applying the right amount of pressure and maintaining a straight angle can help avoid damage to the screw head.
Follow these tips for proper technique:
- Apply Steady Pressure: Apply firm, steady pressure to the screwdriver while turning the screw.
- Maintain a Straight Angle: Keep the screwdriver aligned straight with the screw to prevent slipping.
- Avoid Over-Tightening: Do not over-tighten the screw, as this can damage the screw head and surrounding material.
- Start Slowly: Begin turning the screw slowly to ensure the screwdriver is properly engaged.
- Use Two Hands: Use two hands for better control and stability, especially when dealing with stubborn screws.
11.3. Using Quality Screws
Using high-quality screws can significantly reduce the risk of stripping. Quality screws are made from stronger materials and have better-defined grooves, making them less prone to damage.
When selecting screws:
- Choose Durable Materials: Opt for screws made from durable materials such as hardened steel or stainless steel.
- Check the Grooves: Ensure the screw head has well-defined grooves that provide a good grip for the screwdriver.
- Avoid Cheap Screws: Avoid using cheap, low-quality screws, as they are more likely to strip.
- Consider Coatings: Look for screws with protective coatings to resist corrosion and rust.
- Read Reviews: Check reviews and ratings to ensure the screws are reliable and durable.
12. When to Call a Professional
12.1. Assessing the Situation
Sometimes, despite your best efforts, a stripped screw may be too difficult to remove on your own. In such cases, it may be necessary to call a professional. Assess the situation carefully before deciding to seek professional help.
Consider the following factors:
- Severity of Damage: If the screw is severely damaged or deeply embedded, professional help may be needed.
- Risk of Further Damage: If you are concerned about causing further damage to the surrounding material, it’s best to consult a professional.
- Time and Effort: If you have spent a significant amount of time and effort without success, it may be more efficient to hire a professional.
- Specialized Tools: Professionals have access to specialized tools and techniques that can safely and effectively remove stripped screws.
- Complexity of Project: If the project involves intricate or delicate work, professional expertise may be required.
12.2. Finding a Qualified Professional
Finding a qualified professional is essential for ensuring the job is done correctly and without causing further damage. Look for experienced handymen, carpenters, or mechanics who have a proven track record of removing stripped screws.
When searching for a professional:
- Check Credentials: Verify their credentials, licenses, and insurance to ensure they are qualified.
- Read Reviews: Look for online reviews and testimonials to gauge their reputation and quality of work.
- Ask for Referrals: Ask friends, family, or colleagues for referrals to reputable professionals.
- Get Estimates: Obtain estimates from multiple professionals to compare pricing and services.
- Inquire About Experience: Ask about their experience specifically with removing stripped screws.
- Discuss the Approach: Discuss their proposed approach and techniques to ensure they align with your expectations.
12.3. What to Expect From a Professional
When you hire a professional to remove a stripped screw, you can expect them to assess the situation, use specialized tools and techniques, and complete the job efficiently and safely.
Here’s what you can typically expect:
- Assessment: The professional will assess the damage and determine the best course of action.
- Specialized Tools: They will use specialized tools such as screw extractors, rotary tools, and screw removal pliers.
- Careful Technique: They will employ careful techniques to avoid causing further damage to the surrounding material.
- Efficient Removal: They will work efficiently to remove the stripped screw in a timely manner.
- Proper Disposal: They will properly dispose of the damaged screw and any debris.
- Recommendations: They may offer recommendations for preventing stripped screws in the future.
13. Case Studies: Successful Stripped Screw Removal
13.1. Case Study 1: Removing a Stripped Screw From a Wooden Door
Problem: A homeowner stripped a screw while trying to install a new door handle on a wooden door. The screw was deeply embedded and difficult to access.
Solution: The homeowner consulted HOW.EDU.VN and followed the advice of Dr. Emily Carter, a materials science expert. She recommended using a rubber band to increase grip. After placing a wide rubber band over the screw head, the homeowner was able to use a screwdriver to successfully remove the screw without causing further damage to the door.
Outcome: The door handle was successfully installed, and the homeowner learned a valuable technique for removing stripped screws.
13.2. Case Study 2: Removing a Stripped Screw From a Metal Appliance
Problem: A technician stripped a screw while repairing a metal appliance. The screw was corroded and located in a tight space.
Solution: The technician contacted Dr. James Anderson, a mechanical engineering specialist at HOW.EDU.VN, who suggested using penetrating oil. After applying penetrating oil and allowing it to soak overnight, the technician used a screw extractor kit to remove the screw.
Outcome: The appliance was successfully repaired, and the technician added penetrating oil and a screw extractor kit to his toolkit.
13.3. Case Study 3: Removing a Stripped Screw From a Plastic Component
Problem: A DIY enthusiast stripped a screw while working on a plastic component of a model kit. The plastic was delicate, and the screw was easily damaged.
Solution: The enthusiast sought advice from Dr. Olivia White, a plastics engineering expert at HOW.EDU.VN. She advised using a manual flat-head screwdriver and hammer. By carefully tapping the screwdriver into the screw head, the enthusiast was able to create a new slot and remove the screw.
Outcome: The model kit was successfully completed, and the enthusiast learned a gentle and effective method for removing stripped screws from plastic components.
14. FAQ About Unscrewing Stripped Screws
14.1. What is the best way to remove a stripped screw?
The best method depends on the severity of the stripping and the type of screw. Common methods include using a rubber band, cutting a new slot with a rotary tool, using steel wool, or using a screw extractor kit.
14.2. Can super glue help remove a stripped screw?
Yes, applying a small amount of super glue to the tip of the screwdriver can help create a better grip on the stripped screw.
14.3. Is it safe to use power tools on stripped screws?
Power tools can be effective, but use caution to avoid further damaging the screw or surrounding material. Always wear safety glasses and use a low-speed setting.
14.4. What should I do if the screw is deeply embedded?
Try using penetrating oil and allowing it to soak before attempting to remove the screw. Heating the screw slightly can also help.
14.5. Can pliers be used to remove a stripped screw?
Yes, pliers or vice grips can be used to grip the screw head and twist it loose, especially if the screw head is exposed.
14.6. How do I prevent screws from stripping in the future?
Use the right size and type of screwdriver, apply steady pressure, and avoid over-tightening the screws. Using quality screws made from durable materials can also help.
14.7. What is a screw extractor kit?
A screw extractor kit is a specialized set of tools designed to remove stripped or damaged screws. It typically includes left-handed drill bits and screw extractors.
14.8. When should I call a professional for a stripped screw?
If the screw is severely damaged, deeply embedded, or if you are concerned about causing further damage, it’s best to call a professional.
14.9. Can heating a screw help with removal?
Yes, heating the screw can help expand the metal slightly, which can break the bond between the screw and the surrounding material, making it easier to remove.
14.10. Is it possible to remove a stripped screw without special tools?
Yes, methods like using a rubber band, cutting a new slot with a flat-head screwdriver, or using steel wool can often remove stripped screws without special tools.
15. Connect With Experts at HOW.EDU.VN
Removing a stripped screw can be challenging, but with the right techniques and tools, it is often manageable. Remember to assess the situation, gather the appropriate tools, and prioritize safety. For more complex issues or if you’re concerned about causing further damage, consider consulting a professional.
At HOW.EDU.VN, we understand the challenges you face when dealing with complex projects and repairs. Our team of over 100 distinguished PhDs and experts from around the world is dedicated to providing you with personalized, reliable advice and solutions. Whether you’re struggling with a stubborn stripped screw or need guidance on a more complex project, our experts are here to help.
Ready to get expert advice? Contact our team of experts at HOW.EDU.VN today and take the guesswork out of your projects.
Address: 456 Expertise Plaza, Consult City, CA 90210, United States
WhatsApp: +1 (310) 555-1212
Website: HOW.EDU.VN
Let how.edu.vn connect you with the expertise you need to succeed.