Beats headphones are renowned for their powerful sound and stylish design, making them a popular choice for music lovers worldwide. Whether you’re new to the Beats family or upgrading your audio experience, knowing how to connect your Beats headphones to your devices is essential. This guide provides a detailed walkthrough on how to connect your Beats headphones, ensuring a seamless listening experience every time.
Getting Started: Powering On and Charging Your Beats Studio3 Wireless
Before diving into connections, let’s ensure your Beats Studio3 Wireless headphones are ready to pair.
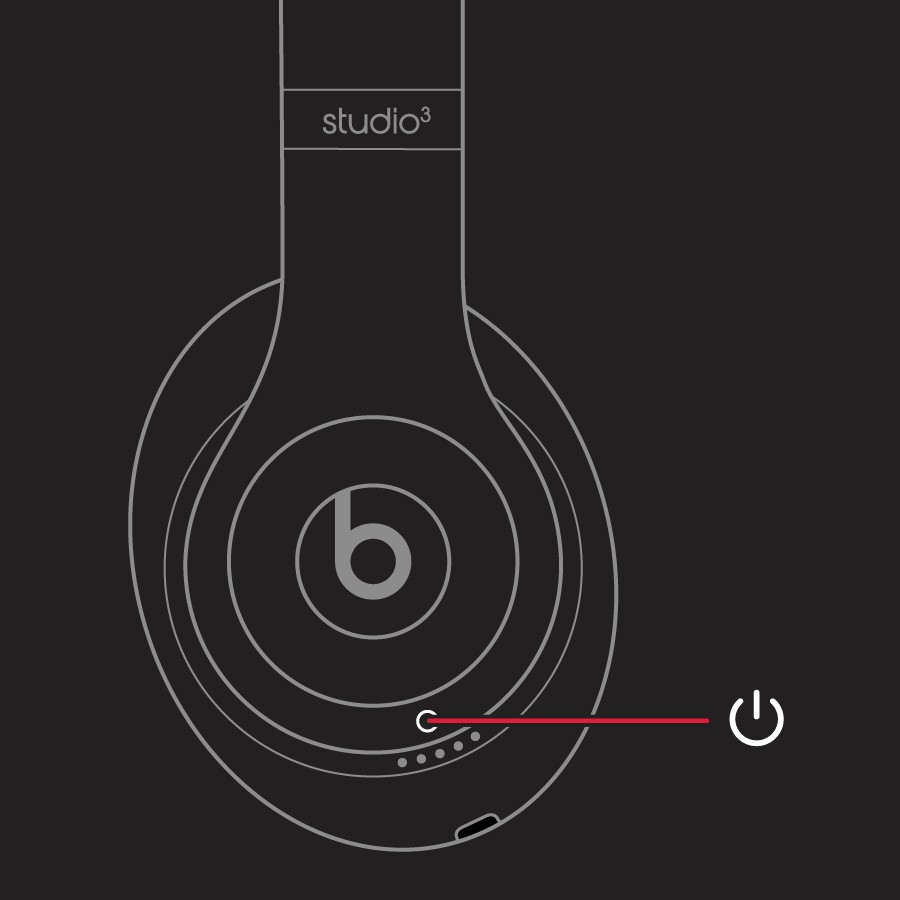
To power on your headphones, simply press and hold the power button for 1 second. You’ll find this button conveniently located on the right earcup.
To keep the music playing, regular charging is necessary. Use the included micro USB cable to connect your headphones to a power source. While charging, the five Fuel Gauge lights on the earcup will blink, indicating the charging progress. Once fully charged, all five lights will remain steadily lit, signaling that you’re ready for hours of audio enjoyment.
Beats Studio3 Wireless boasts impressive battery life. A quick 90-minute charge provides up to 22 hours of playback, perfect for long commutes or travel. If you disable Pure ANC (Adaptive Noise Cancellation), you can extend this to up to 40 hours. Need a quick boost? Fast Fuel technology gives you up to 3 hours of playback with just a 10-minute charge, ensuring your music never stops for long.
Checking Battery Status
Want to know how much power you have left? It’s simple. Make sure your headphones are powered on, then tap the power button once. Observe the five Fuel Gauge lights on the right earcup. These lights provide a visual representation of your battery level, so you’ll always know when it’s time to recharge.
Pairing Your Beats Studio3 Wireless Headphones
Now that your headphones are charged and ready, let’s explore how to connect them to your devices. If you’ve already paired your headphones previously, the indicator light will be solid when you turn them on. If you need to connect to a new device, follow these steps:
Connecting to an iPhone (iOS 11 or Later)
For iPhone users with iOS 11 or later, the pairing process is incredibly streamlined thanks to Apple’s ecosystem integration:
- Enable Bluetooth on your iPhone: Navigate to Settings > Bluetooth and ensure the toggle is switched to the “on” position.
- Power on your Beats Studio3 Wireless: Press the power button for 1 second.
- Bring Headphones Close to your iPhone: Hold your Beats Studio3 Wireless within 2 inches of your unlocked iPhone.
- Follow the On-Screen Prompt: After a few moments, a “Connect” prompt will appear on your iPhone screen. Tap “Connect” to initiate pairing.
- Complete Pairing: Follow any additional on-screen instructions to finalize the connection.
Pairing with a Mac or Other Bluetooth Devices
Connecting to a Mac, Android device, or other Bluetooth-enabled devices is also straightforward:
- Activate Discoverable Mode on Headphones: Press and hold the power button on your Beats Studio3 Wireless for 5 seconds. The five Fuel Gauge lights will begin to flash, indicating that your headphones are in discoverable mode and ready to pair.
- Access Bluetooth Settings on Your Device:
- Mac: Click the Apple menu () > System Preferences, then select Bluetooth. Ensure Bluetooth is turned on.
- Windows: Go to Settings > Devices > Bluetooth & other devices and make sure Bluetooth is enabled.
- Android: Go to Settings > Connections > Bluetooth or similar, depending on your device. Ensure Bluetooth is turned on.
- Select Your Headphones from Discovered Devices: Your device will scan for nearby Bluetooth devices. Look for “Beats Studio3 Wireless” in the list of available devices and select it to pair.
- Confirm Pairing (if prompted): You may be asked to confirm pairing with a passcode. If prompted, enter “0000” or “1234” (common Bluetooth passcodes) or simply confirm the connection.
Once paired, your Beats Studio3 Wireless headphones will automatically connect to your other devices signed in to iCloud and using iOS 11 or later, macOS Sierra or later, or watchOS 3 or later. This seamless integration makes switching between Apple devices effortless.
Using Your Beats Studio3 Wireless Headphones: Controls and Features
Now that you’re connected, let’s explore the various controls and features of your Beats Studio3 Wireless headphones.
Music Playback Controls
The “b” button located on the left earcup serves as your central control for music playback. If you are using the optional RemoteTalk cable in wired mode, you can also use the center button for these functions.
- Play/Pause: Press the “b” button once to start or pause your music.
- Skip to Next Track: Press the “b” button twice to advance to the next song.
- Skip to Previous Track: Press the “b” button three times to go back to the previous track.
- Fast Forward: Press the “b” button twice and hold on the second press to scan forward through a track.
- Rewind: Press the “b” button three times and hold on the third press to scan backward through a track.
Volume Control
Adjusting the volume is intuitive with dedicated buttons located above and below the “b” button on the left earcup. Alternatively, you can use the volume buttons on the RemoteTalk cable in wired mode.
Answering Calls
The “b” button also manages your phone calls. Again, the center button on the RemoteTalk cable provides the same functionality in wired mode.
- Answer/End Call: Press the “b” button once to answer an incoming call or end a current call.
- Answer Second Call / Switch Calls: If you receive a second call while already on a call, press the “b” button once to answer the new call and place the first call on hold. Pressing again will switch between the active calls.
- Reject Call: To decline an incoming call, press and hold the “b” button for approximately 1 second.
- Transfer Call to Phone: If you wish to switch from listening through your headphones to your phone’s speaker during a call, press the “b” button twice.
Hands-Free Voice Control (Siri and Voice Command)
Activate voice assistants like Siri on iOS devices or voice command features on other devices effortlessly using your Beats Studio3 Wireless.
- Activate Voice Assistant: Press and hold the “b” button until you hear a chime. Then, speak your command or question.
Pure ANC (Adaptive Noise Cancellation)
Beats Studio3 Wireless features Pure ANC, which actively blocks external noise for immersive listening. Pure ANC is enabled automatically every time you power on your headphones.
- Toggle Pure ANC On/Off: To manually turn Pure ANC on or off, double-press the power button while your headphones are connected to a device. Turning off Pure ANC can extend battery life for longer listening sessions when noise cancellation is not essential.
Keeping Your Beats Studio3 Wireless Updated
Ensuring your Beats Studio3 Wireless headphones are running the latest firmware is crucial for optimal performance and access to the newest features.
- Automatic Updates with iPhone (iOS 11 or Later): If you regularly pair your headphones with an iPhone running iOS 11 or later, your Beats Studio3 Wireless will automatically update to the latest firmware version in the background.
- Manual Updates via Beats Firmware Updater: If you primarily use your headphones with devices other than iPhones with iOS 11 or later, you can use the Beats firmware updater tool, available on the Apple support website, to manually update your headphones.
By following these instructions, you’ll be able to seamlessly connect and enjoy your Beats Studio3 Wireless headphones with all your devices. Explore the rich sound and convenient features for an unparalleled audio experience.